I hate humidity. I hate it more than slow walkers, asking people for favors, and not being able to eat Blue Bell ice cream with the cobbler I made a few days ago. I talk my fair share of trash about Clovis, but usually our humidity levels are so low we all shed our skin like snakes every season to deal. Lately, however, we have gotten more rain than this city has seen in years. Almost 8 inches since the beginning of May! I mean, things are green,
my predator pond is back in full swing and has triple the water of last year, but the mosquitoes and humidity are now rampant. I don't like stepping out of a shower only to sweat through my towel and need another one before I even finish drying my hair. Granted, I probably have some sort of sweat gland cancer considering I sweat like a football team in sauna, but somehow it doesn't bother me so much when summertime isn't humid. Aside from my hair looking like a wilted dandelion and my excessive sweating issues, humidity is hard on way more than my petty vanity and other people's sense of smell--humidity is hard on baking. I was commissioned to make an ace of spades birthday cake for a friend's party last weekend, and the 95 percent humidity nearly killed my frosting dreams. I realize if we ever move somewhere with regularly high humidity that I may not be able to frost without the use of fondant, and that makes me incredibly sad. I mean, I'm not so good with the emotions, but that realization definitely didn't give me the warm fuzzies inside.
 |
| But this cake certainly did. |
I used a few new techniques in creating this cake: buttercream transfer and stenciling, but I used the
Guinness chocolate cake with Baileys frosting recipe just doubled to make a 9x13 cake. I wanted to make the whole thing look like an actual (albeit edible) playing card, complete with that Bicycle Playing Card back look on the sides. The humidity almost beat my dreams, but after a few meltdowns and tantrums and threats of never making another cake, I managed to pull myself together and soldier on. And it only took one glass of wine! I mean, really, like I'd never make another cake...if I had a piece of actual cake for every time I've said that I'd have like five cakes all made by me anyway. So let's talk about this buttercream transfer business because it will totally change the cake game for you, especially if you feel like fondant is the only way you can do cool cake toppers. Be prepared, as I am about to take you through a crappy photo montage to the max.
 |
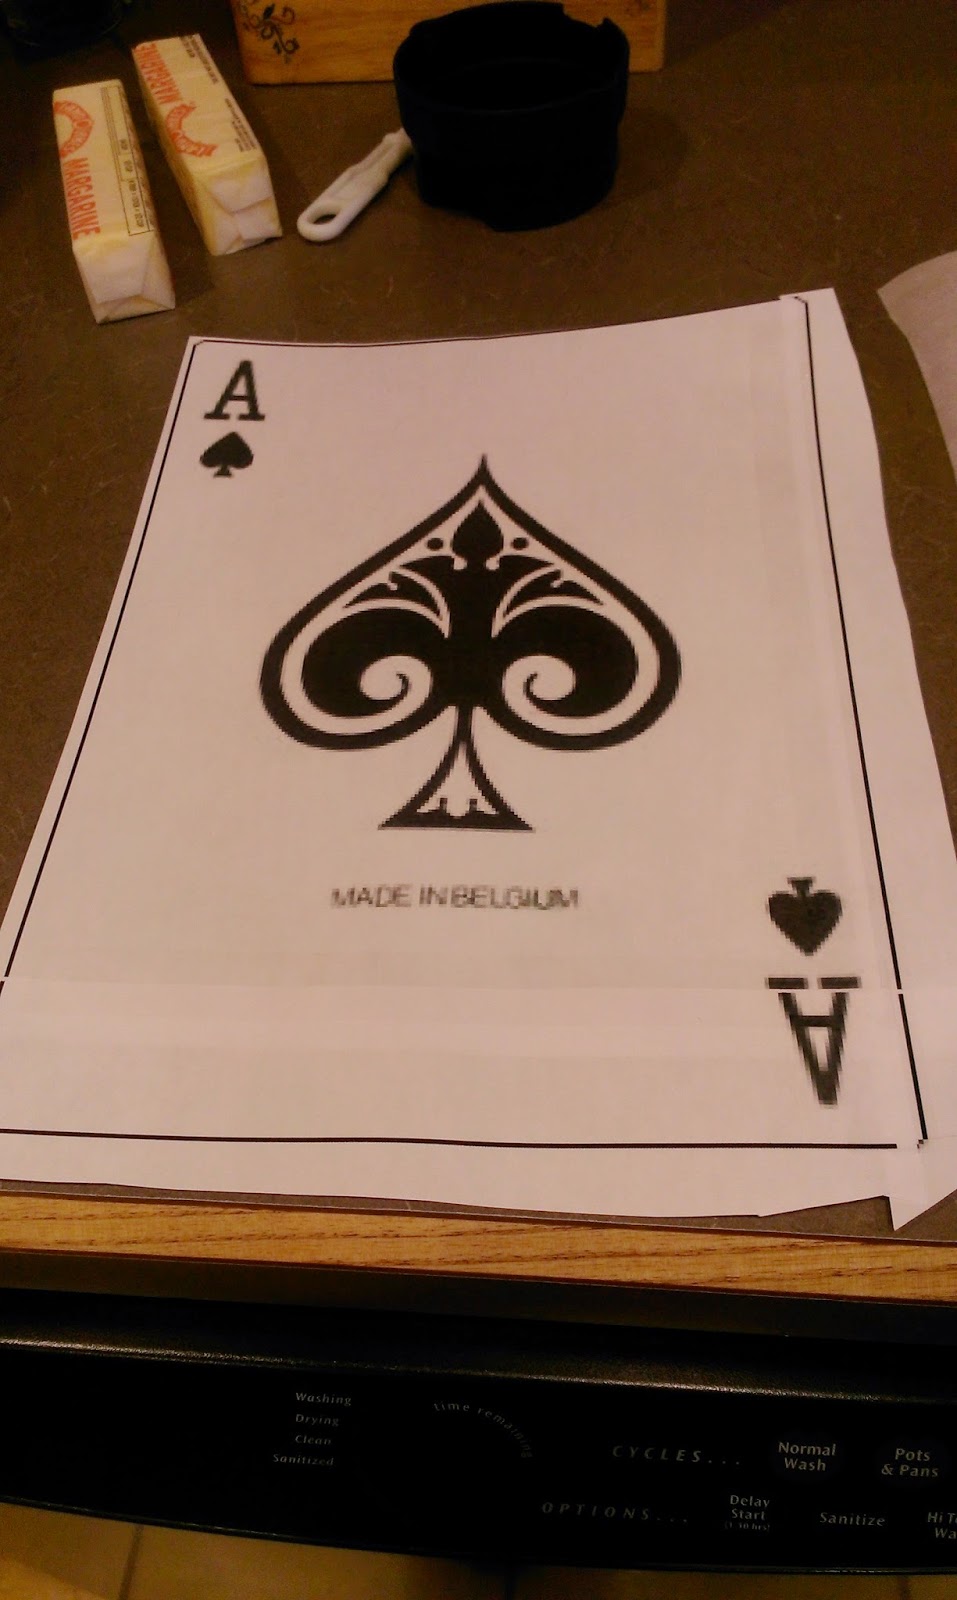
| Start by printing out whatever image you want to appear on the top of your cake. I adjusted the printing size to 8 1/2 by 12 1/2 inches because I initially planned on having a small border around the cake top. But apparently my 9x13 pan is actually only an 8x12, so I had to scrap that idea entirely. No idea how the hell that happened since the pan itself really does measure 9x13. |
 |
| Then take some Parchment paper and place it on top of your printed image Trace the image with a Sharpie. |
 |
| So much Sharpie on my left hand after this. |
 |
| Take your tracing and place it face down on a clear cutting board or plexiglass. Be sure to tape all the edges down. |
 |
| Drink Baileys as needed. |
I made some alterations to my Baileys buttercream so that I could make it as white as possible for the playing card top. It was still deeeelissshhh:
- 1 stick of room temp butter
- 1 1/2 cups of Crisco
- 6 cups of powdered sugar
- 1 tablespoon of CLEAR vanilla extract
- 3-4 tablespoons of Baileys
This does make quite a bit of frosting, but I used it all to make my buttercream transfer PLUS another batch to crumb coat and frost the sides of my cake. Combine the Crisco and butter for 3 minutes in a stand mixer, then add in the extract and 1 tbs of Bailey's. Add in three cups of powdered sugar and mix on low, scraping the bowl as needed. Add in 2-3 more tbs of Baileys depending on consistency preference and three more cups of sugar. It is easier (and boozier!) to add in 3 tbs at this point to make piping with the buttercream turn out better for your transfer.
 |
| You will need varying sizes of round tips depending on what kind of image you are piping. I used a 3, 5, and 12 Wilton tip. If you need to dye your frosting different colors, simply take a few small bowls and dye away. I like using Wilton's gel dye, as it really gives a rich color without a weird taste like Americolor dye can. Fit your tips to piping bags and load up with whatever color you plan on outlining your image with. |
 |
| I needed to outline the spade and smaller details in black, so I loaded a piping bag fitted with a 5 tip and outlined the A, small spade, and large spade. |
 |
| Buttercream is quite malleable, so if you look under your glass cutting board and see spaces or small holes in your outlines, take a paintbrush and lightly push your frosting in and down until the light or holes aren't noticeable when you check from the underside of the cutting board. |
 |
| Once you've got all your outlining done, place the cutting board into the freezer for at least a half an hour to set. I waited a FULL hour because I did not want there to be a remote chance that my black frosting would melt down and stain the white frosting later. |
 |
| After my first deep freeze, I went back in and filled in the A, little spade, and larger spade. If you have multiple colors in your image, fill them in one at a time with a freeze between each color so nothing runs. Again, CHECK your work frequently from the other side of the cutting board. If you see light poking through, uneven lines, etc. fix it with a little paintbrush. I'm not going to lie to you, this is insanely time consuming, but I accept nothing less than perfection. If I had a ruler, I'd snap you on the wrist with it right now. Ice your wrist while your transfer is back in the freezer for another 30 minutes to an hour to let things set. |
 |
| I fitted a 3 tip with plain white Baileys frosting and came back in and filled in the large spade, and with a 12 tip I outlined around the edge of the card before switching back to the 3 tip to fill in the A and little spade. Of course, things went back into the freezer after a quick quality check from underneath the cutting board and necessary adjustments with my paintbrush. |
 |
| Now, once you've filled in all your colors, you want to give your transfer a background. Fill it in with whatever color you want to match the rest of your frosted cake. Clearly I needed to use white to give my playing card a white background. I piped back and forth across the card and OVER the top of all my previous work using a 12 tip. I came back in with a larger paintbrush and pressed things flat. |
 |
| To finish up, smooth out your background with a small angled spatula. You want an even, flat back so it fits smoothly on top of your cake. Place in the freezer for AT LEAST two hours before transferring to your cake. I did my transfer a full day before I made my cake so that it could sit in the freezer overnight. |
I told you it wasn't easy, but it is possible. Anything worth doing is worth doing well, or as I call it, whole-assed. Half-assing your transfer is going to make for one sad cake. Sad cake can still be eaten, but you will taste it's tears and heartbreak which taints the experience. Or something. Definitely give yourself a day or two ahead of time to make your transfer. Now, on to the much simpler stenciling--especially if you live somewhere without soul crushing humidity!
 |
| Before you stencil, make sure you've crumb coated your entire cake. Freeze the cake for 30 minutes, and then frost your top layer of frosting. The top of the cake doesn't need a final layer of frosting because it is getting the transfer. Not pictured because I was hungry for lunch: Place back in the freezer to set for 30 minutes and smooth out the sides with the Viva paper towel technique. |
 |
| You can find a stencil for just about anything on Amazon, just search for "cake stencils." Yes, supremely easy compared to what we just went through with the transfer, thank the cake gods. Whatever color you want your stenciling to turn out, head to Walmart, Michael's (hate you if you have one!), HobLob, etc. and get a can of Wilton color mist. My husband picked up two for me just in case (but mostly to prevent another meltdown if I ran out. Thanks, hun.). |
 |
| Your buttercream should be very cold for this so the stencil doesn't peel your frosting away. Simply place up against the side of your cake and press in gently so all the little nooks and crannies are sprayed evenly. |
 |
| Then spray! I covered myself and most of my kitchen in blue, but most importantly, I covered the sides of the cake! Hooray! Once done spraying, gently pull away the stencil and rinse it off with water. Color mist's mortal enemy is water (and subsequently humidity), so it will come off of you, your kitchen, and your stencil quite easily. Be sure to thoroughly dry the stencil before repeating on all sides of your cake. |
Place your stenciled cake back in the freezer for an hour or two to firm up the color mist. This is where I lost my mind. It was so humid my cake started sweating if it was left out for more than five minutes and ended up looking like a crying teenage girl wearing blue eyeliner (unclear if she's crying because she couldn't find the right shade of eyeliner or Manic Panic hair dye). This meant I needed an extra set of hands and more wine- stat! To finish the cake in a quick manner. Carefully and oh so gently, we took the buttercream transfer from the freezer and removed it from the cutting board. Using all four of our arms (not a typo!), we flipped the transfer over and lowered it on to the cake before removing the Parchment paper.
 |
| I would've lit my house on fire if this had broken in it's final stages. |
Upon peeling off the Parchment paper, you will have lines running across your cake giving it that Crow's Feet look we all try to Botox away. Don't worry- if you followed the frosting recipe above, you have a crusting buttercream on your hands and can use a Viva paper towel to smooth these lines and wrinkles away. Wish this worked on my face, too.
 |
| Ahh, Botox cake. |
I had to keep taking breaks to put the cake away so it would stop crying.
I may have even been crying in there once or twice. But thankfully, humidity be damned, this cake turned out almost exactly as I had pictured it in my head....minus the border because my transfer flattened out significantly after the paper towel trick, so I had no room for one. I simply smoothed the sides of the buttercream transfer for a finished edge.
 |
| I believe this cake is aces... |
Y'all, this cake was a HIT. Worth the existential crises, back-aching work, and everything. The birthday party had a poker theme, and this confection literally took the cake...as did everyone else. I've never had people take SECONDS of my cake, but they did, and they did with frequency. I was told by several guests that this was the best chocolate cake they'd ever had in their life (and naturally I agreed- I just didn't realize how big of gold mine I've been sitting on since St. Patrick's Day). Basically, what I'm saying is, make the damn chocolate cake and change your life already. If you live in sweltering humidity, forgo the pretty frosting and just eat this by the fistful. 'Til next time, my fellow eaters!
 |
| I don't have a poker face, but I do have a cake face. As in, my face was covered in it after I finished my piece. |


No comments:
Post a Comment
Leave me some love, some advice, tell me the meaning of life...whatever you fancy! You don't have to have a Blogger account, you can leave a comment by clicking "Anonymous" in the "Comment As" box..but if you're not a troll, leave me your name after your comment so I know who said what!