Sunday, October 29, 2017

Bewitching Brownies with Captivating Cream Cheese Swirls!

I am positively atwitter with excitement as Halloween festivities are in full swing at Casa de Crazy Foxes (or Casa de Zorros Locos si habla espaƱol). Last night, Derek and I continued the tradition of couple's costumes that don't make you want to barf as we donned creepy skeleton makeup and spooked unsuspecting piano bar patrons with our friends. I sincerely enjoy that my husband is becoming quite the costume aficionado (I mean, he let me paint his face with makeup, if that's not commitment, I don't know what is). We're looking forward to scaring small neighborhood children together on Tuesday night, and yes, we have already decided what we're going to be for Halloween next year. I enjoy this season so much not just because my macabre attitude goes along with it perfectly but also because the creative side really comes out of everyone when they construct clever costumes (read: not just slutty "insert generic costume here" or bed sheet ghost). It's fun, it's creepy, and it truly makes me happy. As a creative mad genius, I simply shine during the month of October into Dia de los Muertos. But as with all good things, they will soon come to an end. So it's only fitting I have one last ghastly dessert to help me cope:
Naturally, it's full of cocoa.
These sinfully chocolatey brownies with a heavenly cream cheese swirl are so fudgy and so delicious that you'll hardly believe their secret: they're only 150 calories a piece for a pan of 9 brownies, or to cut down calories even further, 112 calories a piece for 12 brownies. I didn't have to summon a demon and sell my soul or anything supernaturally devious to make it happen (I'm saving that for eternal youth, obviously). With Truvia Baking Blend, all things are possible. After baking that massive chocolate cake for my mom's birthday, I wanted to see how Truvia would hold up in a fudge brownie recipe alongside some other healthier swaps. Turns out, absolutely fantastic. I'm not sure how long this stuff has been around, but it is now a must-have as far as I'm concerned. It may seem counter intuitive, but you really can trust the skinny baker on this one. I'm all about having my cake and eating it, too. Except in this case, it's a brownie. And it's so low cal that I also get to top it with ice cream. I always did dream big, and by dream big, I mean dare to try to eat ice cream daily.
It's fall, the applesauce switch seemed appropriate.
I've adapted these from an old tried and true brownie recipe that makes a nice 8x8 pan of seriously fudgy brownies, so if you like dry, cake-style brownies, these are not going to be what you're looking for. If I can't taste all of the chocolate melting on my tongue when I take a bite, what's the point of having a brownie? A fudge brownie is as close to a hug in food form as it gets, so to make these spectacular (and spooky!) swirled brownies, gather up:
  • 1/2 cup of Truvia Baking Blend
  • 1/2 cup of All Purpose flour
  • 1/2 cup of unsweetened cocoa powder
  • 1/2 tsp of baking powder
  • 2 eggs
  • 1/2 cup of unsweetened applesauce (used in lieu of vegetable oil)
  • 1 tsp vanilla extract
  • Black gel dye
Start by preheating your oven to 350 and lining an 8x8 pan with Parchment paper or foil (spray lightly with cooking spray). In a large bowl, mix the Truvia, flour, cocoa powder, and baking powder with a whisk until combined. Then, add in the eggs, unsweetened applesauce, and vanilla extract. Whisk until just combined. Batter will be very thick (and very delicious). If you're making spooky Halloween brownies, be sure to add in a little black gel dye to get things to optimum creepy level--so black Spinal Tap members would be satisfied.
Could be none more black.
Reserve 1/4 cup of brownie batter, and then smooth your brownie batter out into your prepared baking pan. Set this aside, and get ready to make cream cheese magic.
It is sweet, and it is tangy.
With the Truvia Baking Blend, this cream cheese layer is definitely more on the tangy, tart side, but it does pair nicely with how rich the brownie layer is. If you want a sweeter cream cheese layer, add more Truvia and vanilla at small increments. I used:
  • 8 ounces of 1/3 less fat cream cheese at room temp
  • 2 TBS of Truvia Baking Blend
  • 1 egg
  • 1 tsp of vanilla
  • Green gel dye
Whip the cream cheese in the bowl of a stand mixer until smooth, then add in the Truvia, egg, vanilla, and gel dye. Mix on medium high until everything is smooth.
And greener than a neon highlighter.
 Very carefully smooth your cream cheese layer on top of your brownie layer. Then take a small spoon and drop dollops of the 1/4 cup of reserved brownie batter randomly over your cream cheese layer:
At this point, it looks like an unfortunate lab culture gone wrong.
To make the swirls, take a chopstick or butter knife and carefully draw S shapes back and forth over your batter:
I was going for a melted Wicked Witch of the West look.
 Once swirled, bake at 350 for 35 minutes, or until a toothpick comes out of your layers mostly clean (there will be a little build up of batter since the brownies are fudgy).
You'll know they're done when they look even greener than you thought possible.
These were so vivid and vibrant they almost hurt to look at directly. To me, this means they'd be the best addition to a Halloween dessert table because they're like a flashing neon sign of deliciousness. Let your brownies cool for an hour or two before slicing.
What, of course I have skull sprinkles.
Do you see that fudginess? It is mouth watering. We have positively chowed our way through these brownies because they are such a satisfying mix of dense chocolate and light cream cheese topping. And they're super festive. You could always go orange instead of green or split the cream cheese and dye half green, half purple, and mix in the brownie batter swirls for an impressively insane Halloween trifecta. Either way, they will get eaten, and they will get eaten fast. Be sure to keep these in the fridge (if they last that long) and reheat for 30 seconds in the microwave to get that straight-from-the-oven goodness that fudge brownies are known for...
They also make a really good ice cream plate.
When they're only 150 calories, you can make all of the ice cream happen on top of these for minimal guilt or potential gut-bomb hauntings. We like Breyer's No Sugar Added Vanilla with a (large) drizzle of sugar free chocolate syrup. Still under 300 calories for a massive amount of dessert, so those Halloween costumes will still fit like a glove. Was a little jealous of a guy I saw in a blow up Sumo Wrestler costume last night, because that would be an excellent way to hide the fact that I'd like to eat an entire pan of these brownies all at once. Either way, enjoy your Halloween, and know that I'm already coming up with ideas for next year's baking extravaganza. See you back here soon with your regularly scheduled pumpkin-filled desserts. 'Til next time, my fellow eaters.
I'm dying for some pumpkin spice...

Monday, October 23, 2017

A Birthday Cake Fit for the Queen of Halloween

We just spent a wonderful weekend with my parents to celebrate my mom's birthday. We took them to the traveling Cirque du Soleil show, Crystal, yesterday. I was in absolute awe of the talent and performance of the entire cast, while simultaneously being very much so aware of the fact that I have difficulty communicating with my left foot what my right foot is doing at the same time. I may never be able to perform acrobatics while suspended from the air (or the ground) or be able to complete a triple axle on ice (or even in my imagination), but what I can do is bake and decorate cakes so good they'll leave you speechless. I may be a little sad that as a baker no one ever gives me a standing ovation for my creation/performance, but I'm also extremely introverted and turn into a statue when a group of more than 5 people are paying attention to me directly, so I suppose it's all for the best. But I knew I had to make my mom a birthday cake fit for the Queen of Halloween and the woman who spent countless hours always ensuring my birthday cakes were absolutely perfect. I am fortunate that both her creativity and attention to detail were passed on to me, as well as that flair for the dramatic where Halloween is concerned. This meant my cake needed to be as scrumptious as it was spooky, and I thought it the perfect chance to test out two styles I've been dying to use: a semi-naked cake oozing with ganache dripping down the sides.
I was also pretty stoked to make my own swirled chocolate bark.
This is a variation of my dark chocolate cake recipe with a chocolate amaretto buttercream frosting, a chocolate amaretto ganache, and swirled chocolate bark. It was gothic but chic and delectable while full of Disaronno. For those of you looking for calorie content, I will say that this 3-tier, 6-inch cake yields 12 servings at about 312 calories a serving, and that does include all of the full-sugary goodness that is buttercream frosting. I ended up barely using any frosting save for in between layers, and I used less than half of the ganache I made, so this helped. Knowing I have a large Tupperware full of amaretto buttercream in my freezer is both tempting and terrifying, but I'll find another use for it (read: will eat it by the spoonful when I'm bored). I was actually able to cut a veritable buttload of calories by trying out what I shall now refer to as Kate's little helper: Truvia baking blend.
Yes, I used my family as guinea pigs, but I trust their opinions on dessert more than anyone else.
I ate a small amount of Truvia baking blend all by itself to make sure it had no weird aftertaste or wouldn't make me die of dysentery or sadness. It tasted fine, and I am obviously not dead (although I will probably find a way to blog in the afterlife because I am delightfully weird). I will offer you a few tips about using this stuff: you will need to add more baking soda (1/4-1/2 tsp) so that things bake evenly. I did not know this until after I was horribly shocked by how uneven and domed my cakes became in baking (don't worry, I leveled them and ate the remaining evidence). You also lose some bulk, but since this was a 3-tiered, 6-inch round cake, I didn't require a ton of bulk to my recipe. If you wanted to yield two 8-inch cakes at full size, swap out some or all of your recipe's butter for vegetable oil or applesauce instead. Applesauce will make it wayyyy healthier, but sometimes you just need to go calorie crazy to yield a cake worthy of applause (I'm still angling for the standing ovation). To make this version of my dark chocolate cake, gather:
  • 1 3/4 cups all-purpose flour
  • 3/4 cup + 2 TBS Truvia baking blend
  • 1/4 cup Hershey's dark cocoa powder
  • 1/2 cup Hershey's regular cocoa powder
  • 2 1/2 teaspoons baking powder
  • 1 teaspoon baking soda
  • 1/4 teaspoon salt
  • 2 eggs at room temp
  • 3/4 cup buttermilk at room temp
  • 1/4 cup sour cream at room temp
  • 1/3 cup vegetable oil
  • 2 tsp vanilla extract
  • 3/4 cup boiling water
Super important that your buttermilk, eggs, and sour cream are at room temp so they don't cook and curdle respectively when you add boiling water to them later. Start by preheating your oven to 350 and greasing three 6-inch pans. I only had two, so I had to bake my last layer after I was done using my pans the first time around.
It was very hard not to eat the batter from the cake layer that got left behind.
Mix together the flour, Truvia, cocoa powders, baking powder, baking soda, and salt on low in your stand mixer until blended. Then add your eggs, buttermilk, sour cream, vegetable oil, and vanilla extract. Blend on medium-high for about two minutes, until things have come together nicely. While this is mixing, boil 3/4 cup of water. Turn your mixer off and add the boiling water. Blend slowly and carefully until fully mixed. I turned out about a cup and a half of batter into each prepared pan and baked for 35 minutes.
Not pictured: the evidence I ate.
Let your cakes cool in the pan for 10 minutes and then remove to a cooling rack to finish cooling. If you have uneven tops, wait until your cakes are mostly cooled and then use a cake leveler to even out the tops of your cakes. You want each layer to sit perfectly on top of one another with a naked cake because all flaws aren't easily covered by frosting with this technique, so don't skip on leveling. Once cooled and leveled, wrap in plastic wrap and let freeze overnight or at least for a few hours. Scraping frosting down for the naked cake technique is hard on your cake, so you want it to be a dense cake recipe (a.k.a., no box mixes need apply) and you want it to be mostly frozen (like my demeanor).
Yes, I have a holiday bottle of Disaronno that has lasted since before Christmas 2016.
Disaronno is my beverage of choice when I run out of wine. But since I never run out of wine (the horror), this stuff tends to last me for the better part of a decade. I did a lot of adding and experimenting with this frosting, so keep in mind what I used, you only need about 1/4-1/3 of for a semi-naked cake. If you're frosting a full 2-tier 8-inch or 9-inch cake, you will need about the full recipe (with several spoonfuls leftover for "taste testing"):
  • 1 1/2 cups of butter at room temp
  • 1/4 cup Hershey's dark cocoa powder
  • 1/2 cup Hershey's regular cocoa powder
  • 6 cups of powdered sugar
  • 2 teaspoons of vanilla extract (I literally never remember to take a photo of this ingredient)
  • 6-8* tablespoons of Disaronno
  • Dark purple gel dye
*For a naked cake, you want a thinner consistency frosting that is easier to swipe off the cake, so use more Disaronno. For a thicker frosting you can smooth and pipe with, use less Disaronno.

Whip the butter in your stand mixer for a few minutes until fluffy, then add in the cocoa powders, vanilla extract, 2 TBS of Disaronno, and 2 cups of powdered sugar. Blend slowly until mixed, then add in 2 more TBS of Disaronno, 2 more cups of powdered sugar, blend, and repeat this step until you've used all the sugar and Disaronno you need for the right consistency of frosting. If you're dying your frosting (it will be a light brown shade), add in a darker gel dye. I wanted my color to be a chocolate cherry hue, so I used quite a bit of dark purple gel dye to achieve this.
The circle of life.
 Remove your cakes from the freezer, unwrap, and place the first layer on top of a prepared cake round (place it upside down so the top of the cake is facing the cake board). I always pipe a little frosting on my cake board so my bottom layer stays put. For a naked cake and even layers in between each tier, I used a large round tip (Wilton 1A) and piped a circle around the outer edge of my bottom layer. I then piped inside of this circle and smoothed things out with an angled spatula:
There will be overhang, and this is good.
 Now, take your next layer, and once again, place it face down on top of your first cake layer:
Like a giant, delicious Oreo.
 By putting your layers upside down, you're ensuring each layer has an even and flat surface. Remember, much like when you're naked, it's pretty difficult to hide flaws sans clothing, and this cake follows that same principle without a lot of frosting to cover it up. Repeat the outer-circle with your piping bag of buttercream, fill it in, and smooth. Then place your final layer (upside down again) on top:
Is a triple-stuffed Oreo a thing yet or should I patent that?
 Place a large blob of frosting on top of the final layer and smooth out with an angled spatula. You will have lots of overhang, and again, this is good. Take more frosting and spread it in varying thickness all over your cake. It should be pretty much covered for a semi-naked cake. For a mostly naked cake, don't use as much frosting on the sides.
Got a few spots poking through, but this was mostly covered.
 Now, take a bench scraper and run it around the sides of your cake like this video shows you at the 4:00 minute mark. Clean off your bench scraper after each pass, and continue scraping frosting off the sides of your cake until you have it as naked as you want.
I loved the amount of dark chocolate peeking through here, so I stopped.
Do whatever you want with copious amounts of leftover frosting that you've scraped off, like eating it with a shovel or using it for another baked good. Use an angled spatula to even out any weirdness you see on the top of your cake after scraping. If you're ganaching the top of the cake, freeze it for a few hours so your buttercream stays firm. While it's setting up, you can make your chocolate bark.
Not pictured: the vegetable oil you will definitely need.
 Melted chocolate is a fickle nightmare. It seizes up at the slightest sign of moisture, so when you're trying to dye it a different color, you're gonna need vegetable oil. I recommend making life easier for yourself by buying chocolate melts in whatever color you want your swirled bark to be. If I had purple chocolate melts, my bark would've turned out better because I wouldn't have spent precious time adding oil into my dyed chocolate to get it smooth again, all the while my dark chocolate was firming up to the point where swirling the two colors together was a small nightmare. The things we do for our mothers... ;-)

For the bark:
  • 2/3 cup semisweet chocolate chips
  • 1/3 cup white chocolate
  • Dark purple gel dye
  • 1-2 teaspoons of vegetable oil
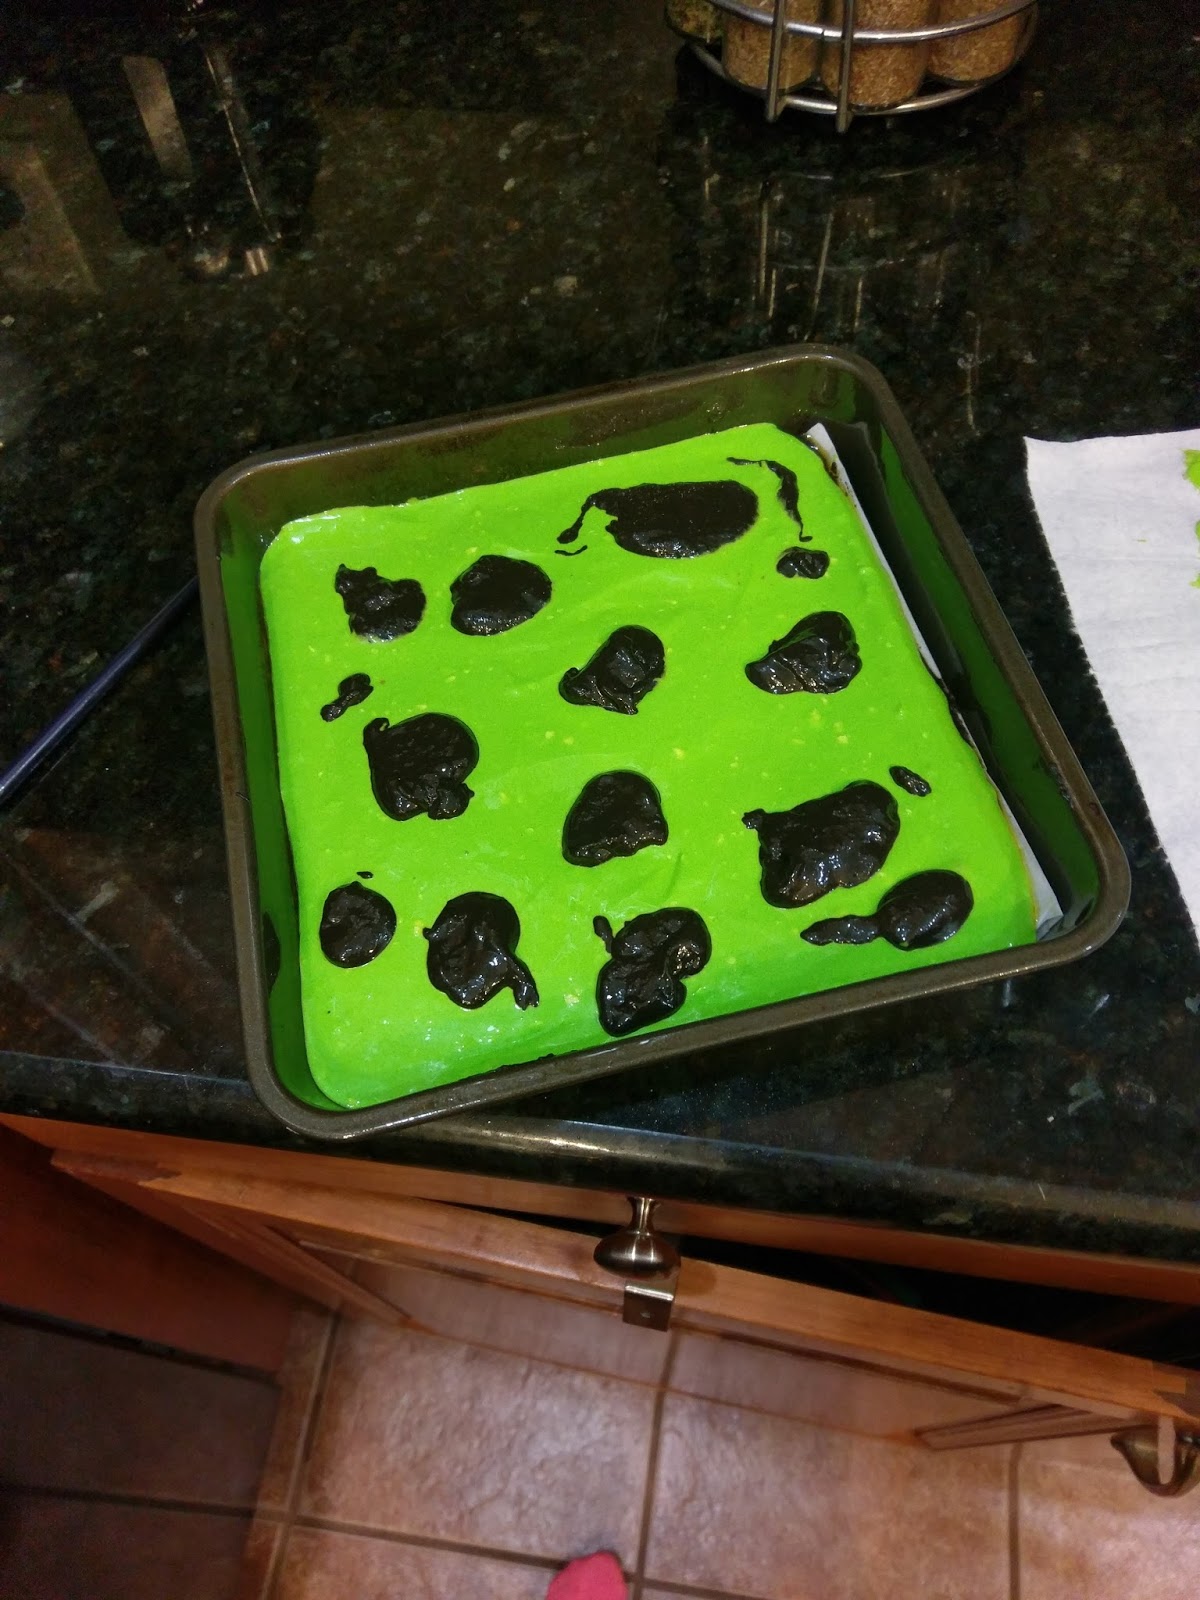
Place Parchment paper down on a baking tray. Melt your semisweet chips following package directions (usually 30 seconds at a time on 50% power in the microwave, stirring after each time). Using an angled spatula, smooth out the melted chocolate onto the Parchment paper to form a large rectangle:
Like so.
 Then, melt your white chocolate melts and add in the purple dye and vegetable oil. Stir well, then drop dollops on top of the semisweet chocolate layer:
Not much rhyme or reason to my dolloping.
 Had I used purple chocolate melts, things would've swirled together better since my semisweet layer was hardening fast by the time I finished mixing my white chocolate, dye, and oil. I was able to swirl with a chopstick somewhat, but it didn't mix as well as I had hoped. Moral of the story: colored chocolate melts are your best friend here. Set your tray in the fridge to firm up for a half an hour. Then simply chop into triangles:
Nice, stabby, pointy triangles.
Set this back in the fridge until you're ready to ganache the top of your cake. I did a lot of reading to test out adding booze to a ganache after the nightmare that was adding gel dye to melted chocolate earlier. I was determined to make adding liquid to a melted chocolate work, rules be damned!
Otherwise this Disaronno wasn't going to see any action again until like 2019.
To make the amaretto ganache, you need:
  • 1 cup of semisweet chocolate chips
  • 3/4 cup of heavy whipping cream, with 1 tablespoon removed
  • 1 tablespoon of Disaronno
Basically, when you want to add booze, you need to keep the liquid level at the same amount. So if you wanted two tablespoons of Disaronno, remove two tablespoons of heavy cream from your 3/4 cup. Melt your chocolate using the method described above while bringing your heavy whipping cream to a boil over medium-high heat. Once the chocolate is melted, pour the the heavy whipping cream on top of it 1/4 cup at a time, blending very, very well in between additions. Once completely smooth, add in the tablespoon of Disaronno and blend well again. I used a strainer to remove any air bubbles from my ganache.
Hello, gorgeous.
 Remove your cake from the freezer, place it on a cake plate, and then spoon ganache on top of your cake. Use an angled spatula to smooth out and allow the ganache to run down the sides of your cake:
This moment was positively divine.
 So if you don't want as much of a drip, don't use as much ganache on top. I only used about half of my ganache. While the ganache is still soft, remove your bark shards from the fridge and gently secure them in the top of your cake with a bit of pressure.
Arrange however you like--I was going for "Halloween crown."
 Place everything into the fridge at this point so your ganache can set up for a few hours.
It will be hard to take your eyes off this beauty, but no one wants to eat an unset ganache.
 It's pretty much like just eating chocolate syrup straight out of the bottle at this point, so give it time. I also found some glittery purple candles to complete the look:
I didn't put them in until after the ganache had firmed, so this was an interesting experience.
 Birthday song was sung, presents were opened, and cake was had. And oh how gloriously delicious it was. I didn't tell anyone until after we were done drooling over it that I used the Truvia. Everyone agreed it still tasted exactly like dark chocolate cake should. And since it was covered in booze-laden frosting and ganache, it was still plenty sweet all around. The first bite hits your taste buds with chocolate and finishes with that sweet cherry flavor from the Disaronno. This chocolate amaretto buttercream is probably the craziest frosting combination I've concocted to date, but it works oh. so. well.
Seriously, you just have to try it.
 Most importantly of all, my mother loved it. It was wonderful to give her a cake that is probably only half as good as anything she's ever baked for me, but to know how much she enjoyed it and appreciated my efforts made all the tiny heart attacks that occurred during baking and chocolate melting worth it. I may not ever be a Cirq performer with my two left feet and an intense avoidance of the spotlight, but I know how to say "I love you" with cake and the steely determination only a Type-A introvert can have. So happiest of birthdays to my biggest fan and best friend--love you, Mom! I'll be back this weekend with one final Halloween delight. 'Til next time, my fellow eaters!
P.S., I'm bringing the bottle of Disaronno with to Christmas, or it'll never get finished.

Monday, October 9, 2017

The Number One Hurricane Survival Item

Well, Florida threw us another curve ball in the form of Hurricane Nate this past weekend. I've been slowly amassing my hurricane preparedness kit since Irma couldn't make up her mind last month. Battery-powered lanterns? Check. Tons of flashlights? Check. Enough bottled water to bench press my weight in? Check. So much ramen in my pantry it looks like six college students live here? Check. I had literally everything I thought I needed, down to extra dog food (...for the dogs, not me). I had a lingering feeling I was forgetting something, so I hearkened back to the last several insane winter storms that trapped us in our house for a few days (Clovis was a magical mix of Narnia meets Antarctica during winter). It was then that I remembered the number one item I need in my survival kit: cake. I was still pretty miffed that after spending several hours putting up my Halloween decorations on Monday (and getting sunburned because Florida is just that out of line) that I had to take them all down for this stupid hurricane. This was my first official foray into "spite baking," so naturally my cake needed to be extremely Halloweeny to compensate for my favorite month of the year failing to live up to my expectations down here. And so, out of repugnance and macabre, this ghastly slime cake was brought to life. Or death, really, since it's a ghost cake.
The horror...my poor ghost has a broken arm.
Remember the last time I made a surprise inside cake? When it almost failed terribly and I then decided that making these types of cakes are way too stress-inducing and absolutely ridiculous? Yeah, well, apparently I didn't. I'm told time heals all wounds, and I suppose this applies to cakes that make you want to cry while baking them. I did quickly remember my shortcomings last time and tried my best to overcome them only to be met by different obstacles with this cake. I mean, clearly we can all see it turned out okayish, but it was touch and go there for awhile. I was really glad that baking a cake within a cake at least yields a ton of cake scraps for me to eat my feelings aplenty during baking. But in the end, this creepy, wonderfully Halloweeny cake is a yummy mix of chocolate and white cake with a vanilla pudding topping. And since I went the low-cal route, each slice is only 209 calories for a total of 12 slices. It's nice when the shock and horror is related to the spooktacular decoration and not the calorie count.
I buy my black gel dye in bulk during this time of the year.
To make both cakes, you will need to scoop up the following:
  • 1 box of white cake mix
  • 10 ounces of diet creme soda
  • 2 egg whites
  • 1 box of chocolate cake mix
  • 10 ounces of diet root beer
  • 2 egg whites
  • Black gel dye
To make the slime topping you'll need:
  • 1 box of sugar free vanilla instant pudding
  • 2 cups cold skim milk
  • Lime green gel dye 
  • Optional: spooky sprinkles for topping
Now, this is a cake that comes together over the course of 24 hours because you'll need to do some freezing. Start by baking your white cake. Mix together the creme soda, two egg whites, and white cake mix for 2 minutes on medium-high in your stand mixer. Grease a 9x13 pan very, very well (especially if your humidity is a balmy "we're on the bad side of a hurricane" level). Pour into the pan and bake at 350 for 20-25 minutes. Cakes will always cook quicker when you use soda, so keep that in mind.
Hindsight: literally the pumpkin or the cat would've been a better choice.
Once your white cake has baked, let it cool in the pan for 10 minutes and then turn it out onto a cooling rack. Place this in the freezer. Your cake needs to be mostly frozen to cut out the ghosties. I got an absolutely adorable set of three Halloween-themed cookie cutters from Amazon because even though I live within 10 miles of a Walmart to both my east and west, I simply refuse to go there because it's bad for my incarceration-free lifestyle to deal with other people once inside of one. 
Sigh, I still thought I knew what I was doing...
Here is where all my plans began to fall apart. See those tiny little cute arms waving in adorable terror? Yeah, they're a reallllll pain to cut out of a soft cake and keep intact. I knew I would need 6 perfectly-shaped ghosts to fill the inside of my cake, and I also knew I would be able to cut out 8 total. I considered the first two practice ghosts. My cake was not frozen enough for practice ghost number one, and he looked like he had died of some sort of wood chipper incident. While my cake was frozen enough for ghost number two, he lost both his arms in an unfortunate out of body experience because my cake was just too moist to pry him out of the cookie cutter. Should you choose to use the ghost with his delicate little birdlike arms (clearly he never hit the gym when he was alive), spray your cookie cutter with so much cooking spray you can taste it in the air. This is the only way to cut out a ghost and allow him to not be a double amputee.
He seems appreciative because he can still high-five you with either hand.
You'll only end up using about a third of your white cake to get six ghosties, but you will completely demolish it, so you can either toss the rest out or save your scraps. We had some scraps with a little bit of lemon curd on top, and it was delightful. Put your six ghosts onto a sheet lined with Parchment paper and leave to freeze overnight. After about 8-12 hours (I literally baked this first thing Sunday morning because I have a real problem with age-appropriate responsibilities), the ghosts are frozen enough to handle being baked again. Mix the chocolate cake mix, 10 ounces of root beer, 2 egg whites, and a large dollop of black gel dye on medium-high for two minutes. Side note, 10 a.m. is way too early to drink the leftover root beer if you've just consumed an apple cider donut.
Ahh the loaf pan, my worst enemy.
Preheat your oven to 350 and grease a 10x6 loaf pan with all of the cooking spray. Seriously. It's a heavy cake, don't leave it to chance! Take half a cup of cake batter and ladle it into the bottom of the loaf pan. Spread out a bit, and then go grab your ghosts (unlike skeletons, we won't keep these hidden somewhere for long).
They mostly have all their arms!
 Gently place each ghost into the cake batter at the bottom of the pan. Stack them close together. There will be a small gap on each end, and you need it so the ghosts can get completely covered up. It's not really a surprise inside cake if you can see the surprise from, well, the outside.
It turns out prettier, I promise.
Now, continue using a half cup scoop and gently plop batter into the cake pan, working to cover up all the ghosts. I had a few ghosts lose an arm during this process, so take your time and work as gingerly as possible, or in hindsight, just use the pumpkin because it is round and easier to deal with. But if you're a crazy person who loves to defy logic, try pouring batter under the arms before you pour it on top. Use a spatula to smooth out the batter as best as you can when you're done covering up your ghosts. Tap gently on the counter to get rid of any bubbles, and then bake at 350 for 50 minutes.
Not a giant bowl of boogers.
While your cake is baking, get out a medium bowl and dump in the pudding mix, 2 cups of cold milk, and a squeeze of lime gel dye. Whisk for two minutes, cover with plastic wrap, and let set in the fridge for a few hours so your slime can firm up. No one wants runny slime...this isn't the Nickelodeon Kid's Choice Awards, after all.
Ahh yes, a perfect black void made of cake.
Once your cake has baked, leave it in the pan and place on a cooling rack for 10-20 minutes (or the amount of time it takes you to get completely soaked while taking your dogs for a walk during the tail end of a hurricane because they are super annoying when they don't get one. Judging by how wet we were, I assume we were gone for 15 minutes). Take a butter knife and gently run it around the edges of your pan to ensure no sides are sticking. Lay a towel out on top of your cooling rack, and place this on top of the cake. Flip everything over carefully, and gently slide the loaf cake out of the pan. It will be upside down at this point, so prepare a cake board or large platter and place this on the bottom of the cake that's facing up at this point. Quickly flip everything over so your cake is right side up. Transfer your cake to the freezer for several hours so it is completely cooled.
Basically, make sure in the end your cake looks like this when its on a prepared surface. Otherwise your ghosts will be upside down, and it's probably not as easy to haunt people if you're not right side up.
 Once your cake is totally cooled, remove your pudding mix from the fridge. Load up a piping bag or plastic baggy with half of the pudding. Save the other half to eat later, torment people with by acting like you sneezed out a booger, whatever your heart desires. Snip the tip off of the bag, and pipe a layer on top of the cake:
Greener than Shrek!
 Smooth out a bit with an angled spatula. Once topped, take your piping bag and drag it up and down the sides of your cake to create slimy drips:
It should look oozy and gross.
 Bonus, the grosser and oozier it looks, the less like you will have to share your cake with anyone else!
Sprinkles: because everything deserves to feel a little pretty.
I finished by smattering some Halloweeny sprinkles on top (the colors bled into the slime, but it looked even cooler) and then set into the fridge to finish thawing out from the trip to the freezer earlier. You will want to keep this cake refrigerated since it is topped with pudding. This will also keep any potential hauntings relegated to the inside of your fridge and not your entire kitchen. Fact.
What horrors lie beneath the surface...
I'm always really worried when I cut into a surprise inside cake that the surprise inside the cake will be that I completely screwed it up. Have we talked about my low level of self-esteem lately? No? Well, too bad, because this is a cake blog, so self-loathing must remain relegated to said cakes.
He's more like a spectral blob.
Well, you can tell they're ghosts, sort of. My arms broke off in a few places causing my ghosties to look more like ethereal shapeless figures, but it still works. In all seriousness, surprise inside cakes are a bit of work, but the end result is always a lot of anxiety fun. At this point, I'm running out of new ways to bake Halloween-themed desserts after blogging for several years, so I have to go for broke. But does broke ever taste delicious! This cake tastes like a marble cake thanks to the combination of vanilla ghosts and chocolate cake. I'm really late to the party when it comes to pudding...I hated the texture until my late twenties, so naturally I'm eating it as much as possible to make up for lost time. It's a nice sweet addition to the cake, and it does help to keep things from getting dry or stale. But what I love best is that the combo of chocolate cake and vanilla pudding make it taste like you're eating a giant Oreo. Since I spent half of the baking process in sheer terror, I feel it's definitely an appropriate Halloween dessert, blobby ghosts or not (seriously, just go with the pumpkin shape). Don't worry, I've still got another one up my sleeve to celebrate the season, so as long as Florida stops actively trying to kill me, I'll be back with hauntingly awesome desserts soon. 'Til next time, my fellow eaters!
I' just ooooozing with anticipation...