Monday, December 11, 2017

Gingerbread: the Pumpkin Spice of Christmas

Hell has finally frozen over--at 4:30 a.m. last Saturday morning, it snowed for like thirty seconds in Northwest Florida. That day I believe I went through about four wardrobe changes so I could cycle through all my favorite boots because I literally had no idea if the opportunity would present itself again, and after spending a week in the sweaty nightmare that is Orlando, I nearly wept at the sight of frosty lawns while walking the dogs. It was so cold I couldn't feel my face, and it was fantastic. It finally feels like Christmastime, so it was only appropriate that I commenced with all of the Christmas baking this past weekend. My family traditions are stacked high with Spritz cookies, caramel bars, lemon squares, fudge, literally everything under the sun except gingerbread. I decided I needed to change that this year and baked this super cute naked gingerbread cake with cinnamon cream cheese frosting and edible chocolate trees (because there should be chocolate in every dessert):
Squee! So wintery!
I had so much fun decorating this cake. It was a pleasant, spirit-lifting experience after watching my Vikings winning streak get snapped. It took everything in me not to sit down and eat the entire pan of caramel bars I just baked to get over it. But sadness coupled with stomach ache was not how I wanted to spend my Sunday, and my sports-related depression was stopped dead in its tracks the second I took a bite of this cake. Why did I wait almost 31 years to bake a gingerbread cake? This stuff packs a punch. It's like the pumpkin spice of Christmas!! That jolt of ginger and cloves followed by the smooth sweetness of the cinnamon cream cheese frosting transported me to snowy, cold lands (you know, like Minnesota or inexplicably the entire South last weekend). What I'm trying to say is, I'm super late to the gingerbread party, but I'm trying to live my best basic white girl life, so I'm putting this into regular holiday rotation, stat. I adapted a recipe that was almost 550 calories for one slice of cake and Kated it up (I'm using my name as a verb now, deal with it) to cut the calorie content down to a much more respectable 330 calories a slice. You know, so you can have your cake, cookies, and fudge and eat it, too.
Praise be to Truvia, for making holiday binge eating possible.
Legitimately the hardest part of making this cake was tracking down a bottle of molasses. Apparently gingerbread is super popular during the month of December (Who knew? What? Everyone but me? That checks). It took us a few store runs, but eventually we found molasses and that moment will be what I consider "Katy's Christmas Miracle 2017." This recipe makes three thin 6-inch rounds, and you'll need:
  • 1 1/2 cups All Purpose flour
  • 2 tsp baking powder
  • 1 tsp ground ginger
  • 1 tsp cinnamon
  • 1/2 tsp ground cloves (or use 1/4 for less of a "jolt")
  • 1/2 cup unsweetened applesauce*
  • 1/4 cup Truvia Baking Blend
  • 2 TBS plus 2 tsp Truvia Brown Sugar Blend
  • 2 eggs
  • 1/2 cup molasses 
  • 1 tsp vanilla
  • 1/2 cup low-fat buttermilk
*Subbing applesauce in place of butter will make a super dense, bread-like cake. If you'd rather have it light and fluffy, use 1/2 cup of butter at room temp. The next time I make this, I am going to use 1/4 cup of applesauce and 1/4 cup of butter to even things out.
Ah, ginger. Color of my hair. Soother of my stomach. You know, Ginger was my favorite Spice Girl, too.
 Start by preheating your oven to 350 and line your pans with Parchment paper and spray with cooking spray. Dump the flour, baking powder, salt, ginger, cinnamon, and cloves in a medium bowl and whisk together. In your stand mixing bowl, blend the applesauce/butter and both Truvias until mixed. Things will be sloshy if you're using all applesauce, so blend on low (if using any butter, mix this with the sugars first until fluffy before adding applesauce). Add in the eggs, one at a time, mixing well. Then add in that mythical, elusive molasses and the vanilla extract. Blend well. Now, take turns adding in a third of the dry mix, blend well, then add in half of the buttermilk. Repeat until you've used all of your dry mix (you'll end with this) and the other half of the buttermilk.
I still only have 2 6-inch pans...
Dump your batter evenly into your prepared pans. Tap on your kitchen counter to release any air bubbles and even out your batter. Bake at 350 for 25 minutes or until a toothpick comes out clean.
Your house will smell like Santa's dreams.
Let these rest in the pan on top of a cooling rack for 10 minutes before removing from the pan and allowing them to finish cooling on the rack. Now, for a naked cake, it is super helpful to freeze your cake rounds to ensure they don't get crumbly while you scrape down frosting (but don't forget to level your cakes so they're all even before you freeze them. You know, like I did. More on that later.). I wrapped all three of my rounds into individual cling wrap pouches and froze overnight. I also made my chocolate Christmas trees the night before to allow them time to set in the fridge. Because is it really Christmas baking if it doesn't take up your entire weekend? Exactly.
You should also hate yourself a little for eating way too many baking scraps.
 To make my Christmas trees, I used green chocolate melts, green and white sanding sprinkles, and white pearl sprinkles. I really like this brand of chocolate melts (found at A.C. Moore) because I wasn't too keen on the shade of green after I melted them, but I was able to add green gel dye to it to achieve the color I wanted without it seizing up which is practically unheard of in chocolate decorating. Small miracles. While I was melting my chocolate according to package directions, I sketched out some trees on a sheet of Parchment paper to act as a guide:
Don't forget to flip this over before you pipe chocolate or it'll taste like Sharpie...some lessons are hard learned from the past and never forgotten.
 I fitted two piping bags with a #16 Wilton tip (star tip) and another with a #5 Wilton tip (round open tip). I tried piping a tree with the #5 tip, but it looked really boring. The star tip definitely wins out here because it gives a nice texture. I piped over the outlines I had drawn by first piping one line the height of the tree to act as the backbone and then piped waves back and forth to create my trees (very slowly to ensure they didn't have large gaps in them).

It's quick and easy, promise. You can eat any you don't like. Win-win.
I piped two at a time and then decorated with various sprinkles while the chocolate was still soft.
I went a little overboard on the number of trees I decorated.
...but since our current house has no place for our Christmas tree, I knew this would be my one shot at tree decorating this Christmas, so I made my own tiny Christmas tree farm. And then I ate several of them because I cannot be trusted around chocolate. I let these sit out on the counter for about an hour before carefully and gently placing them in a Tupperware: one layer topped with Parchment paper followed by another layer. I closed the lid and hid them from myself in the fridge overnight. Just because they are tiny green trees does not mean they have the nutritional content of broccoli.
Don't ever read the nutritional content of powdered sugar, either.
The next day, I made my frosting. I knew I wanted a cinnamon cream cheese frosting, but if you want that "Whiter than a Canadian after a long winter" look about your frosting, you'll want to skip the cinnamon as it does add color to the frosting. And by color I mean "Tan as a Canadian after a brief summer." My color comparisons are distinctly channeling my heritage...Gingerbread men are tanner than I am. To make the frosting you'll need:
  • 8 ounces of 1/3 less fat cream cheese at room temp
  • 1/2 cup of butter at room temp
  • 1 tsp vanilla
  • 1 tsp cinnamon
  • 3- 3 1/2 cups of powdered sugar (I used 3 1/2 but had a decent amount leftover, so 3 is safe for a naked cake)
Blend the cream cheese and butter in your stand mixer until fluffy, about 3-4 minutes. Then add in the vanilla, cinnamon, and powdered sugar. Blend on low until the sugar has been well incorporated, then blend on high until everything is smooth.
Hi cakes I forgot to torte...
 Before I froze my cakes, I completely forgot to level them. This is why baking and Benadryl don't mix. I would probably have a better chance of remembering to level my cakes while just straight up sleep walking than I would when Benadryl is introduced to my system and that sweet, sweet numbness overtakes my sinuses. Since this wasn't for anyone's birthday or consumption other than mine and my husband's, I didn't have too much of a meltdown (I did all my melting in Orlando...86 degrees in December, really?!). But I highly recommend leveling your cakes before freezing them so you can assemble layers without things getting wonky. Unwrap all your cake layers and load up a piping bag with a large round tip (Wilton 1A is my go-to) and a plop a heaping dollop of frosting inside it.
The circle of life.
 With naked cakes, remember to flip them upside down so the bottom of the cake is now facing up. This allows an even surface for you to stack your layers! I place my cake on a cake round and pipe a large circle of frosting around the edge of my cake first.
You're getting very sleeeeepppyyy....
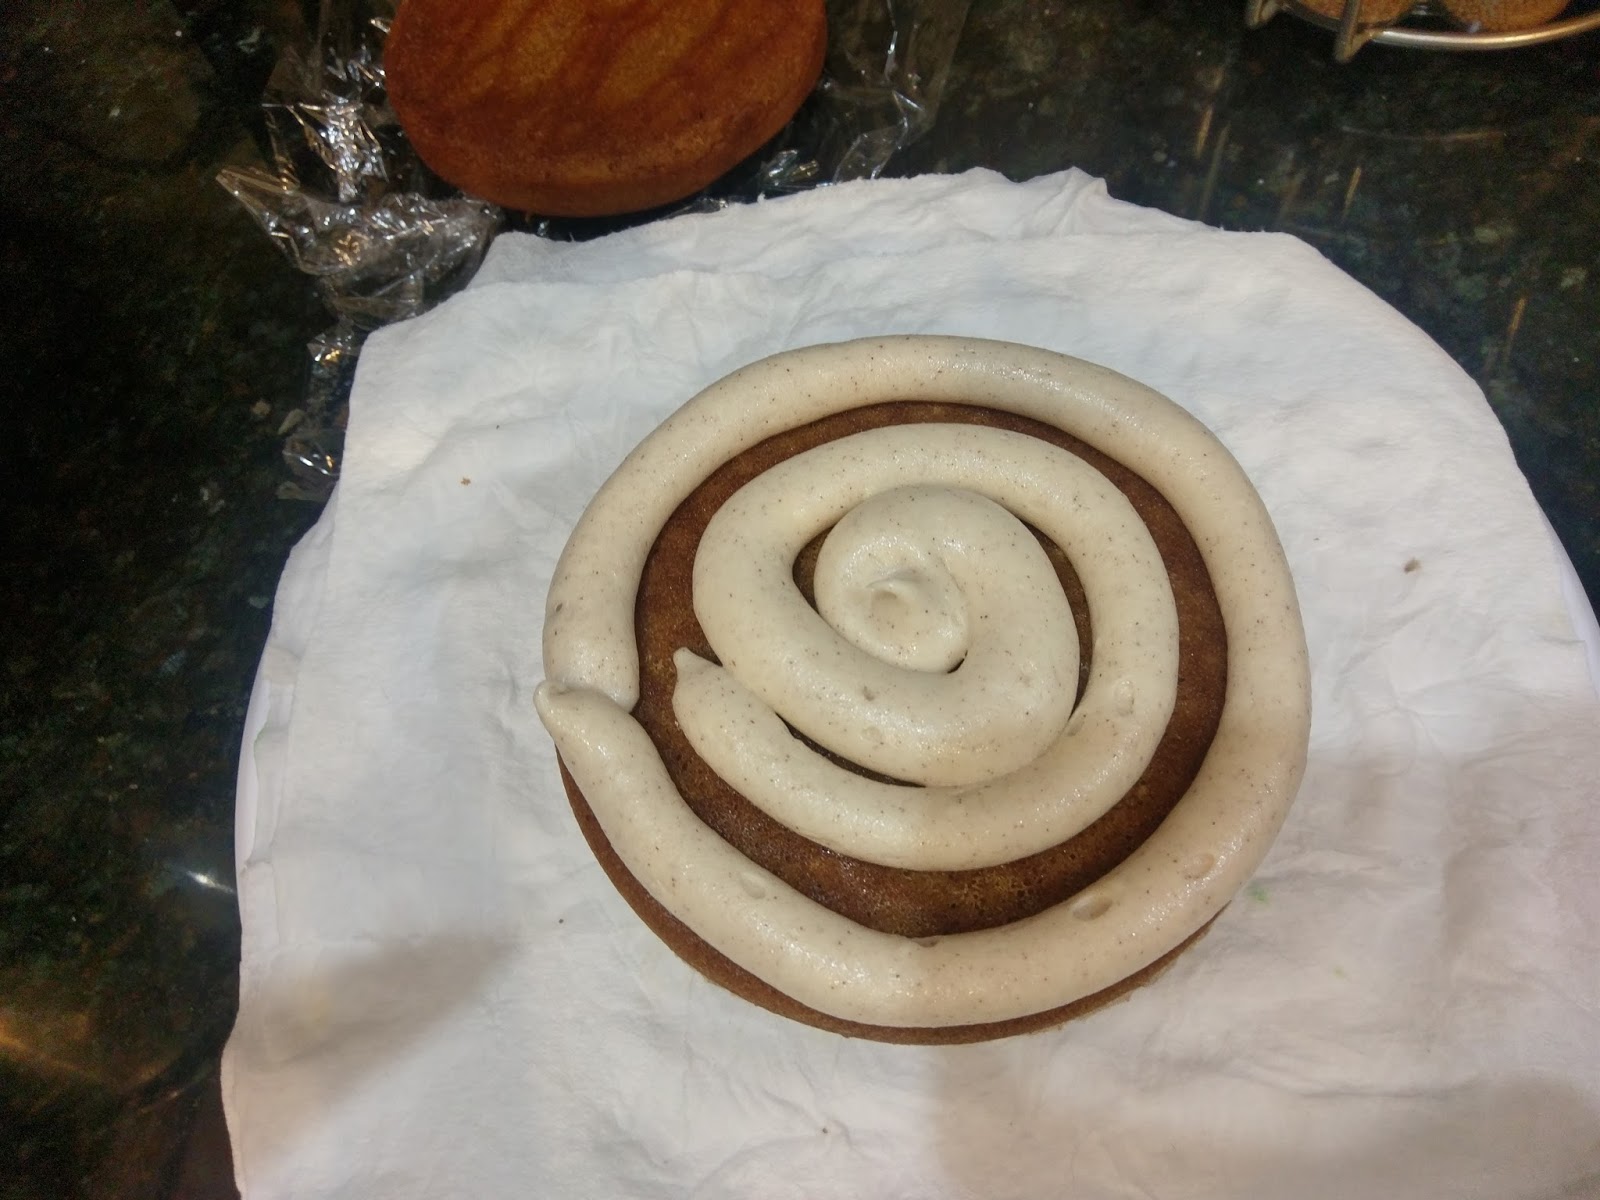
 Then I spiral in a decent amount of frosting in the middle.
And I finish up by smoothing with an angled spatula.
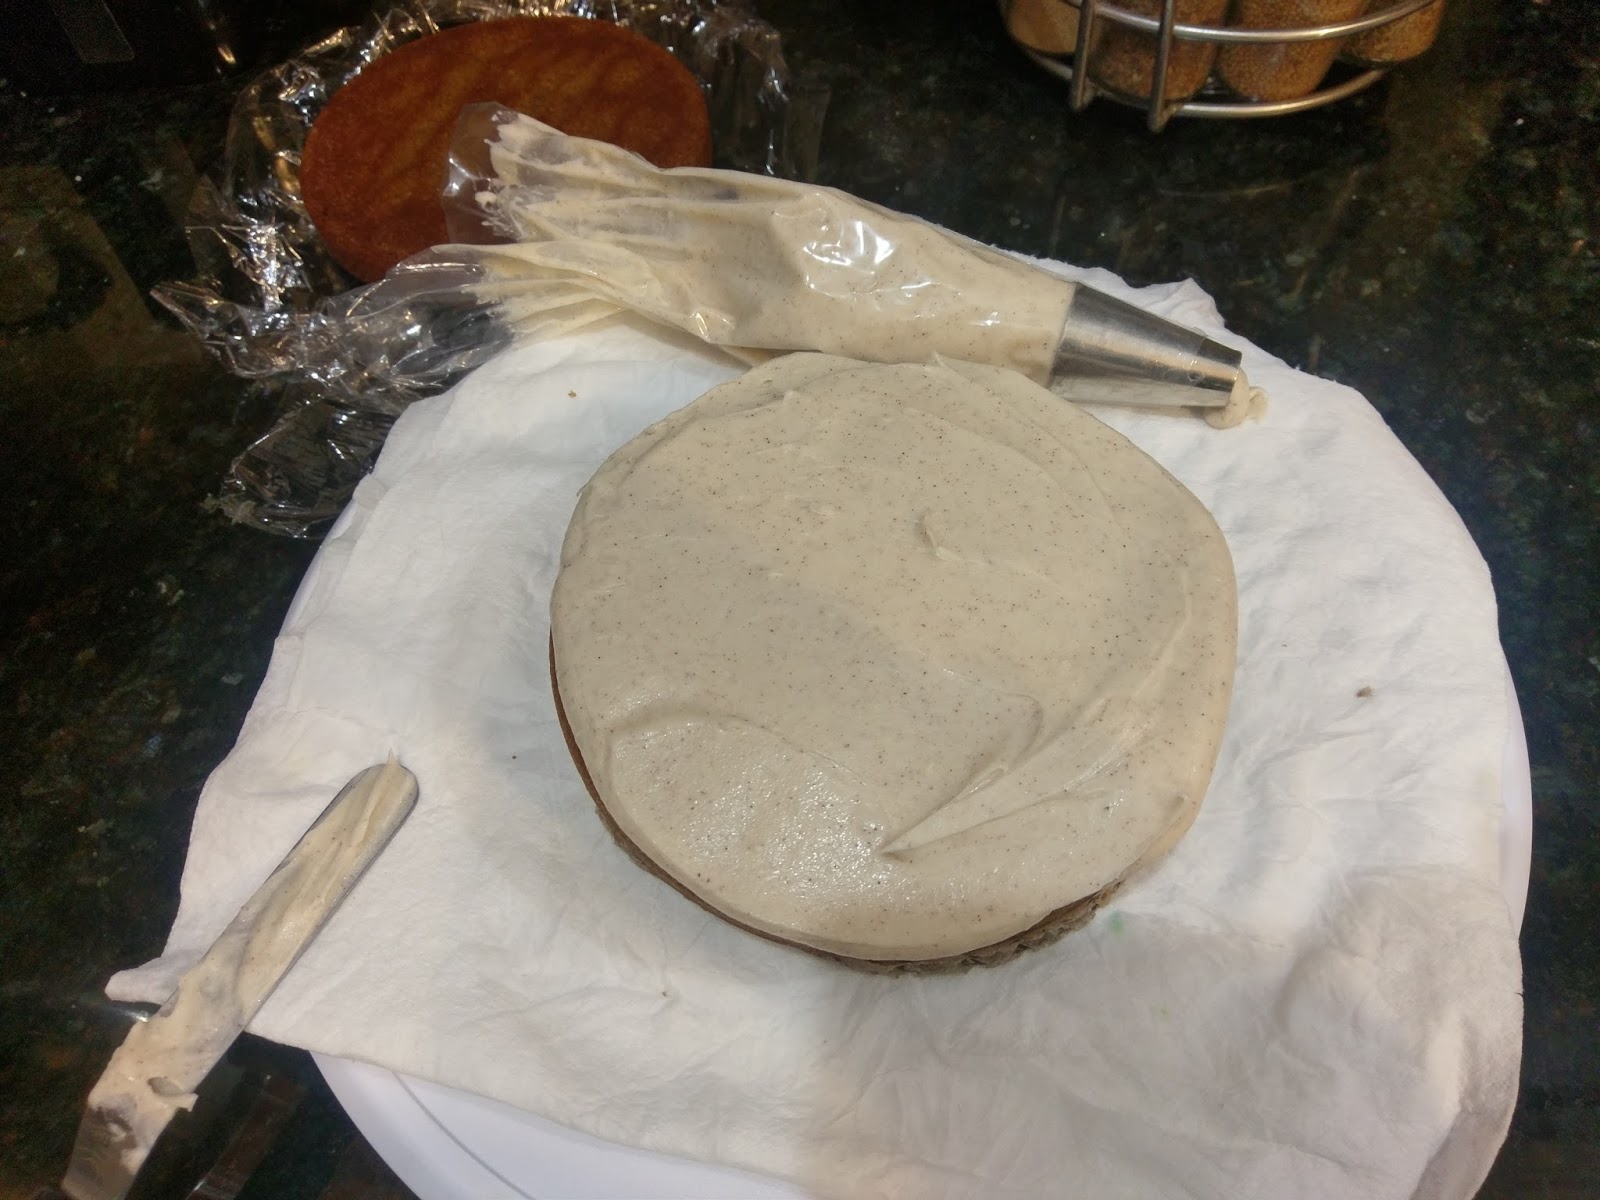
 Repeat this process until you have used all of your layers. Smooth the top layer of frosting out nicely. There will be some overhang, which is good:
Especially if you forgot to level your cake and need to cleverly disguise that fact.
 I took my leftover frosting and angled spatula and filled in any areas where it was obvious that my cakes weren't totally level (then I ate a few spoonfuls of frosting because I'm excellent at coping with problems). Then I went around the cake a few times with my bench scraper to pull any excess frosting off the cake. I didn't have to do this much, as I didn't use a ton of frosting between layers. I wanted this to be a mostly naked cake, so less is more here.
I'm going to be obsessed with naked cakes forever because they are pretty and easy. This is like the no-makeup look but for a cake.
 Once I finished my frosting, I transferred my cake onto a large plate. Then I gathered up my not-broccoli trees.
I piped a gob of frosting down where I wanted to anchor any trees in place.
 Then, with a touch more gentle than I knew I possessed, I gingerly (ha!) placed each tree into the frosting glob until it had sunk into the actual cake. I am happy to report not a single tree broke during this process. I made like ten trees for emergency breakage and only used six because chocolate always crumbles on me (Kate Hulk Smash). More leftover eating trees for me!
So much Christmas in a tiny, adorable, yummy package!
 As you can see, I finished up by adding a large sprinkling of white sugar crystals to give it that wintery feel. I know with the cinnamon cream cheese frosting it looks more like the beach than snow, but I live in Florida, so this totally works here. Let me have this moment, people.
I just needed to see some snow, okay?
 This cake really helped boost my Christmas spirit. I mean, I still avoid stores I know for certain are playing Christmas music, but I'm less angry when I walk by the inflatable beach snowman down the street (for reference, this guy. I can't stand his smugness or his sunglasses.). It might stay "coldish" around here, and I am super grateful for that because I have one hell of a boot collection and not enough reasons to change outfits more times in one day than Beyonce. After finally getting to experience the magic of Disney World at Christmastime (minus the heat, which I am told Mickey can do nothing about), I'm ready for hall-decking and whatnot. A slice of this cake just puts me over the top. Of course, my "over the top" Christmas spirit simply means I might smile for 30 seconds longer a day. Baby steps. But when this gingerbread cake hits my tongue, I believe in Christmas miracles! Cinnamon cream cheese frosting is probably the best thing ever--the right amounts of sweet and tang meet with that unmistakable spiced, gingerbread goodness for literally the perfect balance. And since it is gingerbread with cream cheese icing on top, you can feel completely guilt-free about having a slice for breakfast. It's like a really fancy bagel with enough sugar to power you through even the earliest of Christmas mornings. Happy Holidays! 'Til next time, my fellow eaters!
Pictured: my Christmas joy.

Thursday, November 16, 2017

You Had Me at Pumpkin

Well, it's time to face reality--Thanksgiving is almost here, and once it's passed, the season of pumpkin will come to a close. I'm a seasonal flavor baker...citrus belongs in the summer, pumpkin in the fall, peppermint in the winter, and everything green in the month of March. Literally the only thing I eat year round dessert-wise is ice cream. I love the stuff so much that if I could only eat one dessert for the rest of my life, that would be it. And considering how much I eat dessert, my calcium intake would be off the charts. Bones so strong they're indestructible! ...thus fulfilling my lifelong dream of becoming a Terminator. But, luckily for you guys, that'll never happen. And also luckily for my husband, the final pumpkin dessert of the season is here. If I baked with pumpkin as often as I wanted to, I'm fairly certain he'd have left me a long time ago, citing irreconcilable differences (a.k.a., my wife uses an obscene amount of pumpkin spice). I definitely wanted this baking season to go out with a bang, so I came up with a low-cal dessert guaranteed to wow everyone at your Thanksgiving festivities next week: pumpkin cheesecake lasagna.
Epic taste lies within!

All the best things have layers. Fall outfits, ice cream cakes, my personality...so this pumpkin cheesecake lasagna fits the bill in both the scrumptious and seasonally appropriate categories. Considering the original Tasty recipe was full of all of the fats, I knew I had to come up with a way to make this low cal. There was no way I was going to be able to write off something called pumpkin cheesecake lasagna. Those are three of my favorite things all combined into one blissful dessert experience. I was able to get clever and managed to bring the calorie count down to a respectable 205 calories a slice for 12 slices. If you went for smaller slices, you could go for 15 slices at 164 calories a pop. No pumpkin pie in the world can say the same, and they don't even have layers. Amateurs. Considering I am all about the "bake ahead" when it comes to Thanksgiving, this dessert demands it! It's best if you make it the night before you want to serve it, so this definitely frees up space in the kitchen on Turkey Day.
Just don't forget the caramel. Because I have for like two nights in a row, but we didn't even notice because this is just that good.
The ingredients are also incredibly simple. You don't have to beg a health food store to sell you specialty ingredients for less than fifty bucks a pound or anything. All you need is:
  • 1 brick of 1/3 less fat cream cheese at room temp
  • 2 heaping TBS of Truvia Baking Blend
  • 1 1/2 cups of Cool Whip Free
  • 2 cups of skim milk
  • 2 large (1.5 ounce each) packages of sugar free instant vanilla pudding
  • 1 tsp of pumpkin pie spice
  • 3/4-1 cup pumpkin puree(I used 3/4 cup because it was what I had left in the fridge, but it was definitely plenty)
  • Reduced fat cinnamon graham cracker sheets (14 1/2 sheets total)
  • Optional: caramel for drizzle, pecans for topping
Start by mixing the cream cheese and Truvia in a stand mixer for a few minutes until fluffy. Then spoon in the Cool Whip Free and blend on low until well mixed. Set this aside.
Oh pumpkin, I shall miss you most of all.
 In a medium mixing bowl, dump the pumpkin spice, pumpkin puree, and both instant pudding packages. Then add in all of the milk--this will be very stiff (perhaps less so if you use the full cup of pumpkin), so mix until everything is incorporated:
And definitely looks of pumpkiny goodness.
 Now, get a glass 9x13 baking pan. I say glass because you want to be able to ooh and ahh at your lasagna layers. Hold on to your butts--it's time for a crappy photo montage!
To secure your graham crackers, put a thin layer of the cream cheese mixture on the bottom of your pan.

Then lay out your graham crackers. I fit 7 and 1/4 sheets on my bottom layer. I am nothing if not precise.

You stiff, delicious bastard.
 I wasn't kidding when I said the pumpkin mixture was stiff. I had to hold down my graham crackers while I initially spread the pumpkin mixture over them to keep them from flying around everywhere. You can try heating things up in the microwave to thin them out, but this didn't make a huge difference to me. Had I had a full cup of pumpkin puree leftover, this probably would've been way easier, but I couldn't justify opening a new can to only use a 1/4 cup and then get thrown away due to pumpkin season termination. You only want to use HALF of your pumpkin mixture at this point. Spread it as evenly as you can with a rubber spatula...perhaps a heated metal/angled spatula might make this process easier.
Thankfully, the cheesecake layer is much nicer.
On top of the pumpkin layer, add a layer of HALF of the cheesecake mixture. Smooth out as best as you can. I used a separate rubber spatula for this so I wouldn't have to wash my pumpkin spatula over and over because I am insanely lazy. I've been known to buy everything in twos because of this. Cost effective? Nope. Super efficient? Yep.
Not pictured: the break I needed to take from smoothing out pumpkin mixture to give my arm some rest.
 On top of the cheesecake layer, add the remaining graham crackers. Top the graham crackers with the rest of the pumpkin mix:
After this, you get to lick the spatula!
 And finish off your lasagna layers with the last of the cheesecake mixture:
After this, you get to lick the OTHER spatula!
 Laziness has its benefits. Two spatulas equals twice the taste testing. I sprinkled some additional pumpkin spice on top of my cheesecake layer because a) I like sprinkles and b) I have a pumpkin spice problem.
But it's a pretty way to finish off the lasagna. Think of it like the sprinkling of oregano on top of a regular lasagna. +1 for presentation!
Smooshed layers are still delicious!
 Cover your pumpkin cheesecake lasagna with foil and place in the fridge to set overnight. If you licked your spatulas clean, you already know what greatness will await you for Thanksgiving dessert. You may even want to start a new tradition where you eat dessert first and then pick at the bird. I'm not judging you--I think it's the best idea I've ever had. I say, make it the cheatiest of cheat days! Of course, you're not really cheating when dessert has fewer calories than your sweet potato casserole.
But it is still pretty orange either way.
 After you've let your dessert set overnight, keep it in the fridge until you're ready to serve. You don't want soupy cheesecake lasagna. I'm sure there's a lasagna soup recipe out there, but I can guarantee you it doesn't belong in the dessert category. Serve with a drizzle of caramel sauce, and if you love pecans, throw some of those on top, too! Dream big! It's the best eating day of the year.
Thank you for being you, Thanksgiving.
 When my husband has the rare opportunity to take a bite of a dessert before I do (hi, I'm a glutton and inhale my food) and his first reaction is that "yum" noise (you know the one), I know it's a great dessert. So imagine my surprise when this totally pumpkin concoction elicited said "yum" noise from my husband--whose feelings about pumpkin spice are just "meh." He loved it. I'm trying to come up with a new word for how I feel about this dessert because the word "love" simply doesn't suffice. I would eat the entire pan in one sitting if given the opportunity. Whatever the combination of love and obsession is, that's how I feel about this pumpkin cheesecake lasagna. Each layer really stands out--you get the smooth cheesecake mixing with that nice, thick layer of pumpkin spice pudding, and the graham crackers add a nice cinnamon zip. Not to mention the few times I have remembered to add caramel on top, it perfectly encapsulated the flavor that most of us associate with fall. While I'm incredibly sad pumpkin season has ended in this house, I'm ecstatic that fudge and peppermint season is almost upon us. I hope everyone has an amazing Thanksgiving. Take time to appreciate the Big Four F's: family, friends, food, and football. 'Til next time, my fellow eaters!
Less than 12 months until you're back in my life, pumpkin spice!

Tuesday, November 7, 2017

A Cookie Should Be Two Things: Simple and Tasty.

I haven't made cookies since I spent an entire day working on those bewitching swirl Halloween cookies on October 1. It took forever, and quite frankly, my brand of perfectionism is of the lazy variety. I won't have a tombstone one day, but if I did, it would read, "Worked Smarter, Not Harder." I won't be lacking in the tombstone department because I've found the secret to immortality; I just want to be cremated, thus bringing my work smarter, not harder mantra full circle. Anyway, spending ten hours baking cookies just isn't something I was interested in doing again anytime soon. And I'm not gonna lie, when I think hand-held desserts, I typically go immediately to cupcakes. Taking a full-scale cake and bringing it down to bite-sized deliciousness without the need for a fork? Yep...once more, working smarter. So I needed a dessert that was quick, worked with staple pantry items, and for the sake of my husband's sanity, didn't involve an ounce of pumpkin spice (don't worry, it'll be back in the next blog). Along came a cookie I thought I'd ground test for holiday baking season: the cranberry white chocolate chip cookie.
It's a perfect "After Food Coma" cookie for Thanksgiving or Christmas!
Don't worry, I kept burgeoning waistlines in mind. Because when you sit down to eat a cookie, this weird thing always happens where five minutes later you've suddenly realized you ate six cookies at once. The original recipe I found had insanely high calorie content...over 200 calories for one cookie. That's a hearty slice of delicious roasted bird and some! Naturally, when I want to make something happen, I find a way. I adapted the pants off of the original recipe using some tried and true (and super easy) calorie-cutting methods. Did I mention I like working smarter and not harder? I may have. In this case, I lowered the calorie content to 95 calories a cookie (more than halved the original amount!) so I wouldn't have to work harder with a Jillian Michael's boot camp. Never underestimate the power of a fit girl who wants dessert.
May or may not be buying my Craisins in bulk and adding them to literally everything this month.
Now, I know some people love fluffy, soft cookies and others love crunchy, flatter cookies. I'm Team Fluffy (there's definitely a missed joke opportunity in that), but I am going to divulge how to make these if you're Team Crunchy, too. Sorry, the only thing I like crunchy is my pizza crust, so you're never going to convert me. But in either case, you'll need:
  • 1/4 cup butter at room temp
  • 1/4 cup of unsweetened applesauce
  • 1/4 cup Truvia Baking Blend
  • 1/4 cup Truvia Brown Sugar Blend
  • 2 tsp vanilla
  • 1 egg
  • 2 TBS heavy cream (you can use skim milk to cut more calories, but I had heavy cream leftover I needed to use!)
  • 1 3/4 cup all-purpose flour
  • 1 1/2 tsp baking soda
  • A pinch of salt
  • 1 cup of white chocolate chips
  • 1 cup of 50% less sugar Craisins
  • Optional:
    •  I felt like a tsp or two of orange zest would've taken these cookies to the next level and complemented the cranberries so, so well. Definitely trying this next time!
    • If you hate white chocolate: replace with dark chocolate, semisweet chocolate, or cinnamon chips...all these flavors complement cranberry, so dealer's choice!
Now, if you're on Team Crunchy, preheat your oven to 350 and line a few baking sheets with Parchment paper lightly misted with cooking spray. My fellow Team Fluffy folks, don't preheat your oven yet. Regardless of your cookie texture preference, start by creaming the butter, both Truvias, and the applesauce for a few minutes in your stand mixer (use the paddle!). Scrape down the bowl before adding anything else. Things are going to look a lot like oatmeal when they're all mixed:
I promise you, it doesn't stay like this.
 Next, add in the egg, vanilla, and heavy cream/milk. Blend well, scraping down the bowl once mixed. Once well mixed, add in the flour, baking soda, and salt. Blend on low so as not to cause an explosion of flour all over your kitchen. Fun times.
I didn't lie--it looks like perfectly normal cookie dough now!
At this point, I definitely sampled the wares. I had yet to bake with the brown sugar Truvia, so I was sampling in the name of science. Things tasted perfectly normal to me, and I haven't grown a third arm or anything weird, so I say, use it.
Mmm, Craisins.
I won't lie--not the biggest fan of white chocolate. I really only like it in cookies. I once had a white chocolate macadamia nut cookie so good, it converted me into both a white chocolate chip and a macadamia nut lover. But my personal eating history aside, now you'll want to add in the cup of chips and the cup of dried cranberries. Blend on low. Your mixer will sound like it's either dying or trying to become sentient to kill you for making it mix so many chips. I may have watched Maximum Overdrive recently.
Resisted the urge to eat a dough ball.
Once mixed, grease a tablespoon or a cookie scoop. This recipe should yield you 32 little balls of cookie dough, so scoop away and place on the prepared baking trays. To make them look even more delicious, add a few chips and cranberries on top (baker's secret...I do this with all my chip-based cookies). Okay Team Crunchy: at this point, you will want to bake your cookies 8-12 at a time on your prepared baking tray at 350 for 10-11 minutes or until golden on the top rack of the oven. By not freezing your dough, it will flatten out a lot during baking, so leave plenty of space between cookies. Let your cookies cool on the sheet for 5 minutes before removing to a cooling rack. Team Fluffy: cover your cookies with plastic wrap and place in the freezer for 30-45 minutes.
Partially frozen little disks of Heaven. Like a CPK freezer pizza.
By freezing the dough, you're preventing the cookies from getting thin. Take your dough out of the freezer, and slightly flatten them from ball to disk like pictured above. You will cook your cookies at 350 for 9-10 minutes on the top rack of the oven (no burning bottoms this way! I have dark baking sheets). I under bake a tad to ensure my cookies are super soft in the middle once they've cooled. Am I worried about Salmonella, you ask? I live life dangerously. Well, danger adjacent. Sigh...this is probably the most dangerous thing I do these days. Bake your cookies 8-12 at a time; they won't expand too much, but do leave space between cookies. They'll be done when they're just barely turning golden.
My middle name is Cautious.
Let your cookies cool on the sheet for 5 minutes before removing to a cooling rack for your viewing pleasure.
Stackable! Portable! Edible!
Aren't they cute? They're also scrumptious. They are so sweet and so soft...pillowy even. I feel like they simply melt on my tongue when I eat them. They're packed with tart cranberries, smooth white chocolate chips, and they took no time at all to make--this is everything I'm looking for in a cookie. It's always wonderful when I can bake something that both looks and tastes amazing in the amount of time it takes me to watch one baking show on Food Network. Yeah, I'm one of those people. I'm addicted to baking shows. But luckily for you guys, I'm not so full of myself that I started naming things in French or using super complex terminology. I mean, I admit I still eat cookie dough out of the bowl. If that's not relatable, I don't know what is. Just make the cookies and tell me you don't eat half the dough along the way. If you can hold out though, the end results are positively perfect for your next holiday bake off. 'Til next time, my fellow eaters!
Yep, still using Halloween napkins. Bring it on, Christmas!

Thursday, November 2, 2017

Your Next Thanksgiving Dessert has Arrived!

Sigh...my favorite month of the year has come to a close, and I'm back to my usual ho-hum self. Well, slightly ho-hum because I do still have all my Halloween decorations up to fill me with dark and spooky glee (cue evil laughter). I'd like to become the anti-Hobby Lobby and keep them up for months on end, really. I'm willing to bet Hobby Lobby doesn't even wait until November 1 to start decking the halls in store anymore. It's like there's not a single holiday in between Halloween and Christmas. You know, except Dia de los Muertos, Veteran's Day, and that pesky little thing called Thanksgiving that no one ever celebrates. But speaking of Turkey Day and reasons to be thankful--we're two days in to November, and you know what that means? PUMPKIN EVERYTHING! Well, some of us basic white girls have been adding our drug of choice, pumpkin spice, to anything we can get our hands on since September (Hi, I'm Kate, and I have a pumpkin spice problem). But now that it's November, it's a socially acceptable addiction. I defy you to find someone who doesn't partake in some form of pumpkin goodness this month. In fact, I'm here to shake things up with a non-pie-related dessert that's perfect for the Thanksgiving dessert table: pumpkin angel food cake with cinnamon chip glaze.
Also, it is kind to your turkey and stuffing rations by being low cal!
Look, I'm pretty sure even men will eventually start donning yoga pants on Thanksgiving as a means to allow optimum eating and comfort levels. I wanted to try a pumpkin angel food cake on for size (see what I did there) because angel food cake is so nice and light. After eating ham, sweet potatoes, and enough stuffing for two turkeys, I sometimes completely skip dessert on Thanksgiving because pies are so heavy. Also, I absolutely hate pumpkin pie. I know, I'm a walking contradiction, but even though it is full of pumpkin, it just has a gross texture to me. But since D and I are riding out Thanksgiving solo, I'm thinking of focusing more on dessert and less on the bird. I make fantastic life choices. In all seriousness, this makes 12 slices of cake at only 230 calories a slice--even just looking at a dish of Thanksgiving eats is even more calories than that.
Another blog, another time I forgot to picture the vanilla extract.
This recipe is also insanely simple. Mix it and forget about it simple. The hardest part is getting your angel food cake out of your bundt pan because you don't have anymore kitchen space for an actual angel food cake pan. If you do have an angel food cake pan, you're in even better shape than I am. Gather up:
  • 1 box of angel food cake plus the water it calls for on the back of the box
  • 2 tsp pumpkin pie spice
  • 1 tsp vanilla extract
  • 1 cup of canned pumpkin
Start by preheating your oven to 350 and placing a rack on the lowest level of your oven. If you have a bundt pan, fold a paper towel into quarters and spray it with cooking spray. Rub the inside of the pan with this a few times until things are slightly greasy, but no so greasy that the angel food cake won't be able to "climb" the sides of the pan while baking. In a stand mixer, mix the water, angel food cake mix, pumpkin spice, and vanilla extract for about 90 seconds. Once mixed, slowly fold in the cup of pumpkin with a rubber spatula by hand.
10 of 10 could, would, and did taste test batter.
Pour into your angel food cake or bundt pan. Place into the oven on the lowest rack and bake for 35-45 minutes. A toothpick should come out clean, and your cake should have a gorgeous tan. Seriously:
Not even of my best of days have I ever been able to achieve this color.
Once your cake is finished baking, place on a rack while still in the pan to cool for an hour. Come back in with a long angled spatula or long butter knife and gently loosen the cake from the sides and the middle of your pan. Place a plate on top of your pan and invert your pan so the plate is back on the bottom where it should be. Gently tap until you feel the cake release from the pan. I had to come in three or four times with my angled spatula until the cake was completely loose. Place this in the freezer for at least 30 minutes so the cake is not only cooled, but chilled, for your glaze.
Queen of Sprinkles!
I had every intention of making my glaze an actual ganache, but I didn't have time to let it set long enough before risking forgetting about it completely while we tended to trick-or-treaters since I made this on Halloween night. I knew I was going to need cake to cope with my post-Halloween sadness. To make the glaze or the ganache you need:
  • 1/2 cup of cinnamon baking chips
  • 4-6 TBS of heavy cream
  • Optional but potentially necessary due to the season: Wilton leaf and acorn sprinkle mix
If you want a thin glaze, use all 6 tablespoons of heavy cream. If you want a thicker ganache, use 4 or 5 tablespoons of heavy cream. Bring your heavy cream to a boil over medium-high heat in a small sauce pan. Simultaneously, melt your cinnamon chips in a bowl in the microwave. Nuke for 30 seconds at a time on 50% power. Once the chips are melted and the cream is boiling, slowly pour in a third of the heavy cream into the bowl with the melted chips. Stir away; things will get a little thick and weird, and then it's time to add in another third of the heavy cream. Stir again until things get smooth, then stir in the last of the cream. Remove your cake from the freezer at this point. If you're going for a ganache, let it rest and thicken up for a few minutes before you pour it on the cake. If you want a glaze, pour it on top of the cake while it is still thin in consistency.
Thin, but soooo full of flavory goodnees.
I seriously can't get over these sprinkles. Sprinkles for every season!
 I own a massive amount of decorative sprinkles, from skulls for Halloween, shamrocks for St. Patty's, peppermint chips for Christmas, bubble pearls for New Year's, and practically every color of the rainbow. This is potentially why I don't have room for an angel food cake pan. Worth it. Especially with the addition of these fall sprinkles. Thanks, Amazon!
And thank you, cinnamon glaze.
I have a new favorite dessert as I am completely addicted to this cake. It is so light and airy, but it packs a nice, smooth pumpkin flavor without it being overwhelmingly pumpkin-spicy. And the cinnamon chip glaze...Dear Lord. This is practically a transcendental dessert experience if there ever was one, and minus the frantic hoping and bargaining with the baking gods that my cake would come out of the pan, probably the easiest thing I've baked in over a month. This perfects the problem I have with pumpkin pie. The texture here is perfect, and the flavors all balance out so well. If anything could take on the Thanksgiving dessert table and win, it is definitely this cake. Don't believe me? You're just going to have to bake it yourself to find out. Because I am soooo not sharing any of mine. Except with my husband since I am trying recipe by recipe to turn him into a pumpkin addict, too. 'Til next time, my fellow eaters!
I wish we still had this much cake left.