Monday, March 12, 2018

A Cake Fit for a Viking

Fathers teach their daughters many important lessons in life: how to change a flat tire, why you should never date a musician, and the importance of rooting for your sports team, among many, many other things. As someone who comes from a long line of Vikings fans that bleed purple and gold, by proxy, I also learned how to cope with loss, sadness, anger, and bargaining thanks to the birthright passed down to me by my father. While being a Minnesota Vikings fan has its ups and mostly crushing downs, more than anything, we appreciate being a part of an extremely fervent fan base. Since my dad and stepmom were coming down for a visit just a week shy of his birthday, I knew exactly what I needed to do: bake a birthday cake fit for a Viking. And thus, this extremely purple and yellow beauty was born...
Skol, baby!

It had been a while since I made a buttercream transfer (like almost two years), so I am pretty proud of how this cake turned out. Most importantly, my dad positively loved it, and while he usually grins when encountered with any kind of cake (it runs in the family), the look of sheer joy when he saw this was merit enough. I had to work ahead of time, so I also mastered the art of freezing and preserving cake rounds, buttercream transfers, and frosting--tips and tricks I shall gladly share with you on this blogging adventure today. I also tried a brand new sugar substitute in my frosting: Swerve. This powdered sugar replacement cut one slice of cake down from well over 650 calories to a mere 373 calories (14 servings total). I added most of a bottle of Disaronno to the cake and frosting, so this accounts for the majority of the calories. I'm obsessed with yellow amaretto cake and matching buttercream frosting. I'd apologize, but I'm not even remotely sorry.
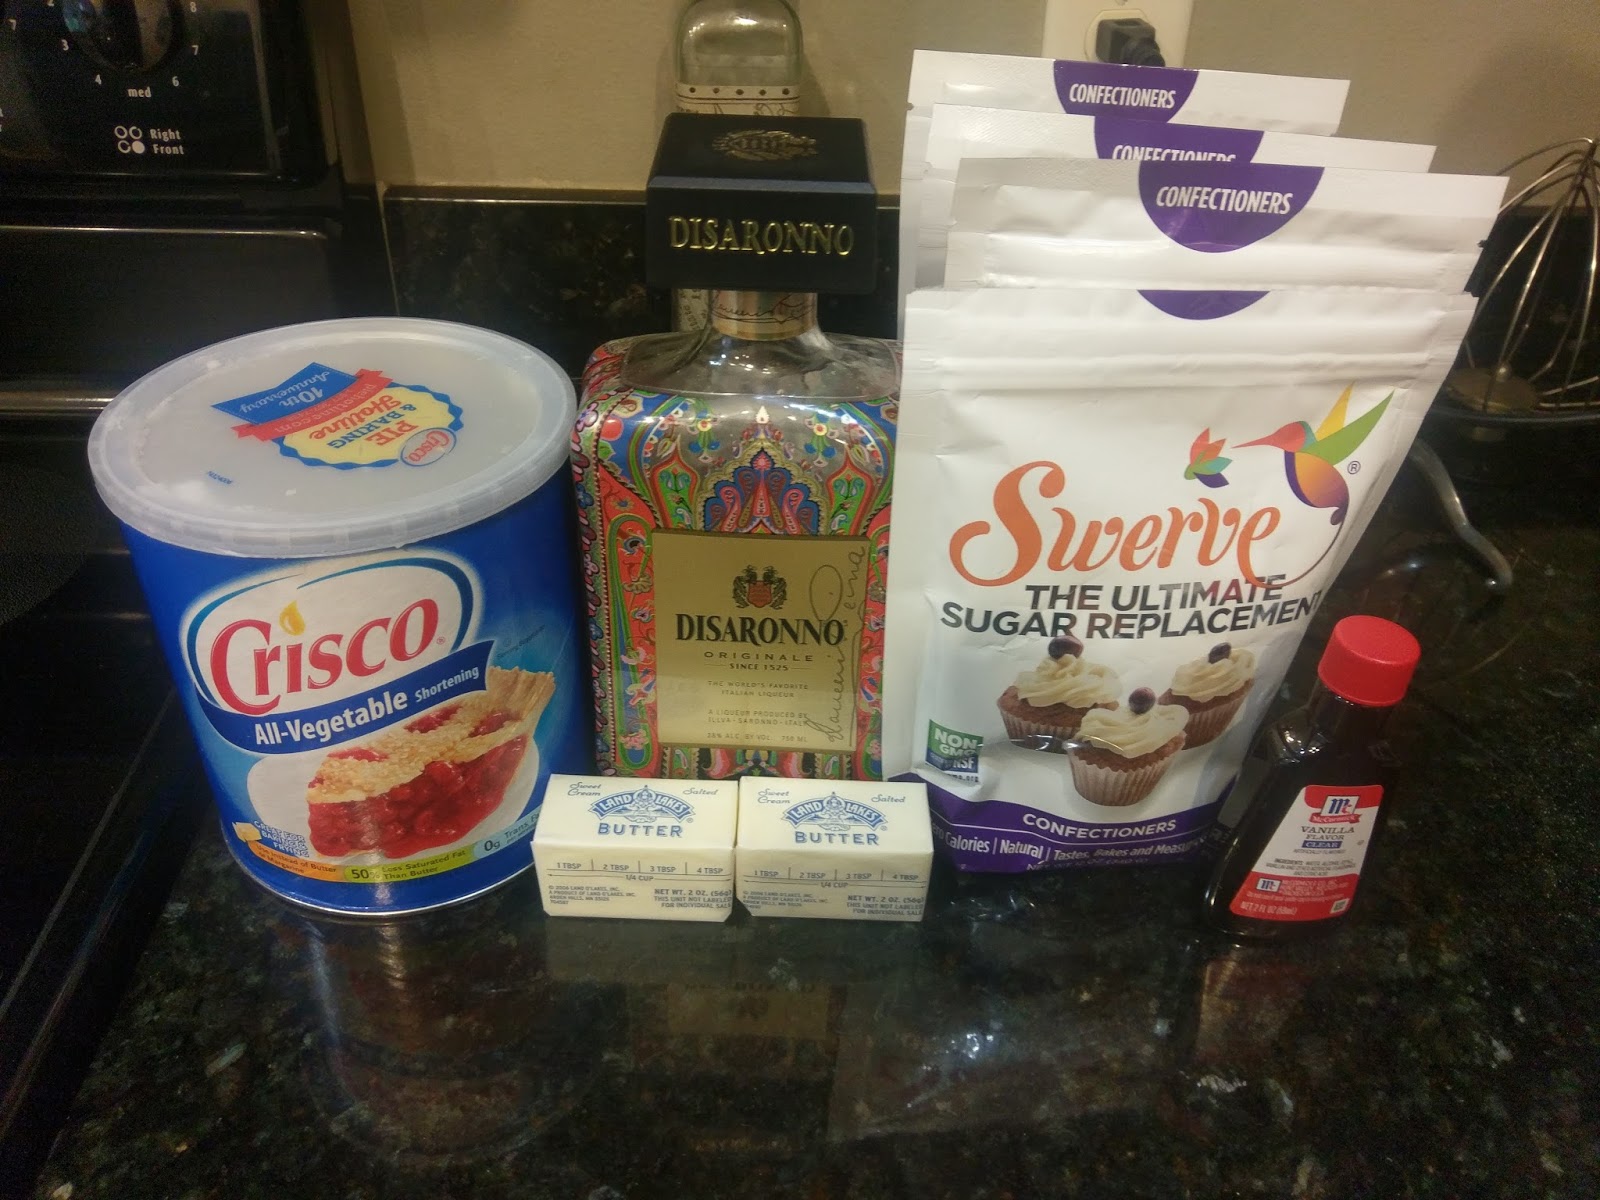
Pictured: the holiday bottle of Disaronno from 2016 that finally met its end.
I did my usual method of hijacking a box cake mix to make it decadent and bakery-level yummy (we all agreed I could've lied and claimed this was made from scratch because it was so decadent, but I'm a notoriously terrible liar...I'm lazy and lying requires way too much effort and energy). To make the cake alone, you need:
  • Yellow cake mix
  • Eggs called for on the back of the box plus one additional egg
  • Substitute the oil for butter, double the amount, and melt it
  • 1/2 cup of milk
  • 1/2 cup of Disaronno
The recipe called for 1 cup of water, so I used half milk and half Disaronno to substitute and yield a denser, moister cake. I preheated my oven according to package directions and prepared two 8-inch rounds with Parchment paper, cooking spray, and bake-even strips.
They're even purple.
I've been using these for a few cakes now, and I absolutely love them. They really do help even out the cake batter. I hardly had to level these cakes because of the bake-even strips. I soak them in cold water for 10 minutes, wring them out a bit, then fit them to my pans. I pour my batter in, bake my cakes in the middle rack of the oven for 30 minutes, and bam, golden, even bake.
Thank you, Wilton.
 Once finished baking, let your cakes rest in the pan on a cooling rack for 10 minutes. Then gently remove from the pan and allow plenty of time to COMPLETELY cool on the cooling rack. Like to room temp or below. I then leveled my cakes to ensure they'd fit together perfectly since this was going to be a naked cake, and frosting couldn't hide much of anything (as a woman who 1. Appreciates a good cover-up, and 2. Is incredibly clumsy, this technique is still slightly terrifying in concept). I wrapped each round separately in three layers of plastic wrap and placed each round into a Ziplock freezer bag. These lived in the freezer for five days before we ate them, and no one even knew. Until now, I guess. Still completely soft and melt-in-your-mouth amazing. I will definitely use this technique to freeze cakes again.
This Crisco is also probably from 2016.
To make a buttercream transfer you can smooth out, you need a lot of Crisco. Crisco is positively terrible for you, but damned if it doesn't make a pretty crusting buttercream. I ended up making WAY more frosting than I needed by like twenty ounces, but if you wanted to crumb coat a cake and frost it completely, this would've been the perfect amount. For a naked cake with a small buttercream transfer, I could've cut it down by half. I used:
  • 1 stick of room temp butter
  • 1 1/2 cups of Crisco
  • 3 12-once bags of Swerve powdered sugar
  • 1 tablespoon of CLEAR vanilla extract
  • 5-6 tablespoons of Disaronno
Blend together the Crisco and butter until soft and fluffy. Add in one bag of Swerve, the vanilla, and a tablespoon of Disaronno. Blend on low until mostly mixed. Add in another bag of Swerve, three tablespoons of Disaronno, and blend until mixed. Add the final bag of Swerve and remaining two tablespoons of Disaronno. The frosting will be very thick, so feel free to add in more Disaronno if you want an easier to pipe frosting and/or just really love Disaronno (definitely both). I split up my frosting, dying one large bowl purple, a tiny glob black, and split the remaining frosting, dying one bowl yellow and leaving the final bowl white. Then I gathered up Wilton 2, 3, 5, and 12 round tips fitted to piping bags with couplers to easily change out tips as needed. I outline a very detailed step-by-step with buttercream transfers, setting up images on Parchment paper, tips, tricks, and more here, so excuse me while I cruise through these instructions without reinventing the buttercream transfer wheel extensively.
After affixing my stenciled image onto a clear cutting board with some tape, I used my black frosting with a #5 tip to outline my viking horn. I used a small paintbrush as needed to smoosh down the frosting and ensure everything was connected, there were no gaps in the frosting, etc. I froze this for one hour, which was not long enough. It budged around on me a bit in the following steps, so in hindsight, should've frozen it for several hours.
I came in with my yellow frosting coupled with a #2 tip to fill in the very narrow yellow band. I used a #12 tip to fill in the white, switching to a #3 tip in the smaller grooves. Once again, I used a paintbrush to push the frosting down and rid and areas of gaps. In doing so, my black frosting moved a bit, so definitely take your time to freeze between colors.
Then I took a #12 tip on a bag of purple frosting and slowly traced my circle outline and around the viking horn, coming back in with a paintbrush to smooth any gaps.

After each round of frosting, I held my transfer up to the light. Any areas that appeared thin or I could see through directly needed help with more frosting and the paintbrush to smooth it in.
I finished my purple border, and carefully smoothed as much as I could to even the layer out before freezing this for three hours.
Then I came in for the final touch and covered the horn with a thin layer of purple frosting so that my transfer would sit evenly on my cake and not sink in anywhere. I froze this for 5 days with it double-bagged in Ziplock freezer bags. I removed the tips from all of my frosting bags and placed them into a large Ziplock and into the fridge. My leftover purple frosting fit into a Tupperware and also lived in the fridge.

But not before admiring my handy work, of course.
Fast forward five days...
 I successfully managed to unwrap all three layers of cling wrap from each cake round without (entirely) losing my mind! I removed all my frosting from the fridge that morning to make my cake that afternoon. I prepared an 8-inch cake round with a small glob of purple frosting in the middle, and flipped one cake round upside down and placed it centered on top of this frosting glob so it wouldn't budge. I filled a piping bag with purple frosting and a 1A tip and created a border around the outside edge of my cake. I came back and swirled in frosting in the middle, and used a hot angled spatula (I just ran it under hot water and wiped it dry) to smooth out the frosting layer without applying too much pressure or causing the frosting to spill over the edge/border I had created.
Like a giant Vikings Oreo.
 I took my second round and placed it (also upside down) gently on top of my frosting layer without applying too much pressure. I used my angled spatula to create a crisp, smooth line of frosting in the middle by placing it horizontally on the frosting line and spinning my cake table around without moving the spatula at all.
Super clean lines for the win!
I refilled my #1A bag with purple frosting and repeated for the top layer so my buttercream transfer had something to adhere to. Speaking of, I nabbed my transfer out of the freezer at this point, and centered it on top of my cake before removing the Parchment paper. Things will look very rough and bumpy at this point. For once in your life, this is actually normal. Let your transfer sit out for 15 minutes before coming back in and smoothing out with the Viva paper towel trick. This is like giving your cake a 20-year age rewind (if only this worked on people, too). 
But I'll take that it works for cakes amazingly.
Could be frosting, could be a bag of my blood. A true Viking fan never tells.
I wanted a border to finalize things after smoothing my transfer out, so I fitted a large piping bag with a #1M tip and placed my remaining yellow bag of frosting and purple bag of frosting in it together. I piped out a bit of frosting on a paper towel until both purple and yellow came out at the same time.
I then piped simple stars around the edge of the cake.
Which was fun, festive, and left me with a ton of frosting. May have piped some out of the bag and into my mouth, but again, a Viking fan never tells.
I kept my cake in a cake safe at room temp. The cake itself tasted flippin' amazing, because yellow amaretto cake is still my jam. Now, let's discuss the Swerve frosting. Swerve does this weird thing after you take a bite when things taste perfectly sweet and just right...then along comes this cooling sensation (think: biting into a York Peppermint Patty). It didn't really bother anyone, and we certainly ate the hell out of this cake, but I did think it bore mentioning. I guess because what Swerve derives its sweetness from has this property when it is not dissolved in liquid or heated up that causes a cooling sensation on your taste buds. I think this would go perfectly with a chocolate cake with peppermint or mint frosting, to be honest. However, the cooling covered up the Disaronno flavor in my frosting too much, so that was disappointing. But I was also able to eat a boatload of cake because of how much it lowered the calories, so I'd say all is fair in love and baking and eating said baked goods. I definitely will use Swerve again, but I will cut it in a ratio with regular powdered sugar. Using it in an actual cake or pie where it will get dissolved in liquid will negate that effect anyway, so really this would just be for frosting purposes. Bottom line: Swerve is delightfully strange and a great replacement for regular powdered sugar in small amounts. Other bottom line: my dad loved his cake, and we had an amazing weekend showing them around Floribama. I mean Northwest Florida. It really is the same thing though.
Pictured: my dad about to apply the family principle of licking things to claim them as your own. My sister's favorite method.
As with all family trips, it went by too quickly, and so did the cake. Only two slices remain, and they both look equally terrified their existence will end each time I walk into the kitchen. They're not wrong. But I was incredibly happy to be able to provide my dad with a birthday cake that was next-level Viking decorated. Perhaps one of the greatest lessons I've ever learned from my father was that actions definitely speak louder than words, and being able to give him this cake was one of the best ways I could think of to say "thank you."..for everything. 'Til next time, my fellow eaters. And, SKOL!
Yes, I even have yellow candles. The fandom is strong. And pretty. Could you imagine how ugly a Packers cake must look? ;-)

Sunday, January 28, 2018

Pineapple Belongs on Everything

I happen to be a lover of all things pineapple. I am not a pizza purist who has no time for a slice of Hawaiian pizza. In fact, it's one of my favorites, and I refuse to let anyone judge me for trying to put fruit on pizza (side note--dessert fruit pizzas are amazing, and I need to make one soon). Even though I adore the tangy sweetness of pineapple, before last weekend, I had never made a pineapple upside down cake. I don't even think I had eaten a slice of one in at least fifteen years. Back then, my taste buds cared less about pineapple and more about McDonald's and Coke Icee's. Well, they still do, but thankfully, they've also branched out and make me try daring things on occasion. Not that I'd consider pineapple daring, but you're talking to a woman who didn't eat avocados until two years ago. I'm maturing, y'all.
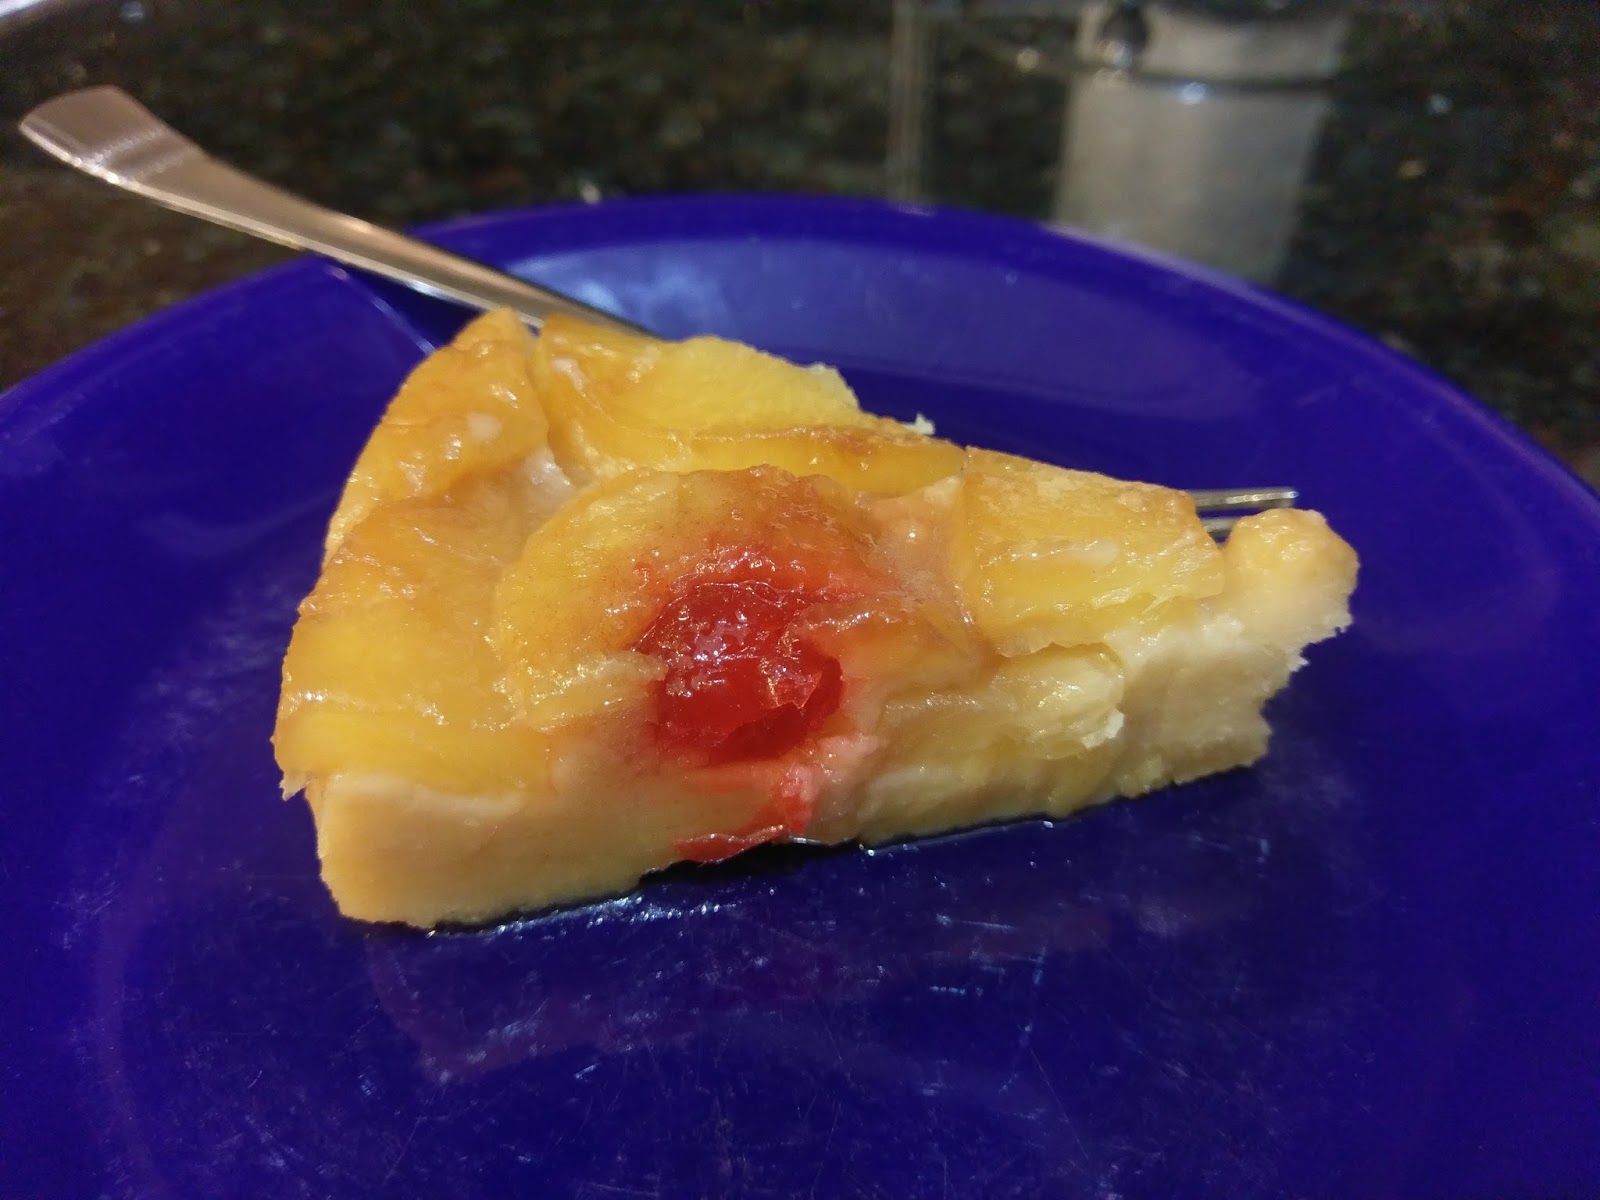
And it tastes way more delicious than I ever figured it would.
Best part about that ooey-gooey, pineapple-y goodness pictured above? I adapted it from a Truvia recipe--so eating it is a transcendentally guilt-free, delicious moment. At a mere 214 calories a slice (8 slices total), you can even add what some might call a "ridiculous" amount of Cool Whip Free on top just to take it that extra mile for few extra calories. I had it with or without, and while I preferred my slice with Cool Whip Free (I have an obsession), this was a damn good cake either way. Something magical happens when butter and brown sugar come together in an oven to form glazed goodness, and I love any recipe that tastes best fresh out of the oven with zero wait time from pan to plate to mouth.
Truvia should just sponsor my blog at this point.
I promise you that this is in no way difficult to make from scratch. I think this maybe took all of ten minutes to throw together, but last weekend was a blur of sadness thanks to my ever-waffling, normally soul-crushing Minnesota Vikings. I will say this cake and the support of my Eagle's-loving husband (seriously, he didn't gloat once) somehow managed to pull me out of the depressing abyss that comes with our annual playoff shortcomings. Crushed hopes and dreams aside, a day in sweats and a slice of pineapple upside down cake had me just right again (with my usual dash of sass and sarcasm). To make, gather:
  • 3 TBS butter
  • 1/3 cup Truvia Brown Sugar Blend
  • 7 fresh pineapple slices, drained
  • 7 maraschino cherries, drained, without stems
  • 1/3 cup unsweetened applesauce (or you can use oil, but this will up the calorie content a lot)
  • 1/2 cup Truvia Baking Blend
  • 1/2 tsp salt
  • 3/4 cup skim milk
  • 1 tsp vanilla extract
  • 1 egg
  • 2 tsp baking powder
  • 1 1/3 cups flour
    Optional: Cool Whip Free for topping
Start by preheating your oven to 350 and placing the 3 TBS butter into an 8" pan. Throw this into the oven so the butter gets nice and melty, like it's on a fresh stack of pancakes. Mmm, pancakes. I bet pancakes with pineapple would be amazing. Sorry, I'm easily distracted by the endless taste possibilities pineapple can provide.
Mmmm buttery brown sugar.
While your butter is melting, drain and set aside 7 slices of pineapple, 7 cherries without stems, and then dump the applesauce, Truvia Baking Blend, milk, vanilla, and egg into a stand mixer bowl. Give a blend on low for about 30 seconds, then dump in the flour, salt, and baking powder in and blend for 2 minutes on medium-high. While this is blending, pull your pan out of the oven and swirl the butter around so it evenly coats the bottom of the entire pan. Then take the Truvia Brown Sugar Blend and sprinkle on top of the butter. I used a rubber spatula to press the sugar down and ensure it mixed with the butter.
Who lives in a pineapple under a cake? Not Spongebob Squarepants, that's for sure.
Your pan will still be hot at this point, so carefully lay out the 7 slices of pineapple. There will be some overlap, but they shrink as they bake, so it'll look fine, I promise. Place a cherry on top (which is actually the bottom--mind, blown) of each pineapple slice's center.
Oh yes, look at that naughty butter, seeping all over the place and breaking the rules in the tastiest way possible.
Gently pour your cake batter on top of the pineapple and cherries, and bake on the middle rack of your oven at 350 for 35 minutes. A toothpick should come out cleanly from the cake when fully cooked.
I literally have the perfect plates for upside down cake.
The moment you remove your cake from the oven, place a large plate on top of your cake pan. Carefully (definitely wear oven mitts or pay the price) invert plate and pan so plate is on the bottom and pan is on the top. Let the cake set in the pan as the buttery glaze distributes itself evenly over the top of the cake. Thankfully, this is a short period of time, perhaps 5 minutes in total.
Worth it. Look at that distribution, baby.
You should be able to slowly but very easily remove the pan from the cake without fear of ruining your cake. Butter is a magical thing, people. Pineapple upside down cake is amazing straight from the oven, and you can definitely slice into this and serve it while warm--in fact, I recommend it.
But don't forget the Cool Whip Free.
In my haste/football shame spiral, I didn't serve our first round of pineapple upside down cake with any, but it was still definitely yummy enough to give me a reason to go on and keep living despite the game results. Behold, the power of cake.
But you better believe I didn't forget it any other time.
I kept this cake in a cake safe in the fridge, reheating our slices for about 30 seconds a pop before topping with Cool Whip. It is a nice and dense cake layer bottom with the perfect amount of sweetness; not too overwhelming since the pineapples and cherries do a nice job of providing plenty of sweetness on their own. The additional sweetness from the Cool Whip Free was the perfect finishing touch. Speaking of finishes, we inhaled this cake, and I miss it terribly. I can relate to a cake that isn't right side up because when you're as clumsy as I am, upside down is a natural resting state. It's nice to know when you've got two left feet and raging seasonal football depression that pineapple has the power to make everything seem right in the world. Now tell me again why people don't like it on pizza? Because unless you're a Patriots fan, I can guarantee on any given Sunday, you're gonna need something to cheer you up. 'Til next time, my fellow eaters!
I mean, I might have to make another one of these just to survive watching the Super Bowl take place in our home stadium without us. The commercials this year better be frickin' hilarious.

Monday, January 22, 2018

Boozy Baking Supernova

Baking with booze is not for the faint of heart. Luckily, my heart is tiny and afraid of very few things (looking at you, spiders and wrinkles), so it is something I do with frequency. I've got my go-to's: the Guinness chocolate anything, Baileys buttercream frosting, margarita cupcakes, etc., but recently, my motto has been Disaronno or bust when it comes to baking (and drinking). When I volunteered my services as the boozy baker for a big event at work, I knew I had to try a recipe that was lingering in the back of my mind. It was either going to be out-of-this-world amazing or quite possibly the worst thing ever to happen to cupcakes in the history of time and space. I live my life based on the extremes, and if you haven't picked up on it, themed desserts. I work for a science museum, so I figured it was only appropriate to have a galaxy/space decorating motif with these cupcakes. Sometimes it's better to think inside the box than out of it, I suppose. Safe theme, daring flavor: the galaxy swirl cupcakes in Baileys chocolate flavor, and, drum roll please: Disaronno yellow flavor.
Literally the greatest flavor in the cosmos.

In space, no one can hear you scream. Or eat. While there still may be calories in space, I'm pretty sure that zero gravity business and relaxed-fit space suit would help hide a cupcake addiction. That being said, let's get to the bad news: these are in no way shape or form low cal. But dear sweet baby space Jesus are they delicious. Each recipe makes 24 cupcakes. The Baileys chocolate cupcake (no frosting) is 165 calories. About two tablespoons of Baileys buttercream is 150 calories. This totals 315 calories per cupcake (yet you won't care when you're eating it, I can promise that). The Disaronno yellow cupcake is 145 calories sans frosting. About two tablespoons of Disaronno buttercream is 140 calories. Together, this totals 285 calories per cake. Not only are they even better tasting than the Baileys cupcakes, they're much kinder in the calorie department. I know a chocolate buttercream with amaretto is fantastic, but just a plain amaretto buttercream is positively divine--and the cupcake itself is my new favorite thing in the entire solar system (sorry, Pluto, you've been ousted once more). Added bonus? You can make them from a box mix...
Corner Cutting Champion of 2018.
I wanted to make this easy on myself ...it had been a long time since I'd baked in mass quantity, so to make the chocolate Baileys flavor:
  • 1 box of chocolate cake mix
  • The amount of eggs the box mix called for PLUS an additional egg for richer flavor (4 total)
  • Nixed the oil and instead used melted butter, with the amount of butter doubled for a silkier batter (it called for 1/2 cup of oil, so I used 1 cup of melted butter).
  • Nixed the 1 cup of water it called for and instead used:
    • 1/2 cup of Baileys
    • 1/2 cup of milk
  • Dump all ingredients together and blend on medium-high for two minutes. Line your cupcake tins with liners and bake according to package directions.
  • After letting your cupcakes cool in the tin for 5 minutes, remove to a cooling rack to COMPLETELY cool before frosting.
For the Disaronno flavor:
  • 1 box yellow cake mix
  • Followed my cake jacking method and added an extra egg, subbed melted butter for oil and doubled the amount, and nixed the water, instead using half milk and half Disaronno to total the amount of water the box mix required (I think it was like 1 1/4 cup. I can't remember specifically, so I can't give you an exact amount. Just use half booze and half milk for whatever your box mix requires as a water replacement to really make the flavor shine).
  • Dump all ingredients together and blend on high for two minutes. Line your cupcake tins with liners and bake according to package directions.
  • After letting your cupcakes cool in the tin for 5 minutes, remove to a cooling rack to COMPLETELY cool before frosting.
Cake jacking a box mix is super easy, and it does result in an insanely rich, flavorful cupcake. Using alcohol to bake with also brings out some great flavor, so you really can't tell these are from a box, and that is all that matters when you're insane and want to bake almost fifty cupcakes in one day while also writing a grant because you're Type A or bust. I think we all just figured out why I eat my feelings. Stress goes great with sugar. And butter.
So. much. butter.
I used my old Baileys buttercream frosting recipe, but I wish I would've used all butter instead of half butter and half Crisco. I find Crisco can sometimes leave a weird after taste when mixed with gel dyes. So instead of linking to my old recipe, here's the full buttercream version of my Baileys buttercream (live and learn and eat the frosting):
  • 1 1/2 cups of butter at room temp
  • 1 tablespoon of vanilla extract
  • 5 cups of powdered sugar
  • 5 tablespoons of Baileys
Now, Future Kate will thank me the next time she wants to use this recipe. I used full butter in the Disaronno frosting and it was leaps and bounds better in taste and a bajillion times easier to pipe with. By the time I finished piping the Baileys cupcakes, I may have acquired early onset arthritis. I may never be able to play video games again. The horror. Before I go into mixing and piping, let's get to that amaretto buttercream. I still have some leftover in my freezer in the event of an emergency. My definition of emergency ranges from, "House is on fire to remembered something awkward I did 15 years ago," so I'm banking on busting into that bag sometime within the next 72 hours because my backlog of embarrassing moments is rather impressive. For the best frosting you'll ever eat in your life, get:
  • 1 1/2 cups of butter at room temp
  • 1 tablespoon of vanilla extract
  • 5 cups of powdered sugar
  • 5 tablespoons of Disaronno
For either frosting, start by creaming the butter for 2 minutes until fluffy. Then add in the vanilla extract, two cups of powdered sugar, and two tablespoons of booze. Blend on low until the mixture is sticky, then blend on medium-high until things mostly come together. Turn off the mixer, add in the remaining three cups of powdered sugar and three tablespoons of booze. Blend on low, then turn to high and fully incorporate everything.
Fun with frosting!
 Ever since I baked Derek's galaxy swirl mirror birthday cake  last June, I have not been able to get over how gorgeous all those colors looked together, and I've been dying for a reason to visit space (theme) again. Space...so hot right now. Zoolander references aside, galaxy swirl is still all the rage, so I'm happy to add my two cents on getting the style to your liking. I'm also available to provide my two cents on why 90s music is still the best, what things ketchup should and should not go on, and the merits of using your blinker. Book me for your next speaking engagement!
But beware, I have the mouth of a well-educated sailor.
For my galaxy swirl cupcakes, I used Americolor's electric blue and royal blue, and Wilton's violet dye. I put equal amounts of frosting into three separate bowls, and then used the following combination in one bowl: 6 drops of electric blue plus 2-3 drops of royal blue and mixed well to achieve a bright blue hue. In another bowl, I mixed 6 drops of royal blue and 2-3 drops of violet to achieve a deep navy (photos don't do it justice) and mixed well. Finally, I used 6 drops of violet and 2-3 drops of royal blue for what I call "Vikings purple" (but don't worry, it won't choke when you need it to work most). I got out three piping bags, and I added half of the electric blue to one bag, half of the navy blue to another bag, and half of the purple to a final bag. I snipped the tip off of each of these three bags and then fit a HUGE (see that trash bag on the right above) piping bag with a 1M tip and gently loaded each bag of frosting inside as evenly as I could:
My veins are bulging because this weighed more than a small dog.
You'll want to pipe out a bit of frosting until all three colors are coming out at once. Then, design however you'd like. I did a traditional swirl on half and a star mound on the other half (these are easy, start in the middle of the cupcake and just pipe a mound of frosting until it's nice and poofy). To swirl, start on the outside edge of the cupcake and pipe in a circular motion, slowly working your way to the inside of the cupcake, overlapping as needed, until you get to the middle. Pipe a small start in the center and pull away the tip:
Space! A tasty frontier!
Oh yes, don't forget the sprinkles (or it really will be a tragedy because space is sparkly whether you like it or not):
Its like Wilton knows...
Wilton has adorable gold or silver stars and edible flakes in a million colors, so find colors that compliment whatever dyes you chose for your galaxy swirl. I pipe about 4 cupcakes, stop, and add sprinkles while the frosting is still "wet" and not set.
My kitchen was so colorful!
These really were so, so pretty. I did the same style for the Disaronno cupcakes as well, mounds on half, swirls on the other:
Shinnnnyyyyy.
The mounds were super adorable, but the swirls did a better job of mixing the colors together to form a gorgeous space-themed treat. While I definitely had one of each, I'm still drooling over how good those Disaronno yellow cupcakes were, and this event was last Thursday. The amaretto and yellow cake flavors together are absolute bliss. Not to knock the Baileys chocolate cupcakes, a traditional flavor pairing, but these Disaronno cupcakes had a bold, sweet flavor, and it will definitely be a repeat recipe for years to come in my boozy baking adventures. You still can't go wrong with how rich Baileys makes any chocolate recipe, so if you're ever in the market to make a borderline ridiculous amount of cupcakes, try both! People will happily sample one of each, especially if you've done the galaxy swirl frosting--just tell them its for market research and space exploration. I've searched the universe for some of the best desserts, and these will not disappoint. 'Til next time, my fellow eaters!
You'll fall into a black hole of flavor. Okay, I promise...no more space puns. This isn't Space Balls: the Blog. Yet.

Monday, January 8, 2018

Brownies Are Not Made for Resolutions...

I made it to 31! Another year closer to getting to yell at kids to get off my lawn without anyone thinking anything out of the ordinary (I get terrible looks when I do it now, so come on late sixties!). Since 31 isn't really anything spectacular and my week was insanely busy, I didn't make a big fuss about my birthday cake this year like I usually do. I just made a simple chocolate cake with my Salted Bailey's buttercream frosting and tested out some Russian piping tips I got for Christmas (photo at end of blog, but really, nothing special). So why are we here, you ask? Because the week prior, I made sure all of my friends got in as many calories as possible before New Year's resolutions began. I made a giant pan of Buckeye brownies to bring to a friend's house. She's from Ohio, so she's definitely "in the know" when it comes to all things Buckeye--football, trees, candy, you name it. So she and her peanut butter and chocolate loving husband were big fans. As someone who spent a lot of time visiting and living in Michigan, it was a little painful to have to admit something to do with Buckeyes was positively amazing. With chocolate, anything is possible.
Worth every calorie.
Honestly, these are terrible for you. HOWEVER, they are also extremely rich and decadent, so you could get away with slicing these even smaller than I did. I made a 9x13 pan and cut them into 36 brownies for 320 calories a brownie. I ended up cutting a piece in half when I ate it because they were so rich and positively the perfect amalgamation of peanut butter and chocolate (so naturally, I had seconds). You could easily cut these into 48 squares to get them under 250 calories a serving. While they may not be New Year's resolution friendly, if you ever have a terrible week and need to eat your feelings, might I recommend this recipe. I'd let someone punch me in the face if it meant I could have one of these right after--they're really that good and great at lifting one's spirit. Behold, the magic of PB&C. Those crazy Ohioans are really onto something with Buckeyes (but only in the realm of food. Not football. Never.).
While they may be loaded with all of the calories, it is so insanely easy to make these brownies. I actually found the recipe on a Tasty video, and for once, it gave enough detail that even a novice baker would be able to handle this recipe swiftly and easily. Gather up:
  • A 9x13 size box brownie mix (plus the ingredients required on the box)
  • 3/4 cup butter, melted
  • 1 1/2 cups of Jif (there is no better peanut butter)
  • 1 tsp vanilla extract
  • 3 cups powdered sugar
  • 10 ounces semisweet chocolate chips
  • 6 TBS heavy cream
  • Optional (but not to me): sprinkles
You could try to make these healthier by replacing the oil in the brownie mix with unsweetened applesauce, and reduce the amount of peanut butter and powdered sugar (I'd say 1 cup PB and 2 cups sugar). The PB layer is super thick, so reducing these amounts would just provide a thinner layer.
Fact: a perfect way to begin any dessert is with a brownie base.
 Make your brownies according to box directions--definitely do not forget to grease the pan before pouring in the brownie mix though! When your brownies are almost done in the oven, mix together the melted  butter, Jif, vanilla, and powdered sugar in your stand mixer for a few minutes until completely smooth.
Try not to take a fork to this and begin shoveling into your mouth with reckless abandon.
Now, the moment those brownies come out of the oven, take your peanut butter mixture and spread it on top of the warm brownie layer using an angled spatula. I heated my spatula up under warm water, dried it off, and then spread out the PB layer. Worked like a smooth, delicious dream. Set this aside and get ready to ganache, baby.
Getting a Homer Simpson level of drool going here.
To make your ganache, dump the chocolate chips and heavy cream into a microwave safe bowl. Nuke in the microwave for one minute, and then stir together until totally smooth. Pour the warm ganache on top of the peanut butter layer and use your angled spatula to smooth things out.
The finishing touches!
I took some gold glitter sprinkles and added a light dusting to the ganache before it set. It was New Year's Eve, after all, so I wanted to get super festive and sparkly. I'm always super festive and sparkly when it comes to dessert decor. Now, cover your pan and pop these bad boys in the fridge. I let mine set overnight before cutting into squares, but you'd probably be safe after refrigerating for 3-4 hours or freezing for 2.
This was a very heavy plate.
These brownies weigh about a ton thanks to all that layered goodness, but they're simple to cut and serve. I did notice that some of my peanut butter layers wanted to separate from the brownie, but since peanut butter is so nice and malleable, I just squished those pieces back together. Remember--alcohol is served at parties, so no one will notice a few smooshed in pieces thanks to this, and to the fact that they'll get inhaled before anyone can look at them for longer than a second or two.
The plate was gone very, very quickly. I mean, just look at that layer action.
These were positively a hit, and I'm really glad there weren't any leftovers for me to take home and end up eating all at once. Small miracles. No matter how you feel about Buckeyes and Ohio, I can promise you if you even remotely like chocolate and peanut butter together, these brownies will blow your mind. Now, on to that boring birthday cake...
Just florals and boozy frosting, NBD.
 I was super frustrated by these Russian piping tips. "It's so easy--anyone can use them." In comes the baker with several years of piping and decorating experience under her belt, and no, anyone cannot use them. I wanted to do two-toned flowers in whites, blues, and purples, and followed directions on several Russian piping tip tutorial videos to do so and used a technique I had never done before and had zero luck with. I will stick to painting the inside of my piping bags with gel dye like I knew I should have because this actually works. I was also told to use extremely stiff frosting, but then only half my decorations were coming out of the piping tips at a time. It's a miracle I got any of them to work at all, so lesson learned--just use regular consistency buttercream. At least my leaf game is on point:
Yeah, you go Wilton leaf tips. Making life easy.
The concept is cool, so I'll definitely revisit these Russian piping tips. My biggest complaint is that the tips aren't numbered, so I have to use the guide that came with them and the tiny little pictures on it in order to figure out what each one does. I'd even have taken Russian symbols or something. I mean, really. First world problems indeed, but I'll be back soon after I've had more practice showing these tips who's the boss. 'Til next time, my fellow eaters!