Thursday, January 19, 2017

Sweet (Cheesecakey) Relief

Welp, this blog post finds me another week into my thirties, and I still know how to use a computer! I only on occasion have referred to myself as Grandma, so I think I'm adjusting pretty well. Because you know what I have? A gift for baking myself any coping mechanism my taste buds desire. You can't be sad about being older when you're eating chocolate. This is just plain true. I decided after inhaling all that creme soda birthday cake that I wanted my next dessert to be mostly chocolate, but I also wanted some added sweetness and saltiness (I've got a complicated coping mechanism). The other trick in this hankering was, of course, that I could shovel said dessert into my mouth with reckless abandon because calories weren't an issue. I spent so much time coming up with a dessert that met all of these criteria only to be reminded by my husband that what I was actually craving was a chocolate-covered pretzel. Gotta hand it to men and their ability to simplify practically every convoluted thought process that spews out of the mouth of their wives. At least this is the case with my husband anyway. When the Thought Train starts rolling out of the station and makes its way to Mouth Central, my ideas are usually so complex that hidden within them is a functioning plan for world peace, so I need to be reminded that sometimes, the easier, the better. But if I had explained myself upon first dessert craving, I never would have come up with the following chocolatey, sweet, salty dessert: mini chocolate-covered cheesecake bites!
Don't let their size fool you; they are big on flavor.
Oh yes, that ooey gooey center is cheesecake filling, surrounded by a wall of chocolate with sea salt sprinkles (everything needs sprinkles. If you've read even just one other blog post of mine, you'd know this is my baking mantra). And no, I'm not lying when I tell you one cheesecake bite comes in at only 130 calories. Call it sorcery, witchcraft, or just my sheer will to eat dessert every night and still fit into my swimsuit, but I made sure it was possible to eat two of these bad boys at once without topping 300 calories. I'm seriously taking that with age comes wisdom bit in stride. I'm not going to lie to you, making your own chocolate candy is messy. But in a good "lick your fingers and reap the tastiness" kind of way. Will things be sticky? Most likely. Will they be melty? Most assuredly. Will it be drool worthy? Most definitely.
Bonus: you already have these things in your pantry!
When I said I spent forever coming up with a recipe for something chocolate, salty, and sweet, I mostly wanted to use a brick of cream cheese that had been staring me in the face every time I opened my fridge. Sometimes I'm not as complicated as I like to think I am. The ingredients here are quite basic:
  • Half an 8 ounce brick of reduced fat cream cheese at room temp
  • 2 TBS sugar
  • 1/2 tsp lemon zest
  • 1 tsp lemon juice
  • 1/2-1 tsp vanilla extract (I opted for 1 because I like a sweeter and less sour cheesecake)
  • 2 1/2 cups semi sweet chocolate chips, divided
  • Sea salt
  • Optional: *2 tsp veggie oil to make the chocolate melt smoother. I didn't use it because, well, calories.
Now, you will also need a mini muffin pan, mini cupcake liners, and a paintbrush safe for using with food (a.k.a., not dripping with lead paint or anything). I've always been bothered by the fact that it's called a mini muffin pan, yet the liners are called cupcake liners. Shouldn't it be a cupcake pan? Or muffin liners? Maybe not the latter because that sounds like it's bordering on NSFW. Anyway...start by lining the cupcake pan and then measure out 1 1/4 cups of chocolate chips. Place in a microwave safe bowl and heat for 30-second bursts at a lower power level like 5 or 6. Stir after each interval until chocolate is smooth and no lumps remain. *If you are using the vegetable oil to help you smooth out the chocolate, be sure to add it in at the beginning of the microwaving process.
Since I'm just now mentioning this a no-bake recipe, I suppose I could clue you in on the upcoming crappy photo montage.
Take a 1/2 a teaspoon (literally, use a 1/2 teaspoon scoop)  of the melted chocolate and plop it into the bottom of one cupcake liner. Then, using the paintbrush, paint the chocolate up the sides of the liner until it reaches the top. Try to work in batches so you're efficient, speedy, and don't need to reheat the chocolate to get it melty and risk burning it. Chocolate is as temperamental (seriously) as it is delicious. I poured chocolate into 4 cupcake liners at a time, then I came back in and painted the chocolate up the edge of each cup.
Repeat this process until all 24 liners have a bottom and sides brushed with sweet, sweet chocolate.
 Now, take your pan and place it in the freezer for a half an hour. You want the chocolate to be completely set before adding in the filling and placing more melty-hot chocolate on top.
But by all means, use this time to make filling so you can lick the spatula.
 To make the filling, simply take the cream cheese, sugar, lemon zest, lemon juice, and vanilla, and mix together in a medium bowl. Place this filling into a piping bag or plastic baggy. Snip the very tip of the bag and then set aside. Piping will be easier if you keep this filling at room temperature while the chocolate shells cool.
So smooth. So beautiful. But wait, don't eat these yet. We need to make it even dessertier.
Still not done making it more dessertier.
 Once the shells are completely solidified, pipe a small mound of cheesecake filling into each chocolate liner. Things will be a bit of a shapeless mess, but a solid tap or two on your kitchen counter with the pan will even things out:
Like so.
 Now, take the remaining 1 1/4 cup of chocolate chips and melt using the technique I mentioned above but am too lazy to type again.
So swirly. Kinda makes me want a chocolate dip cone from DQ. Texas problems.
 Once your chocolate is melted, take the 1/2 teaspoon scoop and plop 1/2 a teaspoon of chocolate on top of the cheesecake filling. Again, it is easier to work with these 4 at a time. Use your 1/2 teaspoon scoop to spread the new layer of chocolate completely over the top. You can finish up by swirling the teaspoon toward the center to create a nice little flair. Once you've swirled the tops of 4 chocolates, sprinkle with sea salt to your liking. I went with a level of sea salt best described as, "I want it to taste like chocolate and french fries at the same time." Repeat on all remaining candies until done!
Chocolate and salt: because if you've never dipped your fries at Wendy's into a frosty, you've never really lived a day in your life.
This is a little time consuming since you have to work so quickly and with so much chocolate. But once you've topped all your cheesecake bites, place them back into the freezer for an agonizing 30 minutes (unless you have those chocolate-covered pretzels to tide you over).
It's going to be the longest half an hour of your life.
 Once the chocolate has totally set, pop these out of the pan and place into a Tupperware. You will want to keep these in the fridge for their very short lifespan (you're going to devour the entire batch of 24 mini cheesecake bites in a startlingly swift amount of time). I recommend letting a few sit out at room temp for 10 minutes before eating so the chocolate isn't too hard and the filling is just starting to get gooey. And now you know how to make your own chocolate candies with assorted filling! I actually first tried out a chocolate candy recipe but with dulce de leche filling when I was still back in Clovis last year:

Back when I had poor plebeian Formica counters.
If memory serves me, I didn't want to share these with my husband. Or apparently anyone else because I completely forgot to blog about them. I just wanted them all to myself. So you see, you can choose whatever filling in the world you want, maybe a mini Reese's cup, some egg-less cookie dough, the tears of your enemies...it's a winning chocolate candy recipe no matter how you shake it. But as for me, right now the cheesecake filling is hitting all the right taste buds. I've got my chocolate, sweet, salty trifecta, and boy do these babies ever make chocolate-covered pretzels look rather silly (but I'd totally still eat them, too). Leave those little logs of chocolatey pretzel for holiday gifting; you've got an ace up your sleeve, now. 'Til next time, my fellow eaters!
And that ace is filled with cheesecake.

Sunday, January 8, 2017

Twenty-Nine for the Second Time!

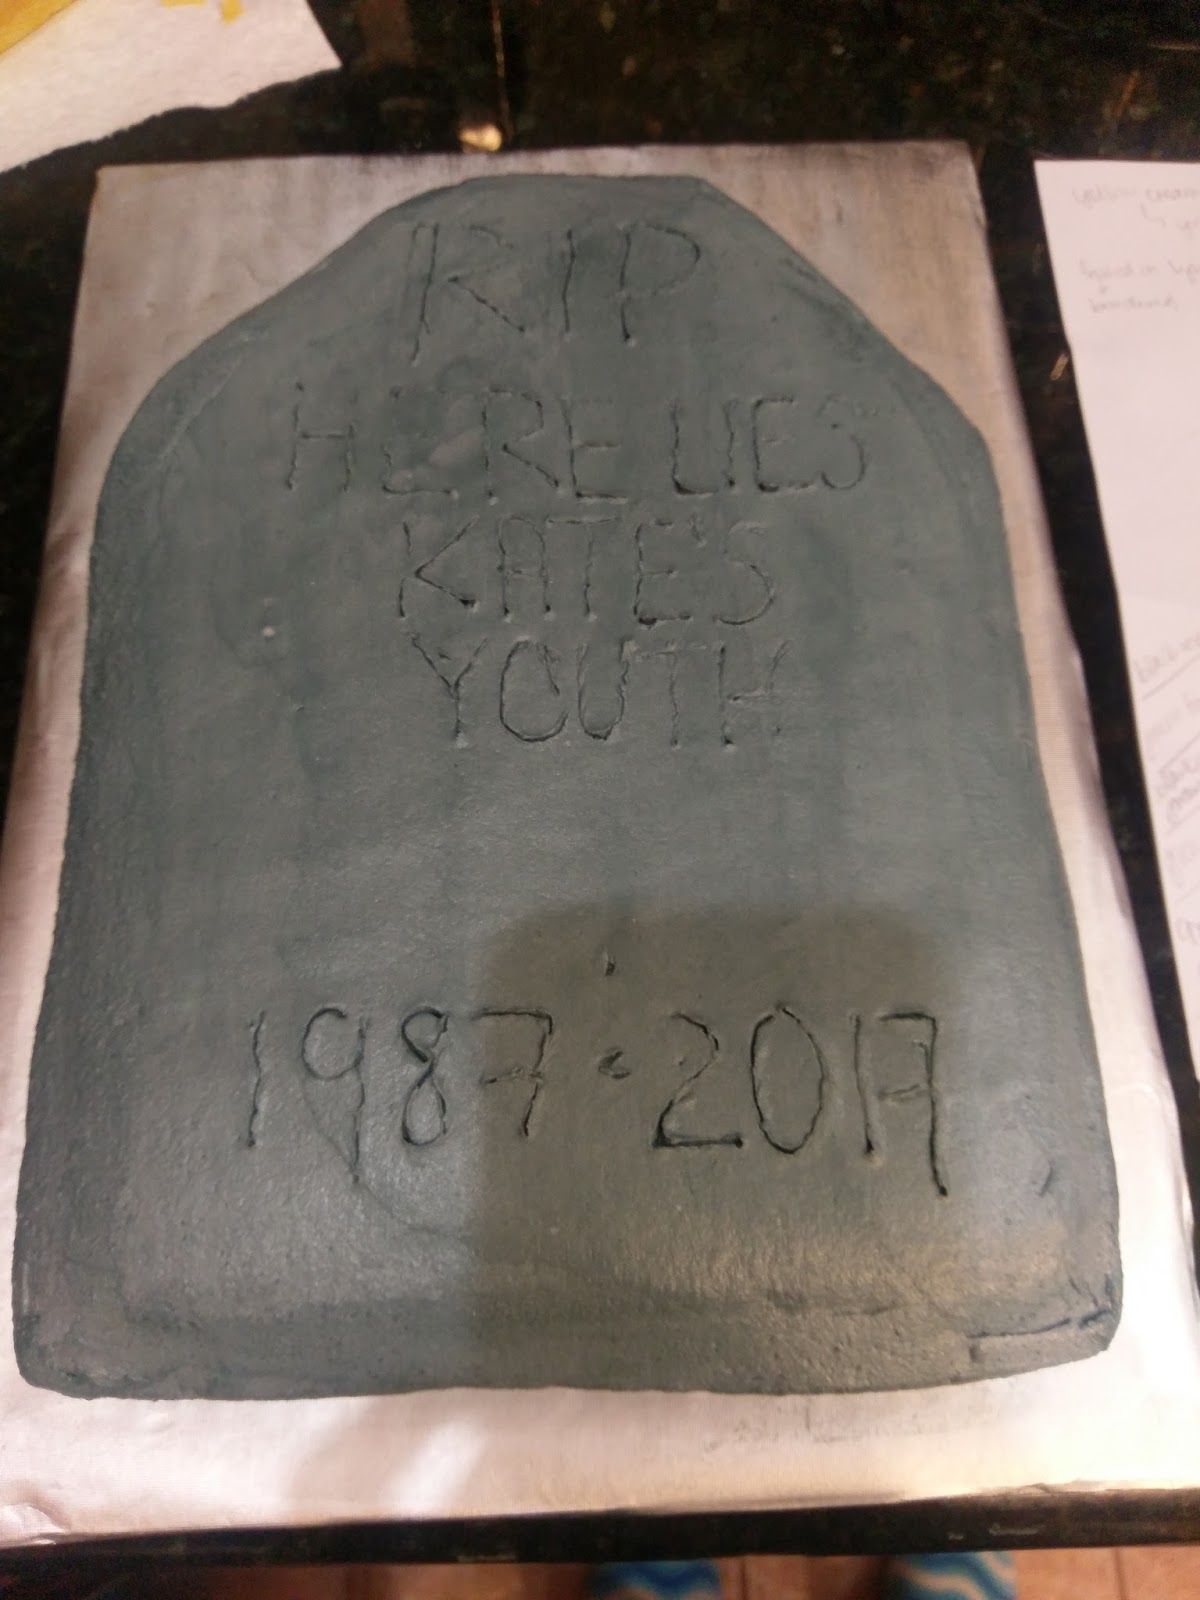
Imagine my surprise when I awoke the morning of my thirtieth birthday to find my hair had not turned completely gray, my girls were not sagging slightly above my navel, and my retinol creams were still working at keeping evil wrinkles at bay. After several brief once overs in the mirror (a typical morning for my level of narcissism) and a realization that it was definitely time to touch up my roots, I accepted that I'm okay with turning 30 as long as I still look 29. Much like a child who finally succumbs to taking a nap after spending an awkward and annoying amount of time resisting, I too have have stopped fighting the fear of turning 30. I spent my early twenties being a total hot mess of blonde hair and really poor fashion choices (ugh, mid 2000's trends--looking at you body glitter), and my mid-twenties cultivating who I wanted to be when (or if) I finally grew up. So now I actually get to be that adult. Or adult adjacent. I still laugh at fart jokes and wear ridiculously fuzzy and usually unmatching socks, so some parts of me will always maintain a youthful jubilance. But once you've been regularly filing your own taxes and held a mortgage payment and non food service related employment, it's simply time to realize age is not really the number itself, but how you feel. Kind of like mileage on a car--there's city miles versus highway miles, and while my city miles may be racking up, my highway miles are barely registering. And even though I had this enlightening epiphany about age and life, I'm still insanely self-deprecating and needed to make a birthday cake to poke fun at the moratorium on my 20s. I've literally been planning this cake since the moment I turned 29, and now that I've done it, I can clearly say I put up a damn good fight while finding the most morbidly original way to deal with the death of my youth:
Buried in this cake is a ridiculous amount of booze. Because the best way to deal with turning a new decade involves both cake AND alcohol.
Only I could ensure my youth's final resting place is made of cake. See, I told you, I lack the ability to become a serious, credentialed member of adulthood (although still looking into AARP...). Even though this was a monumental (see what I did there) cake and birthday, I still wasn't willing to throw caution to the wind and invite all the calories to slumber beneath this tombstone. I created a yellow creme soda cake with amaretto buttercream frosting that clocks in at only 293 calories per slice (15 slices total). I know, a slice of cake for under 300 calories almost seems too good to be true, like all those wrinkle creams resting in the bottom of my bathroom drawer, mocking me, but it really does taste like cake. More importantly, it tastes like Disaronno...because classy 30 year old's drink things like Disaronno on the rocks. And less classy 30 year old's eat things like Disaronno buttercream frosting because childlike joie de vie simply can't allow them to not eat all the cake. But thanks to my recipe tweaking, I'm at least attempting to wrangle that exultation for dessert into a mere mild excitement regarding baked goods. Thirty year old's should know how to compromise, I suppose.
Ah yes, Shasta and eggs, a traditional Southern combination.
Y'all, I haven't made an actual cake since Halloween. HALLOWEEN. It has been MONTHS. I've made cookies, cupcakes, assorted desserts, but no full-fledged caking has taken place since we left Albuquerque. Perhaps I was protesting my ability to accept I was homesick for a state that usually smells like cattle, and I was expressing this by my refusal to really get creative. I mean, they say with age comes wisdom, but damn, I am really firing on all cylinders since hitting the big 3-0. I have always been (a) wise (ass). It felt good to throw together a cake and prepare for decoration, so if you're in a funk might I recommend scooping up a box of yellow cake mix, a slightly chilled can of diet creme soda (measure out 10 ounces), and two egg whites at room temp. Throw all of these together and mix for 2 minutes while you preheat your oven according to box instructions and grease a pan of your choosing.
There will be bubbles thanks to the soda's effervescence, so don't break your counter top slamming the pan to try to get the bubbles out.
 For a tombstone cake, use a 9x13 pan, greased very well. The soda will help everything bake faster, and the egg whites will help the cake remain springy. I ended up baking this cake for 20 minutes until a toothpick came out clean, so start testing your cake about 5 minutes before the box instructions say it should be done. Remove from the oven and let cool in the pan for 10 minutes before removing to a cooling rack.
Be gentle, as these cakes seem to crack quite easily compared to a dense, dairy-heavy cake. But when you're done frosting, this cake won't weigh sixteen pounds, so that's nice.
Prepare a cake board while your cake is cooling on the rack, and the place the board on top of the cooling cake bottom and flip the rack over so you have the top of the cake now facing you. Place into the freezer so trimming it into tombstone shape is easier. While it is cooling, prepare for a crappy photo montage and gather up:
Three piping bags, small round tips (I used a 3 and a 5), leaf tips (I used a 352), black gel dye, green gel dye, and edible rose decorations. No one makes these in black, and I wasn't going to do it myself because I do, sort of, have a life outside of cake decorating.

Oh Disaronno, you are simply my favorite.
Once you've got your materials ready, you can start making your frosting. This frosting is SWEET with the addition of amaretto, so while I made a full recipe, I probably barely used 2/3 of it, if even that much, so this is reflected in the calorie count. If you use it all, you'll have a 4-inch layer of frosting on your cake, making it a double decker of awesome, but also, calories. Boo. Feel free to adjust as needed, but throw together:
  • 1/2 cup room temp butter
  • 1/2 cup of Crisco 
  • 1 TBS vanilla
  • 4 cups powdered sugar
  • 4-5 TBS Disaronno
You could cut this recipe by a third and probably still have a little leftover. But blend the butter and Crisco until well mixed and then add in the vanilla, half the sugar, and half the Disaronno. Blend well and add in the rest of the sugar and Disaronno until you get a smooth consistency.
Such an appetizing color.
 At this point, get out two small bowls and add about a heaping 1/4 cup of plain white frosting to one of them. Now, dye the remaining frosting still in the stand mixer gray by adding a dollop of black gel dye until you get the shade of gray you like. I didn't use much at all. Then take another heaping 1/4 cup of the gray dye and plop it into the other bowl. Add another smidgen of black dye to this to make it a shade or two darker than the base frosting. This will be for the tombstone's engraved message. Cover these two bowls with dampened paper towels, and get ready to be slapped in the face with another montage!
Note to self, use thicker towel on cooling rack to avoid dreaded cake lines. Take your cooled cake and trim the edges to achieve a tombstone shape.

Then add a very thin crumb coat. Take an angled spatula and run it under HOT water. Like, steaming hot sauna water. Wipe it dry, but use the heated spatula to spread frosting easily on those crummy areas that resulted from shaping the cake like a tombstone. This will save you a lot of time if you spread using a heated spatula, so reheat it after you finish crumb coating section by section. You can also use the steam to open your sinuses! Bonus! Place your cake back into the freezer for 15 minutes/the amount of time it takes to do a load of laundry. That's my scientific measurement, anyway.

Using the heated spatula trick, add a final thin layer of frosting. Let set in the freezer for 15 minutes, and then use the Viva paper towel trick to smooth out your frosting. But honestly, keep it a little messy. It's a tombstone, so you want it to look a little rough. I mean, if your cake looks like a tombstone from the Middle Ages, keep smoothing. Think Roaring 20s gangster tombstone--slightly riddle with holes but not entirely dilapidated.
Using a toothpick, scrawl your message out on your cake to act as a guide.
Then load up a piping bag with a #5 tip and the darker gray dye you set aside earlier. Slowly and carefully trace the outline and write out your message.
You can leave it plain, or get creative and add scrolling or a cross to your tombstone in any blank space.
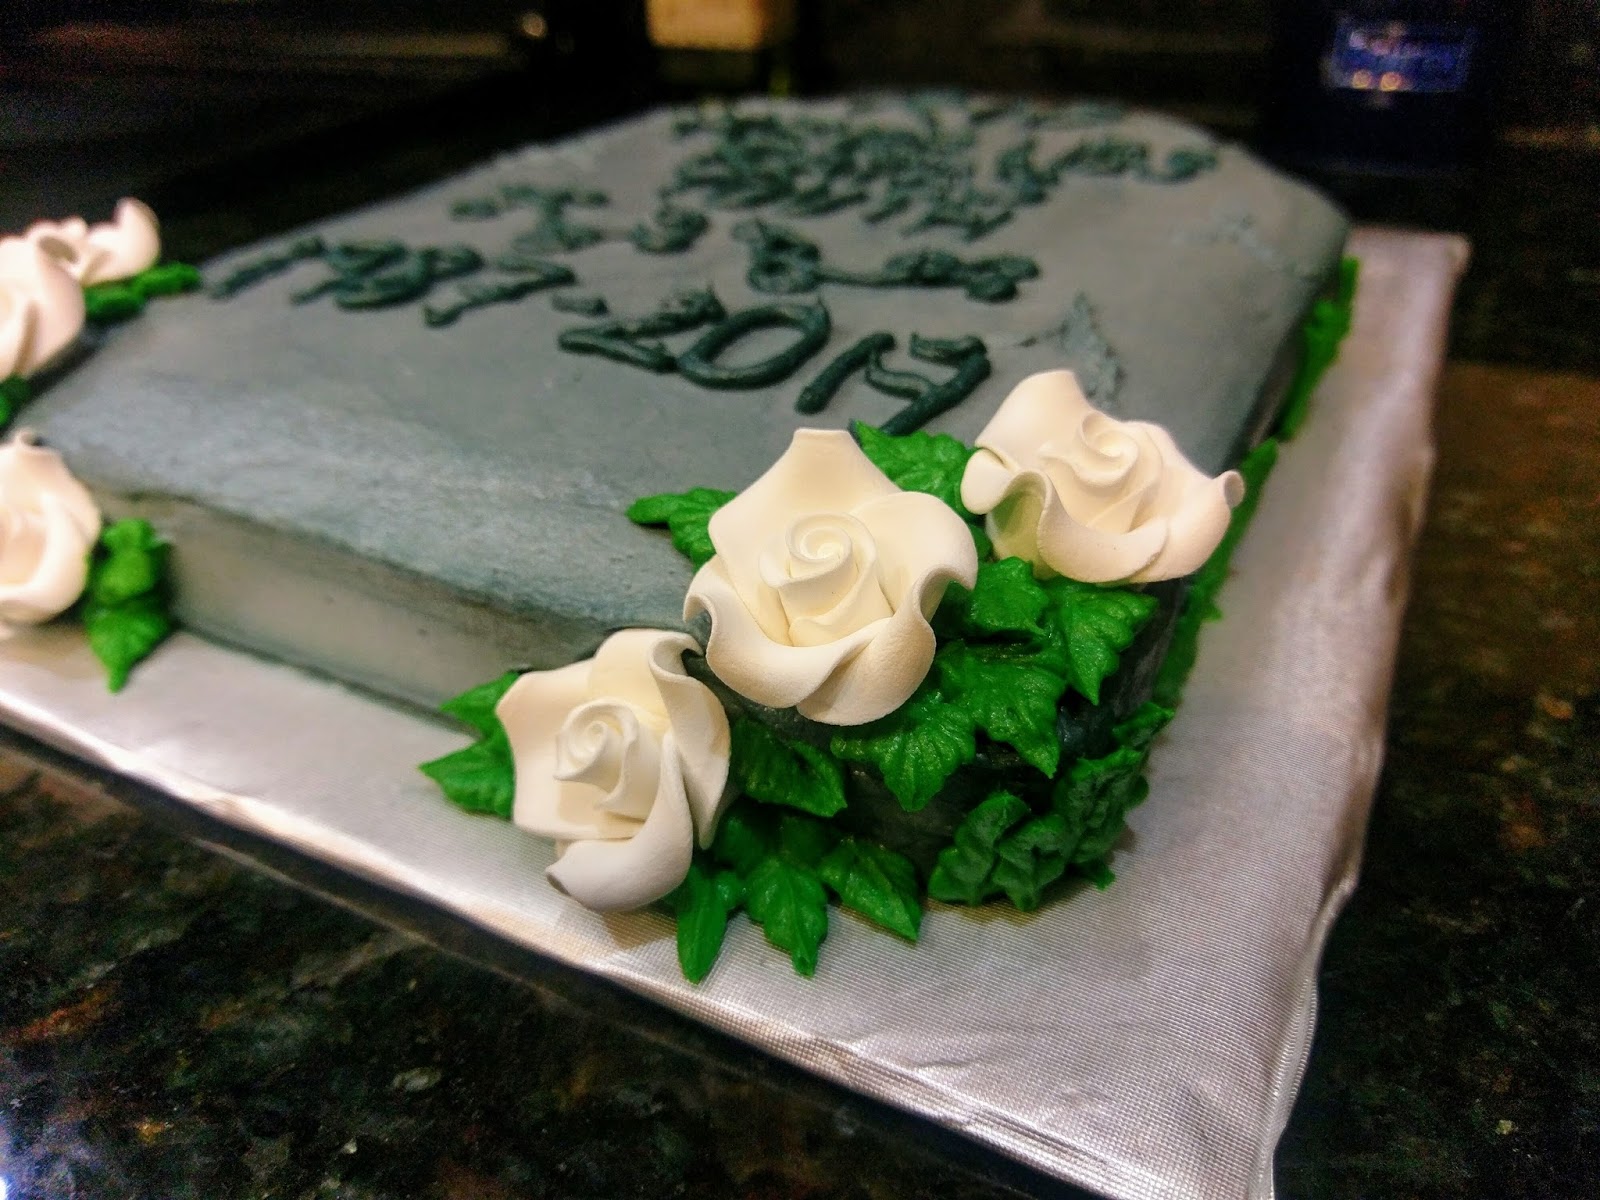
Then take another piping bag and add the leftover gray frosting you used to frost the actual cake with. Fit it with a #3 tip. Now you can add "cracks" to your tombstone by taking the #3 tip and burying it in your frosting layer. While keeping it buried in the frosting layer, squeeze frosting out of the bag while slowly wiggling and drawing lines/cracks of various length and shapes into your cake. I focused on creating most of my cracks at the edges where they would occur on an actual tombstone. Trust me, as a Halloween expert, I know what I'm talking about.

Now, take a few roses and pipe a small glob of frosting on the bottom. Press them gently into the cake to adhere.
Take that bowl of plain frosting we forgot about years ago and hopefully didn't eat. Dye it green--tip, add in a little brown dye if you have it so the green is duller. Take this frosting and place into a piping bag with the #352 tip. Now, to pipe leaves, hold the tip sideways and let a mound of frosting continue to pipe out. It will pretty much automatically make a leaf shape, but for further instruction, check this video out.
Add in the remaining roses on the bottom of the cake and finish piping leaves as you like around them. You could stop here, but if you want to, follow my instructions below for further tips.
Use the rest of your green frosting to create blades of grass and leaves on the sides of your tombstone. Use the same technique, just pipe UP the side of the cake instead of out.

Take the bag of regular gray frosting and continue the cracks you started down the sides of your cake as well to really finish the look of decay and macabre to truly mirror how you feel about turning 30.

Additional photo of leaves because they turned out so fantastically. I'm a leaf tip idiot, so finding this 352 tip to make foolproof leaves has been a lifesaver. 
I am honestly not sure there has ever been a time when I was happier with how a cake turned out. In true OCD, Type-A fashion, I sketch out every cake before I make it. This cake turned out even better than the sketch, so on some level, it gave me the will to turn 30 simply so that I could post this tutorial (and so that I could dazzle you with my wit and creativity. Narcissism is a real diva. The Mariah Carey of flaws.). But as happy as I am with the decoration, I am truly slapping myself upside the head every time I take a bite--WHY did I never think to add amaretto to cakes?!? This is the true hidden gem and best birthday present I could ever give myself. I love Disaronno so much that simply drinking it isn't enough. I must find all ways possible to ingest amaretto. This frosting is so delectably sweet that a little really does go a long way, but it pairs perfectly with a creme soda cake (ahem, and also in liquid form with creme soda. I had to taste test, you know). I'm thinking a naked cake made of Disaronno is going to happen really, obnoxiously, I-can't-believe-I'm-already-making-another-cake soon. If this is what turning 30 involves, bring it on new decade because I got a head full of crazy cake ideas, and I'm only getting started. Thanks to all of you that reached out to me yesterday to wish me a happy birthday (if you didn't, you get a pass for reading my blog). I had a wonderful day filled with love, laughter, bitchin' presents, and tons of joy (and sequins. Thanks, Rent the Runway!). 'Til next time, my fellow eaters!
Just wait til you see what I have planned for my fortieth birthday cake...

Thursday, December 15, 2016

A Twist on a Classic Christmas Dessert

I've noticed over the past few days and reversion to 80 degree weather that Florida tends to do Christmas a little differently than I'm used to. While there are still neighborhoods full of lights and decorations, many houses are "Under the Sea" themed with rows of blue-lit waves or green-lit algae. Santa Claus is frequently seen in festive holiday...Hawaiian...shirts with sunglasses and a general "I'm sure I have something more important to do, but I'm on island time" attitude. Even the snowmen aren't made of snow around here. I mean, obviously they'd melt in record time and turn into a splash pad, but even inflatable snowmen aren't safe from the beachification of Christmas around here. They're the sandcastle equivalent of a regular snowman. It's kitschy. But it's fun. And also incredibly alarming--literally. Last night we were watching The Santa Clause (because bad 80-90s Christmas movies are the best), and suddenly lights were flashing and firetruck sirens blaring on our street. I thought to myself, this is it...it finally got so hot that Florida set itself on fire. But no, there was no cause for actual alarm now that we know the local fire department decks out their trucks with lights and garland and parades around each neighborhood with Santa on one of them to deliver gifts to children. And for the moms standing outside waiting with their children, there's hot firemen. This is a tradition I can get on board with. You can catch me standing curbside next year with the dogs, "waiting for dog treats," just so I don't look too obvious. All this twisting of tradition had me in the mood to take a classic holiday treat, peppermint bark, and put my own spin on it. Naturally, this meant adding even more chocolate. May I present to you peppermint bark fudge:
I will hold for applause.
So now comes the part where I tell you that once again my sheer brilliance (or overwhelming desire to fit into my 30th birthday party dress) has allowed me to craft a fudge that is only 70 calories per square. I give you a moment to digest this while I digest the fudge, and then I explain how this is possible. Still with me? This is how we're doing things around here from now on. I promise to deliver calorie content because I am so tired of finding the "holy grail of low fat desserts" on Pinterest only to calculate calories and realize whoever blogged it was a big fat liar, maybe even literally, because it's still a 500 calorie dessert. I want to be the exception to the "too good to be true" rule. This entire 8x8 pan of fudge comes out to 2,492 calories. I cut this into 36 decent chunks to equate to 69.22222 calories. My father always used to tell me it's all about math, and damned if he wasn't right. Don't tell him that though, or I'll never hear the end of it. I became an English teacher for a reason, alright. While I have cut calories, I have not cut down on taste. This is still fudge. It is melt-on-your-tongue chocolate and peppermint bliss. It's the flavor of the season for a reason! 
Yes, fat free sweetened condensed milk is actually a thing. Who knew?
Thanks to my manly biceps and linebacker shoulders, I was blessed with the ability to make really great fudge. Since 98% of making fudge is the continual laborious process of stirring chocolate until it melts or your arm falls off (whichever comes first), make the strongest member of your family your sous chef. You can executive chef your way to a bar stool to supervise. To make this perfectly Christmasy peppermint bark fudge, you need:
  • 1 can of fat free sweetened condensed milk, divided
  • 1 1/2 cups semisweet chocolate chips
  • 1 1/2 cups white chocolate chips
  • 1 tsp of vanilla
  • 1/2-1 tsp peppermint extract (if you like a normal amount of mint, go for 1/2. If you are someone that likes to eat toothpaste or are just generally really into candy canes, go for 1.)
  • Crushed candy canes (1/4 cup) or 1/4 cup peppermint crunch (found at, where else, Target...because I live there now).
Also needed: cooking spray and foil, or you will have to employ your sous chef to scrape and scour the pan.
Before you begin, line an 8x8 pan with foil overlapping the edges and spray with cooking spray. With fudge, time is certainly of the essence, so be sure you've got all your ingredients measured out and ready to go. I started out by measuring 1/2 a cup of the condensed milk and 1 1/2 cups of chocolate chips. I made the chocolate the bottom layer, but you could get crazy and switch it up, or do an extremely thin layer on the bottom and another extremely thin layer on the top to create a peppermint bark fudge sandwich. That would look really cool, but the beauty of fudge is that it should be quick to throw together, and that sounds time consuming. Like, I could watch Christmas Vacation at least twice in that time. So if you're into complicated desserts and kinda hate yourself, go for it. As Ellen Griswold would tell you, “I don’t know what to say, but it’s Christmas and we’re all in misery.”
We're at the threshold of deliciousness.
When you've got half your milk measured out, place the chocolate chips into a medium pan and stir in the milk. Heat on medium while continually stirring with a rubber spatula. Be careful to scrape all the sides of the pan and keep any chocolate from resting on the bottom of the pan too long so it won't scorch. I'd still eat burnt fudge, but I have a dessert problem. Once all the chocolate is completely melted, pour in 1 tsp of vanilla extract. Stir to incorporate, then dump into your lined pan.
This is what happens when you don't work quickly enough.
I took like 10 seconds to sneeze or something and already my fudge had hardened up a little, so it require a lot of pressing, nay, slapping, with my rubber spatula to smooth out into an even layer. Thanks to those muscly arms I was telling you about, it left a lasting impression. Now, place this into the fridge for 10 minutes so that it is firm enough to pour and smooth the peppermint layer of fudge on top.
This photo was blurry because my arms hurt too much to hold the camera still. Labor of love, that fudge.
 When there's about 4 minutes left on the fridge fudge, measure out the white chocolate chips, and dump that in the cleaned and totally, 100% dry (or it will ruin your chocolate) pan along with the rest of the condensed milk. Measure out 1/4 cup of peppermint pieces and have the peppermint extract at the ready. Melt the white chocolate and milk on medium, continuing to stir constantly until no lumps remain (take a 5 second breather and remove the pan from the fridge). Then add in the peppermint pieces and peppermint extract and stir well.
Don't take time to sneeze or anything before layering.
This should be able to pour on nice and smoothly if you don't waste any time. You can use a spatula to smooth out a bit, but I just tilted the pan back and forth until the top layer was even. While the white chocolate was still wet, I sprinkled extra peppermint on top. Because nothing can be too minty! Or pretty. You can recall last week and my sprinkle addiction. Everything should have a topping!
It just looks prettier that way.
Now comes the unbearably hard part...put the fudge into the fridge or freezer to set. I placed mine in the fridge for four hours, but you could probably cut that time in half in the freezer if you're in a hurry. When you gotta eat fudge, you gotta eat fudge. No judgement here.
No sane person would blame you; just look at the stuff.
Now that the Pavlovian response of delicious dessert and drooling is out of the way, once your fudge is set, cut into squares. You can leave in the pan or lift out the foil and cut on a cutting board. I measured out even squares because OCD is one of the myriad of mental disorders I suffer from (I put the fun in dysfunctional), but it does lend itself to some perfectly crafted and portioned food, so there's that. Once cut, you're ready to serve! If you're making your fudge ahead of time, still cut and portion the way you'd like. You can place back into the pan and cover with foil, or you can place into a Tupperware with a layer of Parchment paper in between each row of fudge. In either case, put in the fridge or freeze until the day you're ready to serve. I mean, down here in Florida if I left fudge out on the counter for more than five minutes, it would turn into a small lake of chocolate. Would still eat. Too good not to. The only thing peppermint bark was ever lacking for me was more chocolate, and this totally solves the problem. It's got the right ratio of chocolate to mint layering so no flavor overwhelms the other. Basically, it's a Christmas freakin' miracle. And all thanks to Florida's weirdly beachy Christmas for showing me that sometimes the best way to celebrate is by bucking tradition and doing whatever the hell you want. Even if that includes wearing flip flops and shorts while you go caroling. Tis the season! I'll be back next year with more treats. Enjoy your Christmas, have a happy New Year, and I'll begrudgingly meet you back here for my 30th birthday cake in January. 'Til next time, my fellow eaters!
It's a good thing I have this fudge to help me cope.

Sunday, December 11, 2016

Edible Trees That Aren't Broccoli

For 72 hours, I have been in pure winter bliss. I am sure this is some sort of Floridian record, and I greatly appreciate the weather gods for listening to my (annoyingly) relentless pleas for cooler weather to get into the Christmas spirit. When approaching the eve of my 30th birthday, it is shocking to watch How the Grinch Stole Christmas as an adult and realize I wholeheartedly understand the titular green creature whose heart is three sizes too small because I am him. I've always hated popular, lyrically-sappy Christmas music, Santa Claus is a creepy old guy with a B&E record that could circle the North Pole a million times, and if I see one more child pitch a fit in the aisles of Target only to be rewarded with a toy, I might lose it and start decking someone's halls. As it stands, I'm wearing Halloween socks today. So it really, really takes a lot to get me into the spirit of Christmas...but when the temps drop below freezing and Jack Frost is actually nipping at my nose, I'm all in. I want to listen to "Carol of the Bells" for five hours straight while baking every Christmas treat known to man directly followed by eating most of them while driving around looking at Christmas lights, full of splendor and uninhibited hope for the season. I really am all or nothing when it comes to life. But since I've actually been able to bust out the gloves and boots and get into the Christmas spirit, the oven mitts and baking equipment came out with the cold weather, too. Peppermint is the essential oil of Christmas, and I'm going to go full steam ahead with it in my baking this week. I can't let that zest for the holidays leave when its 75 again tomorrow. Peppermint will help me limp through the week before its time to travel off to much colder parts of the world. And since I never got into gear early enough to put up our Christmas tree, I decided to decorate a whole bunch of tiny ones instead to keep me inspired:
Edible trees that aren't broccoli...a Christmas miracle!!
These mini chocolate cupcakes with peppermint buttercream Christmas tree decorations were so unbelievably fun and festive to make I almost forgot I'm a curmudgeonly grump that hates everything except dogs (another thing I have in common with the Grinch; it's a startling resemblance, really). I am still on a mission to make Christmas healthy and not the season of the bulging waistline, so I tried another science experiment in the way of the actual cupcakes themselves: they're made out of only chocolate cake mix, one egg, and Coke Zero. That's it. I thought for certain they'd be a puddly mess or just taste like Coke and not chocolate, but the Coke Zero doesn't lend any taste here once baked; it evaporated like alcohol would and instead left an incredibly springy and moist cupcake in its wake. If you didn't frost these, each mini cupcake is only 64 calories! So eating a normal serving size of two would only set you back less than 130 calories. If you omitted the egg (I might try this to see if the cakes still hold together) and didn't frost them, they'd be practically zilch. But I like frosting. Nay, I feel the way for frosting most people feel for the holiday season: can't get enough of it. I want it inappropriately early in the day like Christmas lovers want the holiday to continue coming inappropriately early in the year. So a mound of delicious peppermint wonder adds on an additional 63 calories per cake for the grand total of 127 calories per mini cake. Still not bad for a 2 serving deal, and certainly way less than when prepared the traditional way with butter, more eggs, and milk.Don't say I never did anything nice for anyone trying to battle the bulge this Christmas!

Pictured: sprinkles I already had on hand.
I have a problem. I love sprinkles. I always stop to peruse when I see nonpareils because they're tiny, adorable, and usually sparkly, like the gemstones of baking. I have an entire cake safe packed full of sprinkles and edible glitter. I knew with these Christmas tree cupcakes, it was literally time to let my massive sprinkle collection shine. I used white and yellow stars as tree toppers, and a variety of green, silver, red, and white sprinkles. I added white pearls and silver and gold stars as ornaments as well. The key was to mix and match. As much as I wanted to add all the sprinkles at once, I knew that would end up looking more like a Jackson Pollock painting than a cupcake, so restraint was needed. Gather up mini cupcake papers and sprinkles in your preferred Christmas colors before you set off on a mission to don we now our sprinkly tree apparel.  
Ugh, even Coke cans are more in the spirit of Christmas than I am.
I only used HALF my box cake mix, one whole egg at room temp, and 5 ounces of Coke Zero (still chilled) to make 26 mini cupcakes. This would probably yield 13 regular cupcakes or one 8-inch round cake. To double, simply use the whole box of mix, two eggs, and 10 ounces of Coke Zero. If you want to omit eggs, use the full 12 ounces of Coke. Follow baking temperature recommend on the box and preheat your oven. Dump the egg, mix, and soda into a mixing bowl and blend on high for 2 minutes.
'Cookie scoops are versatile!' I justify to myself for spending more than two dollars on one.
Line your mini muffin tin, gather up your batter, and scoop a cookie scoop a little over half full. Use this to quickly and less messily dump your cake batter into the liners:
Such precision! Your dish soap and sponge will thank you.
 Once all liners are 2/3 full, tap the pan gently on the counter to remove bubbles. These suckers bake fast, so only cook for 10 minutes before toothpick testing. Mine were ready to be removed from the oven and cooled on a cooling rack after 9-10 minutes.
They look like cupcakes...
At this point I thought for sure after they cooled they would cave in and implode because I still couldn't wrap my head around Coke working well enough to hold something together when I've seen it dissolve a penny with my own eyes (I type as I drink one...). Some people might gripe diet colas are terrible for you, but so is butter and a ton of sugar. You're reading a baking blog, what exactly were you expecting? When someone finally comes up with a healthy way to eat baked goods that doesn't potentially embalm me from the inside out, I'll totally follow along. Until then, I'm gonna have my cake and eat it too, but in a way that doesn't cause an extra hour on the elliptical every day. 
I also have way too many choices when it comes to decorating tips.
Awesome thing about mini cupcakes (other than being able to fit an entire one in your mouth at once), is that they cool off incredibly fast. I spent a few minutes weighing out which tips I wanted to try for my trees, and after that agonizing ten minute assessment (I'm really thorough), they were already cool on the cooling rack, so I set aside my #21 and #32 Wilton tips and got down to business. Frosting business.
I'm still wondering why in Florida, my commissary milk brand is named California Sunshine.
These mini cupcakes don't need a ton of frosting, so this is a half batch of my peppermint buttercream. I didn't even use all of it, and I could've easily frosted 5-6 more mini cupcakes with it. To make, you need:
  • 1/2 cup room temp butter
  • 2 1/2 cups powdered sugar (2 might even suffice)
  • 1/2 tsp peppermint extract
  • 1/2 tsp vanilla extract
  • 2 TBS skim milk
  • Green gel dye
Cream the butter until fluffy, then add in the extracts and sugar. Blend on low while adding in enough milk to get things into thinner piping consistency. Once this is done, add in the green dye until you get a nice festive green. Load up into a piping bag fitted with a #21 or #32 tip. If you're frosting regular sized cupcakes, use a 1M tip. Ensure all the lids are off your sprinkles for quick access, and you're ready to roll.
On the left: the #21 tip. On the right: the #32.
To make a tree, start on the edge of a totally cooled cupcake and make a ring. While continuing to pipe, slightly overlap that bottom ring with another ring on top of this. Continue ringing-around-the-cupcake until you have a tall mound of frosting. Pipe a little extra on top while gently pulling away to create the top of your tree. Now, I thought the #21 tip did a better job of looking like an actual tree, but you can use either tip here for this look. You could also try using a 1M tip while simply piping a large mound of frosting for one uniform tree. Whichever tip or method you choose, only frost 3-4 of these at a time because you have to work fast to get your sprinkles on each tree before the frosting sets up and things will just roll off--like water off a duck's back or your Christmas spirit off my cold shoulder. 
A tiny field of glee!
I frosted 4 cupcakes at a time, then topped each one with a star sprinkle before adding either pearls, various glitters, sprinkles, etc. The combinations here are pretty endless as you can tell above. I made most trees completely different from one another, but a uniform style for all 26 would've been pretty as well. I finally felt the Christmas spirit, so I was like a kid in Santa's Workshop just going for it, no holds barred with reckless delight. Similarly, my fingers were also sticky like that of every child I've ever come into contact with. Go figure.
Pictured: my missing Christmas spirit.
Baking has, and will always be, a cathartic experience for me. When I am sad, it cheers me up. When I am happy, it fills me with hope. When I am still wearing Halloween socks in December, it gets my butt into gear. Upon glancing my creations, I was positively giddy and filled with a month of missing Christmas spirit all at once. If I had a Santa hat, I would've put it on. Maybe I should just start small and find some Christmas socks. Either way, I knew exactly what the Grinch felt like when his heart grew three sizes. Thankfully this was just a metaphorical and not physical experience for me, or, you know, I'd be dead and all and unable to eat these delicious cupcakes. That would be the real tragedy. I've got enough juice (of the peppermint extract variety) left in the tank and a few days before we head off, so I'll be back in later in the week with my next great experiment: peppermint bark fudge. But as for now, I'm going to find appropriate sock wear and giggle with delight at the field of Christmas trees in my kitchen. 'Til next time, my fellow eaters!
Oh Christmas tree, oh Christmas tree, how tasty are your branches.