Wednesday, October 22, 2014

Painted Pumpkins 101

I know, I know..first it was pumpkin bundt cake, then it was pumpkin dog treats, and now its spray painted faux pumpkins (or faumpkins as I call them. Or just started calling them right here in this moment. Whatever.). I really wasn't kidding when I said I'm absolutely obsessed with fall. On a scale of things I could be addicted to, it is a pretty mild issue really, falling somewhere in between Netflix binging and wine fervor. In fact, everyone only seems to benefit from my hardcore seasonal enthusiasm. I spray painted two pumpkins last year for Halloween, and absolutely loved them. Since Derek was home this year, I decided it would be fun for us to make a few more. Derek begrudgingly agreed to my unrelenting arts and crafts session (he secretly enjoyed it), and thus, these faumpkins were born:
I bet its pretty clear who chose to do what pumpkin.
A few Halloween's ago, I carved a Mike Wazowski jack o'lantern. It was in this moment that my arthritis was born. But since we live in a magical land where it is 80 degrees one day in October, and 50 the next before repeating the cycle, jack o'lanterns rot in about a night or two and turn into something reminiscent of Renee Zellweger's new face. Its rough, y'all. So last year, I took the time to churn out a few painted pumpkins from Hobby Lobby, and love that I can reuse them year after year without worrying about melty face.
Mike in cooler, happier times. My fingers get all crampy just thinking about it.
Last year's faumpkins for an NFL house divided.
At least one of these pumpkins isn't dying from embarrassment this season.
These pumpkins are insanely easy to do, and if you live somewhere with bipolar weather, you will find it is nice not to have to worry about your hard work withering and dying before your very eyes. Or if you live somewhere normal, its just awesome to have pumpkins you can use year after year. So let's get to the nitty gritty! Sorry, the fall obsession makes me say very strange things like "nitty gritty."
You'll need spray paint depending on what type of pumpkin you want to make. Get a can for your base color, and if you have large accents, get those colors in spray paint as well. For smaller accents, Sharpie makes paint pens in just about every color imaginable.
Then head to your local craft store (Michaels, Hobby Lobby, etc.) and look for fake pumpkins in the seasonal area. Grab however many you need! They usually come in standard orange, white, and black.
The only downside about the fake pumpkins is that they can be kind of pricey, around 25 bucks. This why I get them from HobLob, because they are 40 percent off. Well, I also have to get them from HobLob because Michaels does not exist out here, unfortunately. Once you've gathered all your paint and pumpkins, get yourself set up outside. Naturally, the weather went to complete shit when I wanted to do these, so we had to work quickly and bring the pumpkins in to the laundry room to dry.
Look, I got me a handsome model to help with the step-by-step photos!
Spray your faumpkin with a base coat of spray paint. Allow it to dry for about a half an hour before hitting it with a final coat. On a nice, sunshiny day, you could leave them outside to dry even quicker between coats. Thanks, Clovis. While drying, create a template for your pumpkin. I simply Googled "Mike Wazowski pumpkin template" and "Grim Reaper pumpkin template" and printed out what I found on sturdy card stock after working my MSPaint mojo and resizing the templates to fit properly on the pumpkins. Yes, MSPaint mojo is a real thing. No, I cannot tell you why I'm too cheap to buy a better image editing software. Anywho... If you have to spray paint an accent color instead of using the paint pens, the card stock will keep the paint from soaking through to the rest of the pumpkin while you use it as a stencil/guide.
Yeah, my printer stopped working halfway through the reaper, so I had to freehand.
You want to reverse-image cut the stencil if you plan on spray painting. Again, this is so that you don't end up accidentally painting the already painted base coat a different color. You'd want to use double-stick tape to secure it to the pumpkin so no holes would cause a leak. I just needed guides to draw on my pumpkin, so that is a lot easier to do.
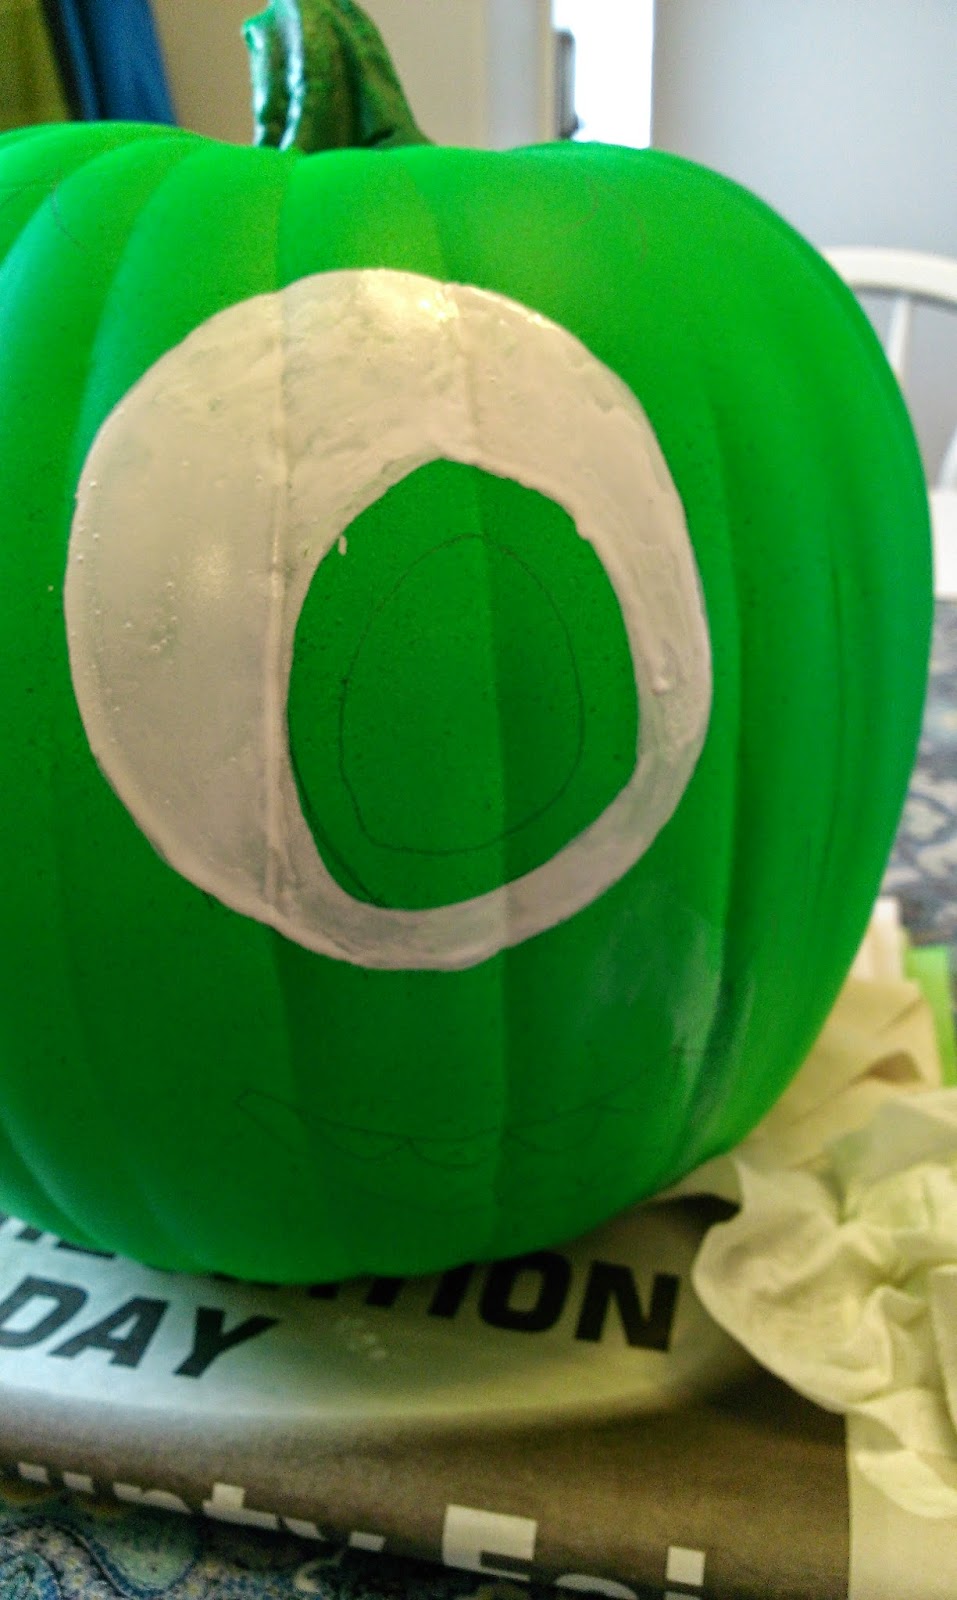
 Once the base paint is dry, it is time to get all super artsy (by super artsy, I mean tracing with a pencil). My pumpkin did not require anymore spray paint, so I just needed to draw on Mike's eyes, mouth, and horns.
I simply traced around his ojo and drew in a pupil and an iris.
"Put that thing back where it came from, or so help me!"
Now we get to practice coloring inside the lines.
Something I have always failed at miserably. Damn these dysfunctional hands!
Derek decided it would be easier to trace the reaper and color him in with my giant Sharpie.
Think markers for three year olds, just toxic.
How ghastly! He has more artistic talent when it comes to drawing than me
because he has real, working hands. Lucky.
 Derek started by working his way from the outside to the inside. As a lefty, this made no sense to me, so I did things the exact opposite way. I now see that probably would have been beneficial working outside to inside because then I would have had a better chance at not coloring like a simple-minded idiot (*waves hands*) or a toddler.
Derek's reaper was outlined in black, and his scythe colored in silver.
Once he colored in the reaper, he used the silver paint pent to add a creepy moon, stars, and tombstones.
At this point, I think he was finally enjoying himself. At least I only make him do arts and crafts time once a year.
I started by working on Mike's beautiful, large, oblong eyeball. Can we just talk about how much I love Monster's Inc.? Seriously. It has to be one of my all time faves. Children are so scary even monsters don't want to touch them. This speaks to me on so many levels. I'm also a fan of any story with a good bromance. Mike and Sully, Turk and J.D., Affleck and Damon...I'm probably just jealous because relationships like that don't exist with women. We get Regina George and Cady Heron, Paris and Kim, that one annoying chick from Glee and that other annoying chick from Glee. Sigh. I digress.
In my own way, I did start working from outside to inside.
Just in a fashion more befitting a scatterbrained chicken.
I used the paint pen to color in Mike's white (he only has the one),
and only dripped paint all over him, me, and my redone kitchen table once! Progress, y'all!
While letting his eye dry, I drew in his horns and colored in his teeth. No drips this time. Little victories.

I then took my industrial-sized Sharpie to color in his pupil. Still, just has the one.
I finished up by coloring in his baby blue (just the one), and painting in his horns before outlining everything last.
Unconventional, but it worked!
From start to finish, including drying time, it took us the same amount of time to make these pumpkins as it would have to cut open a real one, not puke while scooping out the guts, and build on to the preexisting carpal tunnel and arthritis by carving them. And bonus- we get to reuse these again next year. Perhaps Sully might come out to play for Halloween 2015. Who knows...

Each year I add to our Halloween decoration collection. This year I finally had the wherewithal to film all our decorations at dusk (see above). From our Batcave (where I park my Batmobile) to our Murder House windows to our graveyard and swirling vortex of doom, we are really ready for Halloween! Minus the fact that I abhor children and make Derek answer the door. Last year I had to do candy by myself as he was deployed. After one hour and a possible brain aneurism from listening to high-pitched child noises, I quit, turned off all the lights, and ate a bunch of candy in bed. It ended up being a really great night. Back to Halloween treats next week. 'Til next time, my fellow eaters!

Wednesday, October 15, 2014

Pumpkin for the Pooch

Aside from being obsessed with pumpkin-flavored everything for myself, I decided this week it was time to get Hank addicted, too. My version of a trickle down effect, if you will. Canned pure pumpkin is extremely good for a dog with an upset tummy, and Hank has this uncanny resemblance to a garbage disposal on our walks. If I take my eye off of him for one second, he somehow always manages to find something to eat: Oh, wow, that house has really amazing landsca-oh my God what are you eating? This is exactly what happened on our Monday walk when Derek and I were discussing a house across the street, and the dog somehow managed to find what appeared to be some sort of bone or bone-like morsel in some grass. Fairly certain it could've just been bone-scented garbage and the dog still would've tried to eat it. After prying open his mouth and realizing my poor timing had struck yet again, I was happy to know we had canned pumpkin at home to help him digest his poor life choices.
I know the dog can't tell that these are Halloween themed, but it matters to me.
While most people would be worried the dog would die after eating a bone, I, however, was not quite so anxious, as Hankopotamus is clearly part goat. If the dog had a punch card for finding random bones in people's yards and eating them with the speed of a cheetah pouncing on some unsuspecting gazelle, this probably would've been his third or fourth punch. Hank's well on his way to that free t-bone left out in someone's yard who clearly doesn't understand how garbage bags and trashcans work. Oh Clovis...you never stop amazing me for all the wrong reasons.
This time I realized the merits of mini cookie cutters for dog treats,
unlike my dismay with the last batch of milk bones I made him.
I knew I wanted to make pumpkin dog treats for the puppers, so it just happened to be fortuitous that the dog decided to cram his gullet with garbage and be in need of some soothing pumpkin after I had already gathered the necessary accoutrements. If you asked him, I'm sure he'd say he was just trying to do me a favor. But if my dog ever did gain the ability to form coherent human sentences, this would probably be the last thing we'd care about. He'd be asking me for his own squirrel- or cat-filled cupcakes without a doubt. I digress. Wilton has a 12-piece set of mini Halloween cookie cutters on Amazon Prime for like nine bucks...winnnn. 
It really doesn't get much easier than this.
The ingredients for these treats are so simplistic it makes my last batch of dog cookies feel like a five-course meal. One can of pure pumpkin, one chicken embryo, a teaspoon of cinnamon, and two and a half cups of flour. I used wheat flour so it is easier for his doggy digestive system to process. I was already keenly aware of how rank the house was going to smell thanks to his proclivities for snacking on trash, and did not want to add to his future fervor for room clearing. Have I mentioned how this dog follows me everywhere I go, like a shadow? Yeah, always bake with the wheat flour for your dogs. You're welcome.
I sampled the pure pumpkin, what of it?
In a stand mixer, blend together the egg, cinnamon, and can of pumpkin until well mixed. At this point, you're going to start to wonder if these treats could also be fit for human consumption. This is perfectly normal, I assure you.
Thanks for having my back, wheat flour.
Slowly add in a little of the flour at a time, mixing well after each addition until you've got a nice consistency of dough with all two and a half cups mixed in. My mixer is not an extremely expensive Kitchen-aid mixer, so I knew my dough was mixed and ready when the bowl started to knock around like it was a washing machine full of nothing but loose change. It may not be pretty, but it works for my penny-pinching ass.
Time to bust out the kitchen weaponry!!
This dough was stickier than I expected, so I recommend spraying a little cooking spray or dusting some parchment paper with flour before you roll it out. I also placed parchment paper on top of my dough mound before rolling it out. I forgot to take pictures of this process because I was enjoying roughing up the dough and relieving my Monday stress. Sue me. Or try to, anyway, just not when I've got a rolling pin in my hand because I will end you. Once I rolled my dough out to about a half-inch thickness, I used my cute terrifyingly haunting Halloween cookie cutters to cut out my dough and placed these adorable nightmare-inducing shapes onto a lightly greased cookie sheet.
Aren't they just the scariest?!
I cooked my tombstones, pumpkins, leaves, skulls, moons, witch's hat, ghosts, bats, and cats at 350 for a half an hour. I then let them cool completely while on the tray so they'd get a little crunchy. If it isn't crunchy like day-old garbage, Hank may not want it.
The face that says, 'I know I don't need the garbage, but I just can't resist it.
Also, when is this woman going to stop inner-monologuing for me? I mean, really.'
Of course, I had to take it a step further and decorate these bad boys once they cooled off. All you need for dog-friendly icing is fat free plain yogurt, or fat free cream cheese. I went with some yogurt, and placed it into a piping bag fitted with a tiny number two tip. Remember to use the cup trick to fill your piping bags so you don't end up wearing most of your decorations.
Even our cups are terrifying.
Then, just have fun and go to town decorating your dog treats however you'd like. Remember, this step really makes no friggin' difference to your dog, other than they have to wait even longer to eat what they know you've most certainly just made for them. Call this my passive aggressive way of letting the dog know I wasn't rewarding him for dumpster diving.
At this point, these cookies made the house smell SO GOOD I was almost positive I had to eat one, as was Derek.
As of this blog, we still have not eaten any. I make no future guarantees.
With such a small piping tip and such an easy work surface,
you can pretty much do whatever you want. Me gusta.
While these may not be the prettiest, they don't have to be. And not just because they are dog treats, but because they are HALLOWEEN dog treats, and should be both menacing and a little rough around the edges. As far as I know, Casper was the only friendly ghost and cats are definitely evil, so I wasn't too worried about perfection here. No offense to anyone who likes ghosts. If you're a cat person, I'm not sure why you're reading a dog blog unless you wanted to make these for yourself. I'm only judging you for liking cats, bro. 

Of course, Hankenstein was thrilled that I finally baked for him again, and ate these right up. Happy to report the pumpkin did its job, and he wasn't chasing me out of any rooms later that evening, nor did he have any digestive issues due to his version of go hide and seek garbage. Now I can say with certainty that my baking can save lives. Til next time, my fellow eaters!

Tuesday, October 7, 2014

Blue Velvet is the Best Velvet

Today, Derek and I celebrate what we call our "nananiversary." This just so happens to be our third nananiversary. This is similar to an unbirthday, but with much more importance. Three years ago, Derek and I went to the Justice of the Peace and married six months before our big wedding. This will come as a shock to no one who understands military life. There was a large chance Derek would be deploying before our big wedding in April, so he wanted to make sure we were legally wed in the event the worst case scenario happened when he was at war, and that I would be provided for if this occurred. This is the reality that we live in, and I have an absolutely amazing husband that does everything in his power to ensure I am content and have a life that I consider to be an absolute dream. I am still not sure someone as cranky and uppity as I can be deserves such a devoted partner! I consider myself very fortunate, and I baked a blue velvet cake to celebrate our big "non-aversary" (I also bought us some bitchin' games for the Nintendo64 Derek got me). I think this is how we ended up coining it as our nananiversary...because we didn't truly become husband and wife until we took our vows in front of God, our family, and our friends on April 7, 2012 in Oak Arbor Church, nestled in the woods in Rochester, Michigan. Cue the slideshow...
My creation: Abstract meets organization- the cake version of D and me, pretty much.
Celebrating our J.P. ceremony with friends at one of Clovis's "finest," a.k.a, "most expensive" restaurants.

We like each other so much, we married each other twice. As you can see, cake has always played an important part in our relationship...
I literally start drooling when I think about how good our wedding cake was. Chocolate with a chocolate ganache and butter cream icing with cornelli lace decoration. I mean, not that the rest of the wedding wasn't absolutely spectacular- because it was- but cake tasting and cake eating were probably some of my favorite parts of the whole experience. Also, my wonderful stepdad (who also shares his birthday with our nananiversary so selflessly), made the coolest groom's cake to ever exist:
Yes, that IS an AC130H Spectre Gunship cake, complete with working lights and props.
Again, cake is really important to my entire family. So I wanted to learn how to do cornelli lace to make a tribute to the greatest cake in the world (the cake of destiny, if you will). When I found out how easy it was, I nearly kicked myself for not saving a couple hundred bucks and making the wedding cake my damn self. I am clearly in the wrong line of work with this whole noble college instructor business, trying to teach adults how to write proficiently. Let them eat cake, and let me show you how to let them! Let me also fail at brevity!
Yeah, its a box cake...but we're gonna make it taste like a bakery cake! Really!
I know, I know, I'm usually on an "everything from scratch" kick, but Duncan Hines really got their stuff together with this blue velvet box cake. Just make a few changes, and you'll have a much richer-tasting cake. Use milk instead of water, double the amount of butter, and add an extra egg. I am a huge fan of blue velvet cake. It is not NEARLY as heavy as red velvet, and frankly, I like to be able to eat what some may call an absurdly large piece of cake without feeling like I may sink if knocked into a puddle of water. They say absurd, I say shut up. So we'll be skipping the mixing of ingredients and baking info here because they're totes magotes on the box. On to the frosting!!
Ahh, Crisco sandwiched between extract, a baker's dream.
I did use homemade frosting for this cake because I wanted to be able to use the paper towel trick to smooth things out. This frosting is super easy to whip up, minus the fact that you and everything you own will be covered with powdered sugar after you make it. Just combine one cup of Crisco with a teaspoon of vanilla and half a teaspoon of almond extracts. Once these have blended nicely, add in one cup of powdered sugar, and mix. Then add another cup of powdered sugar, and mix. Then add two tablespoons of milk, and mix. Repeat the sugar/sugar/milk/duck/duck/goose business one more time. If you want to dye your frosting, use gel frosting and do it at the very end. Since I was going for more of an angelic/romantic (yeah, on purpose, whataboutit?) look, I wanted plain white frosting.
Stack your cakes, frosting in between the two levels, of course.
Do not forget the all-important crumb coat!! Then place in the freezer for 20 minutes so it can harden,
like most things do when you place them in the freezer for 20 minutes.
Then use the remainder of the frosting to frost the cake, and place back in the freezer for 20 minutes.
Once you remove it, take your Viva paper towel and use it to smooth out any lumps or bumps.
While my cake was freezing, I went ahead and whipped up another half a batch of the homemade frosting. This is for the cornelli lace, so it needs to be super thin. So, half a cup of Crisco, half a teaspoon of vanilla, a dash of almond, two cups of powdered sugar, but keep the four tablespoons of milk to thin things out. The thing about cornelli lace, you gotta use a lot of pressure while doing it, so unless you enjoy having claw hands and forcing arthritis on yourself, thin that icing out, yo! But man alive, it is so much fun and so EASY to do. Place your icing into a piping bag with a number 1 or number 2 Wilton tip. Then you just go crazy with the swirly lines! I call this the amoeba effect. Never have single-celled organisms looked so tasty.
You just don't want the lace to intersect or touch at any point.
Start at the very bottom of the cake, and swirl around making various "s" shapes.
I later added a border at the bottom of the cake,
so this is why I worked my way from bottom to top with my squiggly lines.

You don't want to be able to tell where the cornelli lace starts or ends, either.
Once I added my top and bottom borders, I filled in more lace at the top.
Why? Why did I not know how easy this was? It is one of those things that when executed properly, makes you look like a friggin' cake genius. And I think we all know how much I like looking like ANY kind of genius, so this is right up my alley. I now must resist the urge to cornelli lace all the things. I also tried a new border technique for this cake, and its success has made my head so large it is hard to fit through normal, non-genius sized doorways. Let me teach you my ways, oh normal-headed one.
Start by fitting tip 21 to a piping bag, and add in decorator-consistency frosting.
I wanted a color that nicely accented the cake's white frosting,
so I went with the same blue of the cake itself.

Now, make an S shape on the bottom of your cake,
ensuring you have space under the first "hump."
Then, bury your tip in the hump, and draw another S shape.
This will cross OVER the top of your first S.

Repeat this S-hump filling (teehee, that sounds naughty) around the entire border.
Now you can see why this is called a rope technique. I simply repeated the same process on the top of the cake, and it really does look like a braided rope. Man, I love it when things work according to plan. Surprise, surprise, I added sprinkles. They will never go out of cake fashion!
This. This is my masterpiece. My tasty, tasty masterpiece. I mentioned this was for my husband, right? I waited for him to come home to eat any, I SWEAR. This is another one of the few instances when my husband doesn't lose the battle with my insane OCD tendencies. Also, the fact that I made sure our wedding anniversaries are exactly six months apart to the day- I made things super easy for him with my uberorganization. Did I mention my birthday is on January 7th as well? He pretty much just has to check the calendar on the 7th of each month to make sure nothing important is going on. Why yes, I do think this makes me sound like a good wife and not someone who is in desperate need of a padded cell.
Get in mah bellay!
Yeah, we totally cut the cake Sunday evening after I finished decorating it. Wait two whole days? I think I've made it vehemently clear it was hard enough just to wait for him to come home from watching football, let alone wait TWO WHOLE DAYS? Pfft...we all know I have literally no will power when it comes to cake. She is my mistress. Always tempting me and later filling me with regret (and calories). At least we indulge as a married couple, right? If eating a lot of cake together is the worst thing we're doing, I think we're solid. My husband seems to have a tapeworm that keeps him in impossibly good shape (we call him Tommy Tapes...seriously), and I have Jillian Michaels to kick my uppity, cake-eating ass.
This cake also paired nicely with the bouquet Derek bought me!
A Fox family win!
We're going to enjoy eating this cake for the next few days, until our insides are completely dyed blue (this gives me the opportunity to say 'I blue myself' at least five times). After a romantic trip, or my idea of a romantic trip, to go watch hockey and drink in a real bar, I'll be back next week to blog about making more treats for your pampered pooch! Til next time, my fellow eaters!