Wednesday, November 14, 2018

A Lesson in Pumpkin Spice


Up until like four days ago, I was still wearing shorts and flip flops on a regular basis because Florida doesn’t believe in fall. Imagine my delight when a “coolish” front finally pushed through and plunged temperatures into the mid-60s (Floridians refuse to go outside for anything under 70 degrees) with gray skies and plenty of rain. This is my weather—the cooler days without sunshine and plenty of clouds. If it’s raining to boot, I am in my happy place, probably doing one of two things this weather is perfect for: curled up with a book and a dog or working on puzzle while listening to “I’m Only Happy When It Rains” by Garbage. If you’ve known me longer than five minutes, you know this is my favorite band. So as a nerdy pluviophile with great taste in music, these rainy, cold days (it’s 50, hallelujah!) are my comfort weather days. And you know what goes fantastically with comfort weather? Comfort food! Say hello to my only* pumpkin creation of this extremely brief fall season: chocolate pumpkin cupcakes with cinnamon cream cheese frosting and chocolate leaves.

*My husband is not a basic white girl, so he only likes pumpkin spice in moderation. I was afraid “irreconcilable differences” might get thrown around due to my desire to put pumpkin spice in literally everything for the entire month of November. I refrain from over pumpkin spicing for the sake of love.
I wanted a cupcake that had a subtle pumpkin flavor...I guess you could say what I was going for was the opposite of walking into a Starbucks and getting punched in the mouth by a pumpkin spice latte from a barista with mermaid hair named McKenzie, who's wearing leggings as pants and definitely draws hearts over the 'i' anyone's name. I wanted the flavor to slowly wash over the tongue--hints of pumpkin intermingled with chocolate and finished off with a burst of cinnamon cream cheese silk. No offense to anyone named McKenzie, but I was going for "high class pumpkin spice" here. And it was definitely achieved. I can't believe I had never thought to combine chocolate and pumpkin before--much like peanut butter and jelly, these two flavors go together like absolute magic. Nothing's overpowered by pumpkin, just enhanced by it. Seriously, this recipe is so easy and so quick, you really just have to try it yourself to have a full "fall flavor" experience. As usual, saving the best part for last, this recipe makes one dozen cupcakes--each only 200 calories a piece. Which as you know, means I eat them one in each hand. Classy.
Only 5 ingredients from releasing your inner basic-ness...
 You could easily double this recipe for 24 cupcakes, but since I happened to have half a chocolate cake mix leftover from my Halloween cake, and I definitely did not need to eat two dozen cupcakes (I think), this amount was perfect for me while my husband is away for most of the week. To make the chocolate pumpkin cupcakes, all you need is:
  • 1/2 box of chocolate cake mix
  • 1 egg white
  • 5 ounces diet creme soda
  • 1 tsp pumpkin spice (seriously, it's the perfect amount--don't over do it!)
  • 1/2 cup of canned pumpkin
Preheat your oven to 350 (my fancy new oven does convection baking, so 325 if you have that feature), and mix together all ingredients in your stand mixer for 2 minutes on medium high. Line a muffin tin with cupcake wrappers and gently spray with cooking spray. I only had Halloween cupcake liners on hand, but the color scheme worked perfectly for my tri-colored swirl frosting. Small miracles.
Small, pumpkiny miracles.
 Take a cookie scoop, grease with cooking spray, and plop a scoop and a half into each cup. Tap your tin gently on the counter to release air bubbles, then place into the oven for 15 minutes, or until a toothpick comes out of the center of a cupcake clean. Set your tin on a cooling rack for 10 minutes, then remove the cupcakes from the pan to finish cooling on the rack. Cupcakes cool in record time, so make your frosting and leaves, and they'll be ready by then.
And so worth the wait.
 Making the leaves is probably the most time consuming portion of this endeavor. Since Autumn, or as Americans call it, "Fall. Because leaf fall down," is all about those gorgeous changing of colors, you really should take a few minutes to pipe out some stellar foliage. Unlike real leaves, these are edible, and therefore, worth your time.
Ah, the maple leaf. When piped with chocolate, it looks more like a pot plant. Lesson learned.
 I used *Parchment* and not wax paper in the end for this. But first, I found some leaf templates I liked online, printed them out, and then placed Parchment paper on top of the printouts, so I could easily see the lines I needed to trace.
Told you. That's definitely a pot leaf.


Take 1/3 cup of semisweet chocolate chips and melt on 50% power in the microwave for 1 minute. Stir until smooth, then load into a piping bag fitted with a #3 round tip. Carefully pipe over the templates on your Parchment paper. I made a few extra in case of breakage. Try to make thick lines so your leaves aren't too fragile. I ended up getting to eat my extra leaves because I miraculously was able to leave these alone to set for the proper amount of time while I made my frosting and piped my cupcakes. Seriously...don't touch them once you've piped out the chocolate for at least 20 minutes. Then only gently lift the Parchment sheet and place it in the fridge for your leaves to finish setting, another 15 minutes. Out of sight, out of mind while you make frosting!
Okay, way more than five ingredients here, but worth it for the fall vibe.
For the frosting, you'll need:
  • 4 ounces of 1/3 fat cream cheese at room temp
  • 1/4 cup of butter at room temp
  • 1 cup of Swerve confectioners
  • 1 cup of powdered sugar
  • 1/2 tsp vanilla
  • 1/2 tsp cinnamon
  • 1 TBS skim milk
I chose to go with cinnamon cream cheese to in order to not pumpkin spice the hell out of my cupcakes, but you could easily swap the cinnamon with pumpkin spice to live up to your Ugg-boot-wearing, vests-with-everything fall potential. I also find the 1:1 ratio of Swerve to powdered sugar gives the best flavor without the cooling effects of Swerve but still with very low calorie content. This frosting is so perfectly flavored and autumnal that it mentally transports me to the fall section of Hobby Lobby with every bite. I'm afraid to *actually* go to Hobby Lobby because I know they're already playing Christmas music even though there's another flipping holiday between now and then...ahem. I digress.

Mix together the cream cheese and butter until well blended, then dump in the sugars, vanilla, and cinnamon. Mix well and add in milk as needed. You want a stiff consistency, and since the cream cheese is so silky, it won't take much milk for perfect piping consistency.
It doesn't seem like much in the recipe, but it makes a Chipotle-burrito-sized amount of frosting, as seen here, with my poor weak hand about to give way under its weight.
Making the three-toned color effect is actually super simple. You need some food-safe paintbrushes (read: paint brushes you've never used with actual paint), red, orange, and yellow gel dye, and a 1M piping tip. Fit a piping bag with your tip, then take turns painting a line of red, a line of orange, and a line of yellow on the inside of your piping bag, being sure to use a different paint brush for each color. I had two stripes of each color (6 stripes total) in my bag, then I carefully loaded up my frosting and piped out a small amount to get the colors going.
Then swirl, swirl away.
I piped a traditional swirl with my 1M tip, allowing all three colors to show up on each cupcake, and giving me a place to put my leaves.
Halloween cupcake liners, you the real MVP.
Each cupcake will have a unique color swirl as the frosting works its way over the dye and out of the bag. I love multicolored frosting because of this. It's like owning a favorite pair of pants in 5 different colors. Same style, but so many possibilities. Magic! ...now we know for sure I've earned my basic white girl-ness without a doubt. I am not proud of the number of colored jeggings I own.
The most maple-y, least pot leafy one of the bunch.
 Once you've frosted and your leaves are TOTAL DRY TO THE TOUCH, take an angled spatula and gently lift the leaves off of the Parchment paper one at a time, placing each on top of a cupcake with the help of the spatula. Don't touch with your fingers, or you will definitely cause some breakage. Unless you've been gifted with cat-like dexterity, anyway.
This was my favorite style. Simple, but effective. Like how every Starbucks barista wishes you'd order in the fall.
 Repeat until you've used all your leaves. Told you, these are quick, easy, and oh dear sweet pumpkin spice baby Jesus, so delicious. It's got the right balance of everything--first you're hit with chocolate, then the pumpkin comes waving in followed by the smooth boldness of the cinnamon cream cheese. I'm running out of adjectives to describe how utterly perfect these are, so just bake them yourself and discover a brand new fall staple. Maybe they help you survive Thanksgiving. Maybe you keep some in your car for Black Friday shopping fuel. Maybe you hide them from your family because they're too good to share. Whatever you decide, you won't regret a single bite. Happy Fall, y'all. 'Til next time, my fellow eaters!
Fall will always be the tastiest.

Sunday, October 28, 2018

Even the Dead Like Cake

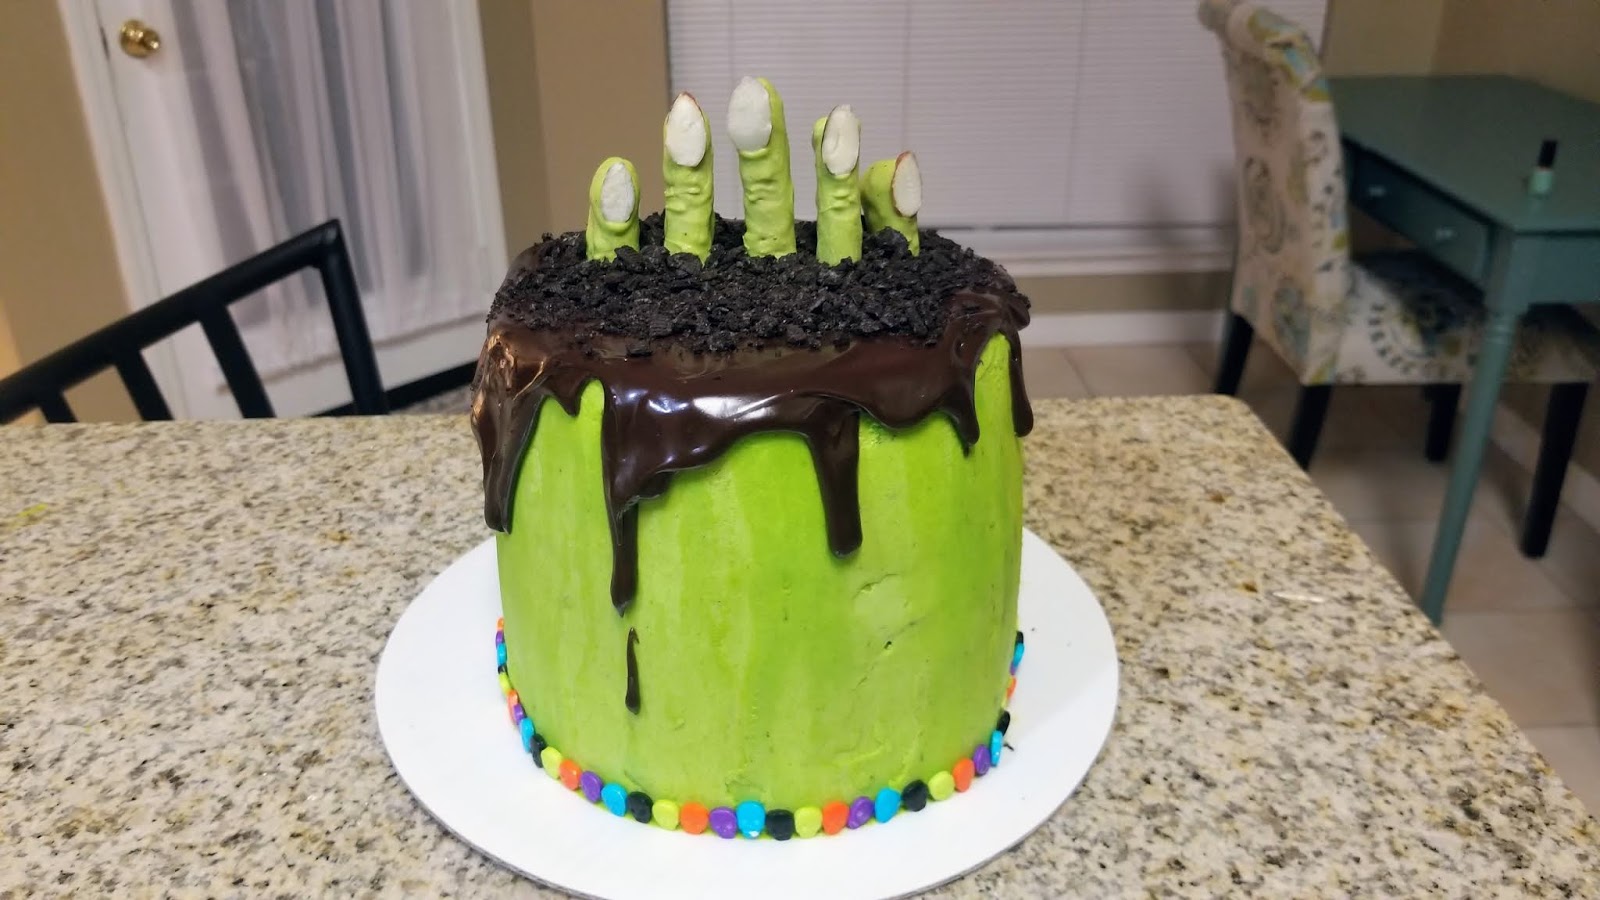
I have been dying to get into my new kitchen and bake, but we have been so busy between moving into the new house, cleaning out the old house, having a spectacular time in Canada for our annual vacation, and pretty much having the best worst problems you can have as an adult that prevented me from doing so. We've been so busy that I didn't even decorate the outside of our new house for Halloween this year...I'm afraid all our new neighbors will think I'm normal. The horror. Halloween snuck up on us this year, like any holiday based around spooky spirits and mischief should, really, but I am so thankful that I at least had a few evenings after work to create one creepy cake before my favorite day of the entire year.We may have been the schmucks standing in line with the masses at Spirit Halloween for last minute costumes (my own personal hell--fitting, since I decided to go as the devil this year), but I will be damned if I have to do last minute Halloween dessert. To me, cake is a form of expression, and since the outside of my house looks completely normal, I amped the spookfest up to 11 inside. Literally, there's a dead guy trying to crawl his way out of my Halloween cake. Because, little known fact, Zombies also enjoy the taste of cake flesh (this is what I'm solely calling frosting from here on out). Prepare for a combination of "oohh" and "eww" with this vertical layer chocolate and vanilla cake with Salted Caramel Baileys buttercream frosting, chocolate ganache, skull decor, and delicious zombie fingers:
That's right, this way you get to eat the zombie and not the other way around.
For real, best fingers I've ever eaten right next to chicken. These were super easy to make, but then again, I think after making the vertical layer portion of the cake, rocket science would've felt easier, too. I tried a different approach from my last vertical layer cake, and this almost ended in near disaster and the saddest Halloween since my final year of being allowed to Trick or Treat. Thankfully, I could pull this one together and perform a resurrection of my nearly dead idea. This cake hits all the flavor high notes--not as spongy as my last vertical layer cake for sure, so the flavor shines much better. A combo forkful of vanilla layer mixed with chocolate layer, a thick slathering of Bailey's frosting (cake flesh), and a finish with smooth, rich chocolate ganache, and this cake is what I shall call "spellbinding." I save a huge bite of Oreo dirt crumbs, ganache, and frosting for last, and it's so good I forget who I am for a minute. I am then reminded that I am a woman who friggin' loves to eat cake, which is why I managed to knock this recipe down to 340 calories a slice for 16 slices total because it is technically one a half cakes, and I am technically the kind of person who sees that as a personal best eating challenge. Maybe next year I'll just dress up as a racoon and rifle through cakes and desserts at a Halloween party "in character."
I mean, I made a great devil (irony?), but I'd be an even better Trash Panda.
Now, if you're afraid to be haunted by a cake wreck, you can always skip vertical layers and make three 8-inch round cakes each in orange, purple, and black, and still make this amazingly stunning-yet-gross-looking cake. But there is something to be said for the vertical layers here because they really add to the cake's spooky scale. To make, you'll need:
  • One box vanilla cake mix
  • 10 ounces diet creme soda
  • Orange and purple gel dye
  • 2 egg yolks
  • Meringue (see below)
  • Half a box of chocolate cake mix
  • 5 ounces diet cola (I used Cherry Coke Zero)
  • Black gel dye
  • 1 egg yolk
  • Meringue (see below)
To make the meringue, you need 6 egg whites, 1/4 cup Swerve granular, and a stand mixer. Beat the egg whites on high for 5 minutes, until stiff peaks form. Blend in the Swerve on low. Set this aside in another bowl and prepare 2 jelly roll pans with foil: make two gutters--one for each cake color--on your first pan. You only need one gutter on your second pan. Spray with cooking spray. Preheat your oven to 350 and clean out your mixing bowl. Dump the vanilla cake mix, 2 egg yolks, and creme soda in. Mix on medium-high for 2 minutes. Take 2/3 of the meringue, and fold in on low until just mixed. Now, take another medium bowl (hi, we're using ALL your dished for this), and dump half the prepared cake batter into in. Dye one half of your cake mix a very deep purple and the other half a bright orange. Pour each color into a prepared foil gutter:
Oh yeah, it's about to get festive.
My new oven and I are still in the "Getting to know you" stage, but so far it has very pleasant, melodic alert tones (so soothing), the inside is bright purple (it's awesome), and it broils faster than the sun (sorry, tostadas), but convection bakes evenly. I ended up baking these for 16 minutes before resting on a cooling rack for 10 minutes still in the pan. I then tried "the towel rolling trick" used for jelly roll cakes...which I beg you not to do. Later, my unrolled and fully cooled cakes broke apart so easily that it was a tragedy and close to a Level 10 meltdown on my end (have some sympathy for the devil). Since I made these the same as my last vertical layer cake, this step was the only difference and led to tons of breakage instead of a few cracks here and there. Just flip your cakes onto Parchment paper, remove the foil, and let them finish cooling, sans towels, on top of a cooling rack while you make your next cake.
Pictured: a huge mistake.
While your purple and orange cakes cool, clean out your mixer bowl...again...and mix together half the chocolate cake mix, the soda, the remaining egg yolk, and blend for 2 minutes. Add in the black gel dye, mix well, and finish by folding in the last of the meringue on low. Turn into the final prepared gutter and bake until a toothpick comes out of the cake clean. Cool using the steps above until room temp.
I have never needed Baileys more in my life than in that towel incident.
I have not made my Baileys frosting in ages, so this seemed like a natural (and tasty) choice for a cake with vanilla and chocolate flavors. You'll need:
  • 1 cup of butter at room temp
  • 1 TBS of clear vanilla
  • 2 12oz bags of Swerve confectioners
  • 6 TBS Salted Caramel or regular Baileys
  • Lime gel dye
Whip the butter in your super used and abused stand mixer bowl (sorry) until fluffy. Add in the vanilla, 3 TBS Baileys and one bag of Swerve. Blend well before adding the final bag and final 3 TBS of Baileys. I like to stand close to the bowl and let the scent of Baileys completely wash over me. I don't really drink, so this is my version of a contact drink I guess. Dye this SUPER DUPER LIMIEST OF LIME GREENS. Because lime green and black are the superior Halloween color combo (no one likes you, orange). Set this aside and turn your attention back to those vibrant cake strips!
If this was a color swatch, it would be labeled "Shrek green."
Once your cakes are cooled, cut the ends til they are even and trim the sides as needed so they're all the same width. You don't need as much of the orange cake, so you can trim about a 1/3 of it off and eat the scraps. You've earned this. Now, slather each strip with a thick layer of frosting and get ready to roll. Starting with the orange cake, gently roll up like a carpet (I've still got moving on the brain, apparently). Once rolled, set on the edge of the purple cake so the ends meet. Roll this onto the purple layer and continue rolling until you reach the end of that layer. Carefully place this massive stack of cake on the final black layer, ends meeting, and roll up. Things will crack here and there, which is fine, since cracks can get covered with frosting.
Definitely getting a Franken-vibe...
Roll your cake into several layers of plastic wrap and place on a cake round. I gently smooshed my cake on all sides to make sure the frosting layer was distributed evenly. Place this in the freezer for at least 2 hours to firm and set. I left mine overnight and put my remaining frosting in a Tupperware for the next day.
Soooo many hiding cracks...
Thanks, cake flesh, for covering the massive cracks all over this cake. Much like how my human flesh covers all my cracked joints (I assume, since everything pops a lot for no reason), this layer hides the boo-boos (not ghosts) of the towel rolling incident. When your cake is set, simply coat in a thick layer of frosting, ensuring you're using a lot of frosting in any areas with cracks to glue things together and create an even coat. You could crumb coat, but I skipped this since my cake was totally frozen and didn't have any crummies. I placed into the freezer for 30 minutes before removing to smooth out with the paper towel trick and putting back into the freezer for another 30-45 minutes (it was dinner time) before adding ganache. Ganache is liquid-hot magma, so you want an extremely firm buttercream before it goes on.
Time to make corpse fingers! Yeah!
With the cake fully prepped, it's time to move on to the delightful step of making dead guy fingers. I am strange. For the fingers, you need:
  • 5 pretzel rods, cut into the size of your fingers
  • 1/2 bag of lime green chocolate melts
  • 5 almond slivers
  • 8 Oreo thins, cream removed, possibly eaten...but do crush the remaining wafers
  • Parchment paper 
  • Toothpick
Once you've got the pretzels cut, melt your chocolate according to package instructions in a small but deep dish or Tupperware. Dip a rod all the way into the melted chocolate, then gently tap the rod on the side of the dish to remove excess coating. Gently set onto Parchment paper and place an almond sliver on top to give it a fingernail. Repeat! I made extra because I was sure I'd screw a few up. I think that's called being proactive self deprecation?
Like giving yourself the finger.
 Let these set up until they are no longer glossy, then take a toothpick and gently roll little lines in to create knuckles:
This was a lot of fun and totally creepy.
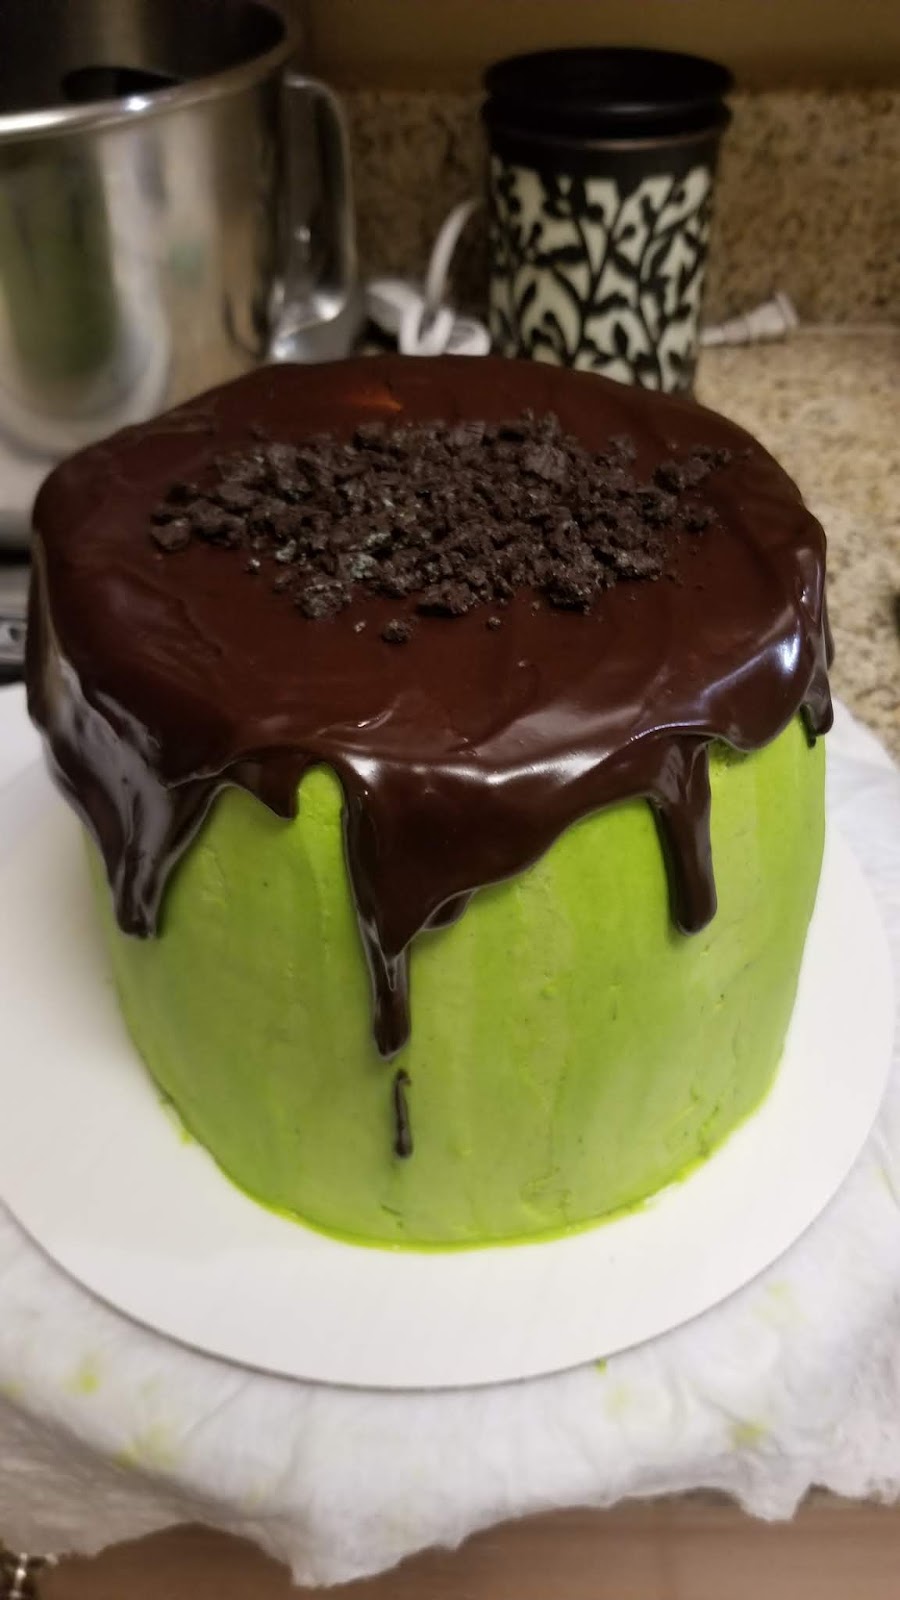
 Give these at least 30 minutes to finish setting before you put them on the cake. While you're waiting, make your ganache by dumping 2 TBS of skim milk and 1/2 cup of semisweet chocolate chips into a bowl. Melt on 50% power for 1 minute, mix, and repeat if needed. Pour this into a liquid measuring cup and let it cool and thicken for 5-10 minutes.
Frankenstein's monster? Is that you?
Decidedly, you could forgo the fingers and just make this Frankenstein's monster's head and pipe on eyes, mouth, and bolts. BUT the fingers are the piece de resistance, so stay the course. Pour ganache on your cake and smooth out with an angled spatula, pushing ganache onto the sides. Sprinkle Oreo crumbs in the middle of the ganache where the fingers will be clawing their way out of the cake.
Oh yes. Full spookiness achieved.
Carefully wiggle each finger into the cake to make it look like a hand is coming up out of the ground. I pretty much modeled how this would look with my own hand (ominous) and then put into the cake with that image in mind. Even after picturing my hands crawling out of the grave, still wanted cake, so a testament to my gluttony.
Always finish with sprinkles. Always.
I had these adorable skull sprinkles leftover from my witch hat cookies, so I created a border around my cake by gently placing into the side one at a time. This took it to the next level for me and was a great finishing touch...from a cake that could reach out and touch you, so that's saying something.
Alternatively, he could just be waving hello.
Let your cake sit in the fridge for a few hours to firm up the ganache before serving. Since you want to be able to slice clean layers, a chilled cake will really help with this. You will get some Oreo crumbs in your layers when you slice, but they're worth it for the dirt effect they give.
A few crumbs, but still, totally Halloween appropriate.
The COLORS are so bright and still so spooky and perfectly Halloween. I am so happy this cake still turned out okay even with the massive cracks from the towel incident. Thank God cake flesh can hold it all together! This really is one of my favorite Halloween bakes of all time, and since it was a labor of love with the vertical layers, I appreciate it even more and think that this definitely helped make it taste even better (but it's probably just the Baileys). While I spend actual Halloween night with all the lights off, hiding from children (my #1 nightmare), I'm just extremely happy I get to spend it with this cake, too. Each bite has amazing flavor, and those fingers are flipping delicious. I am going to watch Hocus Pocus and Nightmare Before Christmas about 5 more times in the next three days, ensconce myself in black and skulls, and just really let my weird little light shine because "This is Halloween!" The most wonderful time of the year! One of the last days before you're hit in the face with Christmas music for two months straight and sanity-questioning gift shopping. 'Til next time, my fellow eaters!
Peek-a-boo!

Monday, September 17, 2018

Florida Is Skipping Fall, but My Baking Isn't

The first 21 years of my life, I had no idea what Autumn really looked like. In West Texas, one day, leaves had trees, the next, they did not. It was always 90 degrees most of October, and I distinctly remember wearing shorts to several Thanksgiving dinners. So when I moved to Michigan at age 22, imagine my surprise when I realized leaves were supposed to turn beautiful colors, not just fall down dead; gorgeous boots (not cowboy) and flannel everything could be worn in October; and dear sweet baby Jesus, apples. Apples everywhere. My mom always talked about going to a cider mill, but in my early 20s, I was just way too cool and still way too Texan for something that sounded so...Midwestern. I remember walking into Yates Cider Mill in Rochester Hills for the first time. I experienced a fundamental shift in my being--watching the cider press at work, smelling fresh apple cider donuts and streusel-topped apple pies...in that moment, I became a fall devotee. I had yet to learn to love pumpkin (give it time), but cider mills and Michigan will always hold a special place in my heart. While I can't get behind Michigan's lack of left turn lanes and freakish love of coney hot dogs, but it is really on to something with all those apples. I have lived a lot of places, but I'll be damned if any of them do fall justice more than Michigan. So here's my tribute: an apple cider cake with cinnamon chip ganache and apple cider cinnamon buttercream frosting.
Fall is for more than pumpkin spice, y'all.
It's still a real feel of 109 outside in Northwest Florida, so fall is happening exclusively indoors this year. When this cake was in the oven, I was magically transported back to my first cider mill trip (I was a lot sweatier than I remember, though). My house smelled like the inside of a box of Apple Cinnamon Cheerios; in fact, it still does an entire day later. Just try to bring me down, Florida! My entire being is wrapped up in cider-scented goodness with my indoor fall decor providing me enough fervor to fake it til I make it. I am definitely veering into feelings-eating territory, so it's a good thing this insanely moist, apple-cinnamon-y cake only runs 355 calories a slice. Whew. There's not a "loose flannel" season around here; in fact, we're moving into a house with a pool next month, and I figure I'll be using it until mid December at this rate.
While drinking *cold* cider...
Super simple ingredients, to boot! I am all about corner cutting because as both a lazy person and a person who hates being hot, I like when my oven is on for very short increments. To make this yummy ode to fall, gather:
  • 1 box of vanilla cake mix
  • 2 egg whites
  • 10 ounces diet creme soda
  • 5 packets sugar free instant cider mix
  • 2 apples, peeled, chopped finely, and tossed in lemon juice (to keep from browning). I used Honeycrisps (Gala or Jazz apples would also work perfectly)
Preheat your oven to 350 and grease three 6-inch round pans, or two 8-inch pans, or one 9x13 pan. I will say the next time I make this, I will go the 9x13 pan route--the apples make this cake very moist, so cutting clean slices from a three-tiered cake is next to impossible because the structure just isn't dense enough. But even if it ends up in a sloppy pile on a plate, it is still the best cake I've eaten all year. And that's saying something because I eat like, a ridiculous amount of cake.

Mix together the cake mix, egg whites, soda, and cider packets for 2 minutes on medium high. Fold in the chopped apples by hand. Pour the batter evenly into your prepared pans (don't forget the bake-even strips!), using the back of the cake box to tell you how long to bake based on the size of your pan. I baked mine for 28 minutes in 6-inch pans.
Apple Heaveeennnnn.
When a toothpick comes out from the cake clean, it's done cooking. Let your cakes rest in the pan for 10 minutes before very gently turning out onto a cooling rack to cool off a bit. I recommend placing the cakes either on the cooling rack or wrapped in plastic wrap into the freezer for a few hours. The rounds are delicate because of all of the apples in them, so you want them slightly frozen so they won't rip or crumble while you're frosting and assembling later.
Everything's better with butter--including apples.
Once your cakes are firmed up in the freezer, start on your frosting. I passed time by sipping on a mug of mostly cooled off apple cider, but maybe you're fortunate enough to live somewhere where you can have hot apple cider in mid September without bursting into flame while you decorate your apple cider cake. Consider me jealous. For the cinnamon cider buttercream, you need:
  • 1 cup of butter at room temp
  • 2 cups of Swerve confectioners
  • 2 cups of regular powdered sugar
  • 1 heaping tsp of cinnamon
  • 1 packet of sugar free instant cider mix prepared--you will use 3 tablespoons of prepared cider
Cream the butter until smooth, then add in the Swerve. Blend on low until mixed, then add in the powdered sugar, cinnamon, and three tablespoons of cider. Mix well.
Now grab those cakes!
 Place your first layer of cake on a cake board, then slather on a nice layer of frosting. I use a piping bag fitted with a #12 round tip to pipe a circle of frosting on the cake top, then smooth out with an angled spatula.
Twice as nice.
 Add the next layer, slather with more frosting, and then get ready for the final layer.
Thrice as nice isn't as catchy, but more cake is always a winner.
 Put a large amount of frosting on the top of the cake, smoothing out and pushing the excess off and down the sides of the cake. Remember to use a soft touch when spreading frosting all over the rest of the cake. These babies are fra-gee-lay (it must be Italian!).
You're getting hunnngrryyy....
 Once a decent layer of frosting was slathered on my cake, I took my angled spatula, pressed it flush horizontally to the sides of my cake, and turned my cake table around, gently dragging my spatula as I went, creating a swirl all around the side of the cake. I started in the center of the top of my cake and swirled outward, keeping the tip of my spatula horizontal while spinning my cake table slowly. It created a pretty nifty swirl pattern I've always wanted to try out. Honestly, I was going to make this a naked cake, but I knew it would be too delicate to scrape the sides, so I did my least favorite thing ever and improvised! Seriously, I sketched out this cake before I made it. I leave nothing to chance, so having a last minute decor change threw me so far outside of my comfort zone I may as well have been lost in an IKEA (same feeling of hopeless despair, but without the Swedish meatballs).
Literally the hardest ingredient to find.
 Put your full frosted cake back into the freezer for about 30-45 minutes. You want your frosting crusted in order to handle the hot ganache. Once ready, dump 1/2 a cup of cinnamon chips (seriously, I can only ever find them on Amazon) and two tablespoons of skim milk in a medium bowl. Heat for 1 minute on 50% power in the microwave, whisk, and repeat heating one last time. Whisk until completely smooth, then transfer to a small liquid measuring cup. Let this sit for 10 minutes to thicken.
Then pour some sugar on cake...
Drizzle ganache over the top of the cake evenly, then use an angled spatula to push the ganache over the top so it can gently drip down the sides. Put your cake back in to the freezer (for the final time, I swear).
Pictured: winging it!
 I was also going to pipe mums on my cake for optimal fall decorum, but my frosting wasn't thick enough. Winging it once more all for the sake of cake (I would do anything for cake, including inciting my very own panic attack), I took the remainder of my frosting, dyed it a light peach shade, and put it into a piping bag with a #21 open star tip. Starting in the middle, I made small rosettes by swirling out and around my center starting point.
I continued all the way around my cake.
 I could've stopped here, but I was mad with misdirection and...freedom? from my original plans, so I found my fall sprinkles. Nothing is ever done if it hasn't been topped with sprinkles or sparkles (except maybe your taxes. Don't top those with glitter unless you like your chances of passing an audit).
But, these are really cute sprinkles.
 I bought these off Amazon last year (they're Wilton brand fall sprinkles). I wasn't sure if I'd have the chance to use them this year, but lucky me, my original plans falling apart entirely! I placed one sprinkle in the center of each rosette, and decided to pipe a shell border at the bottom of my cake...sheerly because I had an insane amount of frosting leftover. I may have cried a little throwing away about 1/3 of my frosting leftovers. It was that or eat it all in one sitting, soooo...

I pressed leaves into the front of the shell border to finish my cake:
It wasn't what I planned, but it still looks like Autumn!
...which kinda works. I didn't plan on becoming obsessed with fall the day I walked into Yates Cider Mill, but fresh apple cider donuts will make you a believer, man. I mean, if I could spend all day eating cider donuts and then napping on alternate hours, I'd be living my dream. Sadly, this is neither good for my health or conducive to supporting my dogs, so instead I'm baking the best tribute to fall I've ever come up with in my crazy brain while sharing my intense love of the season with all of you. Every forkful brings something to the table--cider flavor, cinnamon bursts, and sweet chunks of apple. I'm going to look into how difficult it might be to petition to make this cake the new Thanksgiving dessert regular--move over pumpkin pie. It's that good, people. But never fear, I'm sure I'll come up with something pumpkin-spiced to heaven soon so that I can live up to my full Basic White Girl™ potential. I promised my husband I wouldn't go near pumpkin spice until the actual equinox, so I've got six days (not counting or anything) to make that happen. 'Til next time, my fellow eaters!
This apple dream boat will keep me happy for now!