Monday, February 11, 2019

Because Normal People Celebrate Valentine's Day...

In all my life, outside of receiving chalky candy hearts in elementary school, I've never been a fan of Valentine's Day. I mean, I have "feelings." I, too, like to take long romantic strolls through Target with my husband, and if I'm being extra sappy, we'll even make a stop at Lowe's for his sake. Look, I've never been accused of being mushy. I'm a pragmatic romantic--I tell my husband to wait until the chocolates and Shari's Berries go on sale the day after Valentine's Day to bring any home. Pro tip: sale chocolate tastes way better than regular chocolate. But I wanted to try my hand at making a chocolate cage cake for awhile now, and I figured Valentine's Day probably qualified as the most seasonally appropriate holiday for me to do so outside of a super Gothic cage cake creation for Halloween, but I didn't want to wait over half a year to execute this idea. Besides, Valentine's Day is the perfect opportunity to remind your spouse why they love cake you, so baking a treat from the heart is always a good idea.
This is about as grand a romantic gesture as my tiny heart is capable of pulling off.
This strawberry cake covered in Swiss meringue buttercream (oh yes, it worked this time) and topped with chocolate-drizzled strawberries was the perfect backdrop for a fun, whimsical chocolate cage. I had an amazing time making this chocolate cage. I'm not going to lie--the hardest part about the entire decorating process was figuring out how to cut the cake once the cage was on it. These, my dear friend, are the best kind of problems to have. Whether you attack it with a knife, shovel, or your bare hands, it's a tasty mix of dark chocolate, sweet strawberry, and buttery-delicious Swiss meringue buttercream. Since it's already 70 in Florida, nutritional content was most definitely taken into consideration (I have a date with our pool in t-minus 2-3 weeks). This three-tiered six-inch round cake makes 12 servings for only 330 calories a slice (and that's with a chocolate-drizzled strawberry on top, literally). I'm also going to go on and on about how amazing Swiss meringue buttercream is (even if it is a pain in the butt to make), and it definitely lent itself to this low calorie count for something ensconced entirely in chocolate. A Valentine's Day miracle!
Thanks, Cupid.
I have not had strawberry cake in ages, and it is definitely in my top 5, so I was happy to try out the low-cal trick to see how it would turn out. Short answer: absolutely delicious. Long, selfish answer: I will not share with you because it's just too good. To make, you need:
  • 1 box strawberry cake mix
  • 2 egg whites 
  • 10 ounces diet creme soda
Mix all the ingredients together for 2 minutes on medium high in a stand mixer. Preheat your oven to 350 and prepare three 6-inch round pans with cooking spray and line the outside with bake even strips. Pour mixed cake batter evenly into each pan (about 1 1/4 cup into each pan). Bake for 30 minutes, or until your cakes can pass the toothpick test.
"Pink- it's like red but not quite" (You're welcome, Mom, lifelong lover of all things Aerosmith).
 Let you cakes cool off in the pan for 5 minutes before turning out onto a cooling rack to cool completely. I made my cakes a day ahead of time, so I wrapped these in plastic wrap and put each into a freezer bag before freezing overnight. This made my frosting application an absolute breeze. Do try to freeze your cakes for at least 2 hours before frosting.
65th time's the charm, Swiss meringue...
I failed so miserably when I tried making maple Swiss meringue buttercream last month, that like any hard-headed, stubborn Capricorn, I simply could not let that stand. I was going to make this frosting pay for making me do something so vile--improvise--when it comes to cake. There are few things I am more passionate about that planning out an amazing dessert to the last detail: Vikings football, my dogs, and napping. That's about it. So to make this evil Swiss meringue buttercream pay, I used:
  • 3 egg whites
  • 1 cup Swerve granular
  • 1 cup of butter, barely at room temp (I could press the stick of butter and have it gently give way, but not squish flat entirely)
  • 1 tsp vanilla extract
  • 1 tsp almond extract
  • An iron will and tons of patience
Full disclosure, my frosting turned out a little grainy, but I think that's because I didn't whisk long enough while cooking my egg whites (note: more bicep workouts needed). Swerve granular isn't quite as fine as regular granular sugar, so the next time I make this, I will probably give it a quick swirl in the food processor first. I did use some tricks to make the texture work, but more on that later. First, the arduous prep work.
You're gonna need a lot of lemon.
 After the last catastrophe, I studied up on Swiss meringue buttercream (yes, I am a nerd, thank you). Swiss's mortal enemy is grease...and I here I thought the Swiss were always neutral about everything. So wipe down anything and everything that will come into contact with your egg white/sugar syrup. Whisks, mixing bowls, paddle attachments, your soul--all of it needs a good cleansing with a rag soaked in lemon juice.

Once done, crack eggs one at a time into a small metal or ceramic dish. If ANY yolk gets into your whites, dump it out and start over. It will not be able to whip up with any trace of yolk, so use the small dish so you can do this one at a time and not lose a ton of egg whites when the last egg you crack inevitably decides to betray you.

After each white is separated, dump it into the mixing bowl. Once all 3 are added, pour in the sugar. Fill a medium pot with 1 1/4 cup of water and bring to a low boil; reduce heat to a simmer, then place your mixing bowl with the whites and sugar on top of this. You don't want the water touching the bottom of the mixing bowl, so use a deep pot. Now whisk like your life depends upon it, because for the sake of your cake, it does.

You should continually whisk until your mixture reaches 160 degrees. My arm got sore and I am not an ambi-whisker, so I gave up at about 140 degrees, hence my meringue being a little grainy. Cooking the egg whites to the correct temp will help ensure its warm enough to dissolve all the sugar. You should be able to rub a little of the mixture between your thumb and index finger and not feel any grit--this is when you're ready to move on (I'd say give it 5-7 minutes of perilous whisking if you don't have a candy thermometer).

I didn't take photos during this epic ordeal because I was IN THE ZONE. Sorry. At this point, place your bowl into your stand mixer, turn it on high, and walk away for 10 minutes. You need to let your mixing bowl cool completely while it whips up the meringue, so check on it from 8-10 minutes out to ensure you have a light, fluffy bowl full of meringue. If you do, congrats--you have done the hard part, turn off the mixer and scrape the bowl. If not, do not pass go, do not collect $200. If your bowl is still too hot to the touch (should only be barely warm at this point), put everything in the freezer for 20 minutes and try whipping up again after the bowl is totally cool. Otherwise, there was probably grease or yolk that got in there, and you'll have to start over. Swiss meringue buttercream is a science, for sure. I should know. I am both a baker and a person who works in a science museum, so this is the best use of my trivial knowledge without a doubt.

Cut all the butter into tablespoon chunks, turn your mixer on medium, and add one tablespoon at a time, waiting until each chunk is incorporated before adding more. Things will get curdly and gross, but this is part of the process. Once all butter has been added, add in your extracts and return the mixer to high for 2-3 minutes, until the meringue is completely fluffy again. You can add in gel coloring now if you'd like, or pour yourself a very large, very well-deserved glass of wine.
Trust me, this part is a sinch compared to that frosting.
After dealing with "all that," making the chocolate cage and strawberries are an absolute delight. I used one bar of semisweet chocolate, pink and white sanding sugar, a #3 open tip, and several strawberries.
Told you, I plan out everything.
You will need to measure the diameter of your cake rounds and how tall they are stacked together to make your cage. My cakes were 18" in diameter, and about 4.5" inches high. So I took two strips of WAX paper (easier to peel off), and cut each to 9"x5" before very obviously free-handing a pattern for my cage with a Sharpie. Flip over and melt some chocolate!
This looks like the worst hedge maze ever created.
I broke up my chocolate bar and heated on 50% power for 1 minute in the microwave before giving a stir and heating an additional 30 seconds. I mixed it until completely smooth, then poured into a piping bag fitted with a #3 tip. I let this cool for about 20 minutes before piping onto my wax paper guide. Set this aside for 40 minutes.
Oh yes, I get it, Valentine's Day. I do. Chocolate makes everything sexy.
Once finished with your cage, drizzle lines of chocolate over 6-8 strawberries and immediately sprinkle with pink and white sanding sugar to adhere to the wet chocolate. Set these aside and get ready to frost your cake.
So...smooth.
Okay, as much of a pain it is to make, this frosting spreads, well, like something containing a ridiculous amount of butter. I frosted my entire cake and had it smoothed out in under 5 minutes. The amount of time spent whisking (and praying) earlier felt justifiable for how easy it was to cover an entire cake in this frosting. I spread a dollop onto my bottom layer of cake, and then to help offset the grainy texture that resulted from my impatience and bird-like arm strength, I brought more strawberries into the mix.
Thanks, ingenuity!
I thinly sliced 4 strawberries, placing half onto my bottom layer and the other half onto my middle layer of frosting. If you're grainy, this is a great way to give another texture--you can also add some sanding sugar so it totally looks like that's the what you were going for, but I just added a bit more frosting onto my strawberries before moving on and adding another layer of cake.
Thank you, baking gods.
 I didn't even need a crumb coat since my cakes were frozen, so I lathered on a thick layer of frosting all around and smoothed out with my bench scraper and a small angled spatula, and in no time flat, I had the world's smoothest cake without any special paper towel tricks or intermittent frosting freezing. Say that three times fast.
If it's not topped with sprinkles, it isn't finished.
I added pink and white sanding sugar on top because 1. It's pretty. And 2. Because I put sprinkles on everything. Then I checked on my chocolate cage. It should be firm to the touch but still pliable. This took 40 minutes for my design. It was still very slightly shiny, but my finger did not disrupt the surface of the chocolate when I touched it. I was told that was the magic moment, so I took each strip and placed it on my frosted cake.
There was lots of breath holding.
 You should be able to gently press the chocolate into the frosting layer to adhere it to the cake. I let this rest for 5 minutes to completely stick.
Reminder: you can breathe now.
Then, I very gently and slowly peeled the wax paper away from the chocolate. This was like that glorious moment when you get a new TV and peel the packaging off, but you don't get to eat the TV after you've done that, so this definitely wins for most satisfying peel-off moment.
Victory!
Repeat with the other sheet of wax paper, and you have won the cake game--go you. It really is quite simple and a lot of fun to make these cages, so I can't wait to do this again.
Don't forget the berries on top!
I evenly spaced out my drizzled strawberries, and found I had made one too many. Perhaps I had done this subconsciously so I could enjoy that extra strawberry as a reward for surviving Swiss meringue buttercream making. Thanks, past self. It was delicious.
Loops for dayyyyys.
 It is simple, but it is effective. It's a romantic cake, topped with sprinkles and strawberries, and the best way to celebrate international card and candy giving day. Well, it's the only way we are acknowledging it in this house until chocolate goes on sale, anyway. My husband is actually going to a concert with his husband on Valentine's Day, and I could not be happier for them...they're the most epic bromance since Matt and Ben or Turk and JD. And this means I get to watch Grey's Anatomy uninterrupted on Thursday night because I hate happiness. At least I have the cake?
The real MVP.
I gotta say, a super sweet American buttercream just doesn't do it for us anymore. Ever since going mostly sugar free, that level of tooth-rottingly sweet just makes us gag. The reason I wanted to perfect Swiss meringue buttercream is because it is a still a piping-consistency frosting just without that sickening sweetness. It's a nice, mellow flavor. A hint of sweet, but mostly smooth and rich. A silky, buttery flavor complimented by the vanilla and almond extract. This is now how I frost my cakes--so that means I get to try to figure out how to add copious amounts of Baileys to a Swiss meringue buttercream before Saint Patrick's Day. But this buttery goodness and that saccharine sweet strawberry cake are absolutely amazing together. Add in a little bit of chocolate cage and real strawberries, and this is the right amount of decadent. A whole slice leaves you perfectly content, without rotting out any teeth or inducing any gut bombs. Swiss meringue buttercream--you may be difficult, but like most difficult things (hi!), you're totally worth it in the end. 'Til next time, my fellow eaters!
Now that is a sultry-looking baked good. I'm coming around to ya, Valentine's Day. Oh no...I'm feeling feelings, but considering they're about cake, I guess that's not very surprising. Carry on!

Monday, January 21, 2019

Everything Is Better with Syrup

Breakfast is not only the most important meal of the day, it is also my favorite because breakfast is as close as I can get to eating dessert first thing in the morning and still have it be socially acceptable. Pancakes? Waffles? Crepes? Sweet, delicious, and all have one thing in common: they taste best when drizzled with heaping amounts of maple syrup. God bless the (I assume Canadian) person who took one look at a maple tree and just knew it was hiding the delicious nectar of the gods within it. I love maple syrup...I've been known to "accidentally" pour too much on my French toast, causing it to ooze on over to my bacon and eggs, covering them substantially in a pile of sticky sweetness to compliment their saltiness. Like I said, closest I can get to dessert first thing in the morning. I decided if I can have dessert for breakfast, why not have breakfast for dessert? And in true Canadian fashion, I wanted to make sure my breakfast dessert was absolutely drenched with maple syrup.
Because maple syrup is magical. Cures any and all illnesses, although you might want to fact check that.
As someone with (French) Canadian heritage, there are three things I hold in extremely high regard: Tim Horton's, hockey, and maple syrup. You can bet if there was a Timmy's within a 50-mile radius of me, I'd be eating this maple syrup cake topped with cinnamon streusel and maple syrup buttercream along with a heaping pile of Tim-Bits while watching Hockey Night in Canada. This cake is like eating the lightest, fluffiest stack of streusel-topped pancakes drizzled with pure Canadian maple syrup. I am absolutely gaga for this recipe, and to top it all off, it's only 310 calories a slice (no stack of pancakes can make the same claim). This recipe yields one 9x13 cake with 16 total servings, and I would be willing to fight a grizzly bear (just not a moose) for the last slice.
It's so good, I'm considering buying my maple syrup in bulk so I can make it at least once a month. Potentially to have for breakfast or dessert because versatility is important to me.
I know, I waited for the good part: common pantry staples make the cake itself come together in absolutely no time flat. After vertical layer cakes, meringue-topped cakes, and all the other crazy concoctions I've baked up in the past few months, making a simple 9x13 cake seemed like a reward for all that hard (tasty) work. To make, you'll need:
  • 1 box of vanilla cake mix
  • 3 egg whites
  • 6 ounces diet creme soda
  • 6 ounces pure maple syrup (you could try sugar free syrup as well to lower calorie content even more)
Mix all of the ingredients together in a stand mixer on medium-high for 2 minutes while you preheat your oven to 350/325 for convection baking and grease a 9x13 pan. Turn your prepared batter into the pan and bake about 28-30 minutes until done. You'll know it's ready to come out of the oven when your house smells like Canada.
The smells of syrupy goodness.
 Let you cake cool in the pan for 10 minutes before turning out onto a cooling rack to cool completely before frosting. While your cake cools, keep your oven at 350/325 for convection and make your streusel.
Brown sugar Swerve is now a thing!!! Rejoice, sugar-free people!
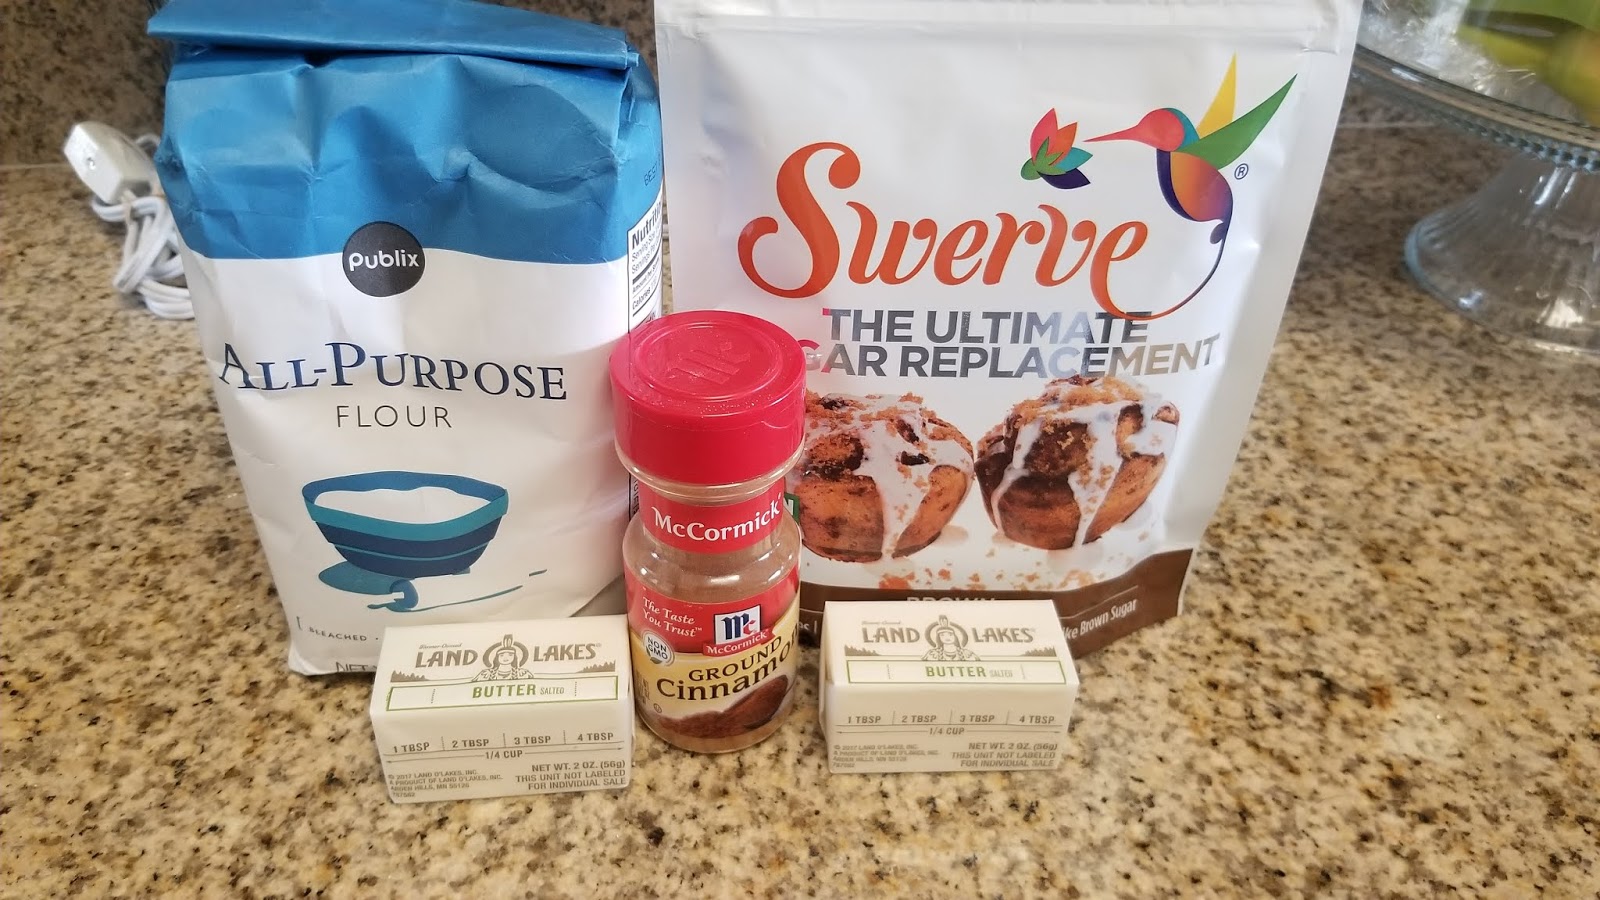
Streusel is something I had actually never made before, and I now consider it dangerous to know it's so quick and easy to make. Swerve now has a brown sugar version, and this changes everything. I am definitely going to figure out how to make toffee with it, along with a thousand different cookie recipes. To make the streusel, mix together:
  • 6 TBS melted butter
  • 1 tsp cinnamon
  • 3/4 cup of flour
  • 3/4 cup of packed Swerve brown sugar 
Stir these ingredients together by hand in a medium bowl until everything has come together.
Like so.
 Things will be a little crumbly, but that's normal. Spread your streusel out on a Silpat (just buy them, they're life changing) or Parchment-lined baking tray. Bake the streusel for 6 minutes at 350, then remove from the oven and set aside to cool completely. Once cooled to the touch, crumble it up into finer pieces.
Some larger chunks make for a pretty texture (and taste) when topped on the cake.
Now we come to the part of the story where everything went wrong. I wanted so, so badly to try to make a maple syrup Swiss meringue buttercream. I knew my cake was going to be sweet, even more so with the streusel on top, so I wanted to go away from a traditional American buttercream that is 10000% sweetness. I tried multiple times, but I could not get my meringue to whip up with the addition of the maple syrup, so after wasting like, a lot of eggs and all the pure maple syrup I had, I turned to the pantry to do my least favorite thing in the entire universe: improvise.
Seriously...I sketch out every cake and write out every recipe in full before baking.
Getting thrown a curve ball happens to even the best bakers (I know, I watch the Great British Bake Off), but I was still extremely sad to have to revert to a typical buttercream...especially since I ran out of the "hard stuff," a.k.a., all my pure maple syrup. Since I guzzle syrup like normal people guzzle water, I typically use sugar free Hungry Jack so I don't add an extra 13,000 calories to my waffles every weekend. I decided to give it a go and used:
  • 1 - 12 ounce bag Swerve confectioners
  • 1 cup of regular powdered sugar
  • 1 cup of butter at room temp
  • 4 TBS sugar free Hungry Jack syrup
I whipped my butter, which, unlike my eggs in my failed meringue, got light and fluffy, before adding in the Swerve and two tablespoons of syrup. I mixed well before finishing with the last two tablespoons of syrup and the cup of regular powdered sugar to cut the "cooling" effect Swerve confectioners has on its own. It's a very sticky, albeit incredibly delicious, frosting, and using the sugar free syrup definitely helped keep it from getting way too sweet when added in with everything else. I had quite a bit of frosting leftover, and I'm pretty sure that's going on top of English muffins from now until the sad day when it runs out.
It was all I could do to not dive in with a shovel.
 I didn't crumb coat this cake since I wasted so much time trying to make meringue happen and just wanted to eat a dang slice, so I took a thick amount of frosting and spread it on with a large angled spatula on top. To help smooth it out, I ran my spatula under extremely hot water before taking a few swipes on top to even everything out. I did this again with a small angled spatula to cover all the sides of the cake.
"Shell-o, is it me you're looking for?"
I originally intended to pipe an interlocking "V" border, but since this buttercream was nowhere near as firm as a Swiss meringue, trying to get a clean line from something this sticky and soft was virtually impossible. Instead I went with a tried and true shell border with the help of a #21 Wilton tip. The classics are classic for a reason, after all.
And they are so very complimentary to the streusel.
My shell border ended up being the perfect basin to hold in all my streusel, so there's something to be said for happy accidents. Once I piped my border all around the top and bottom edges of my cake, I took my crumbled streusel and dusted it on top of my cake, pressing it down to affix it to the frosting.
Bonus: you can lick your fingers once you're done with this part!
Ta-da! That's it...super simple decorations, but it looks absolutely scrumptious. And it is.
Back off, she's mine!
I woke up in the mood for a slice of this cake, although I resisted somehow because I realized ending my Monday with it would be way more rewarding than starting my Monday with it. Besides, Tuesday seems like the perfect day for breakfast cake anyway. The cake itself is so rich with maple flavor but still extremely light and fluffy. A forkful with frosting and streusel added in will transport you to another plain of existence (located approximately somewhere in British Columbia, Canada). I'm not saying you should put maple syrup on everything, but you should put maple syrup on cake for sure. This is definitely going down in my book as one of the best Kate Bakes Cakes original recipes, and I am so very glad we still have 14 more slices to fight to the death over in my house. 'Til next time, my fellow eaters!
I mean, check that cake to streusel action. Coffee cake wishes it looked this fine.

Monday, December 3, 2018

Seasons Eatings

I was combing through my previous December bakes and found a startling number of peppermint desserts. Consider me basic in both fall AND winter, apparently. There's only so many ways you can mix peppermint into desserts, and I've pretty much done all of them. This meant it was time for my least favorite thing in the world: stepping out of my minty-cool comfort zone and finding a new flavor to deck the halls with. Needless to say, the answer was booze. I mean, isn't always? I decided to bake with an old favorite: Rumchata. Now, if you've never had the pleasure of drinking Rumchata, let me set the scene. Remember pouring yourself a giant bowl of Cinnamon Toast Crunch cereal as a kid, letting it get a little soggy (R.I.P. roof of mouth), and by the end, you'd be left with this ultra creamy, cinnamon milk goodness? Yep--that's exactly what Rumchata tastes like. I figured cinnamon + booze = acceptable holiday offering. 'Tis the season to be boozy, fa la la la la la la la *hiccup.* I knew I also wanted to decorate in a winter theme because quite frankly, it may be the only winterscape I view in Florida (Hi, it's 69 degrees today, and I am sweaty and upsetty).
For my Florida readers, this is not a beach cake. It is a winter cake. Winter is a season generally marked by cold weather, immediately following Autumn, another season that, never mind, you don't need to know this. You'll never experience either.
Topped with white chocolate snowflakes and cool-swirled meringues, this blue ombre Rumchata cake with Rumchata buttercream frosting is TO DIE FOR. It's boozy, but not in an, "Oh boy, my throat is on fire," kind of way. A forkful of this cake starts off with a vanilla flavor and is followed by a creamy hit of cinnamon Rumchata goodness that lingers just right. I also added some extra cinnamon to the buttercream to take it over the top. It is soft, it is flavorful, and it is so moist thanks to the booze. I always find boozy bakes cook out the alcohol, leaving rich flavor and a moist cake behind (cake hangovers are far superior). This is a 3-tiered, 6-inch round cake with 12 servings, at only 341 calories a slice sans meringue or snowflake. Adding in those extra elements will total out to 356 calories a slice (oh yes, they are most definitely worth it). Trust me, this cake, frosting technique, and snowflake technique are INSANELY EASY. Meringues on the other hand...well, keep the Rumchata bottle handy, cause you're gonna need it...
I had no idea Rumchata came in bottles this small. Would've been useful information in college.
The base of this cake starts out with a box mix, and it stays pretty straight forward. You need:
  • 1 vanilla cake mix
  • 3 egg whites
  • 4 ounces of diet creme soda
  • 8 ounces of Rumchata
Now, you could forgo the soda and use all Rumchata, but it will definitely cost you in the calorie department since Rumchata is basically cinnamon sugar in liquid form. Whip up your egg whites on medium-high in the bowl of a stand mixer until fluffy, 3-4 minutes. Preheat your oven to 350 and prepare three 6-inch round cake pans with bake-even strips and cooking spray. Once your whites are fluffy, add in the cake mix, soda, and liquor. Blend on medium-high for 2 minutes, then evenly pour the batter into your prepared pans. Bake for 25-28 minutes, and then let the cakes cool in their pans for 5-10 minutes on a cooling rack. Turn these out of the pan and onto the racks to cool another 10 minutes before wrapping in plastic wrap and letting freeze for several hours (boozy cakes are sticky, so this will help when you frost your cake later). You can make your snowflakes and meringues while you wait. Because it will take you 17 hours, a phone call to a priest, and a lot of cursing to get these meringues made.
Have I scared you? Good. Use that fear.
Let's start with the easy and quick snowflakes. I Googled "snowflake piping template," copied and pasted the image into a Word doc, resized a few, and printed out. I set my templates under some Parchment paper and grabbed about 1/3 of a bag of white chocolate melts, melting in a large bowl in the microwave according to package directions. I poured my chocolate into a piping bag fitted with a #3 Wilton tip. I let this cool off for 5-10 minutes, so I could handle the chocolate without burning my hands too much. I piped out a bunch of snowflakes by tracing over my templates, but I still had a ton of chocolate leftover, so I free-handed stars and other little quirky designs. You only need like 6 snowflakes to decorate the cake, unless you're taking a hard pass on the meringues, then go snowflake crazy. Once piped, let these rest while you make your meringues; alternatively, if you're terrified of making meringues, let these sit on the counter for an hour or so before handling. Use a small angled spatula to gently lift off the Parchment and place on your cake.
Tiny but adorable. Super easy to make, so definitely don't skip this part!
Now, my next move was to make meringue. I studied several blog posts, websites, and baking videos. I felt confident I could do this. I'm also super into Pavlovas, and I need to know how to make meringue in order to eat my desired number of Pavlovas per year (I'm guessing about 50). I could still be studying how to make meringue, and it never would've properly prepared me. Much like earning the love of a good man, walking in 6-inch stilettos, or driving a manual transmission--you just have to go all in.
I mean, how hard can cracking three eggs be, right? Oh past, naive Kate...
Meringues are simple enough where ingredients are concerned:
  • 3 egg whites at room temperature
  • 1/4 tsp cream of tartar
  • 1/2 tsp clear vanilla extract
  • 3/4 cup of Swerve granular
I HIGHLY recommend going to view this video and extremely lengthy blog post about how to make a decent meringue. I could spend at least 6 blog posts detailing this process, but I have an entire cake to go eat, so go check that out and get my CliffNotes version here. Basically, you whip your whites, tartar, and vanilla on medium high until the whites begin to get stiff. Then, while the mixer is still running, dump in the sugar very slowly, allowing it to become fully dissolved before adding in any more. When you have extremely stiff peaks forming in your bowl (i.e., you can stop the mixer, pull up the attachment, and the meringue stays perfectly put on it, you're there).
Piping can be a bit tricky, but I am here for you.
I preheated my oven to 215 and lined a large baking tray with Parchment. I then fitted several piping bags with (from left to right) an Ateco #869 tip, a #1M tip, a #2D tip, and a #32 tip. I painted the piping bag with the Ateco #869 tip with 4 stripes of blue gel dye, then plopped some meringue in. I then piped large mounds (seen in blue and white below), before taking plain white meringue, making some stars and large mounds with my 1M tip and some roses with my 2D tip, and then dyed what I had leftover with a tiny drop of blue gel dye and put it in my bag with my #32 tip and piped smaller stars and swirls.
I was so full of hope.
Before everything went wrong, looking back, I could've easily prevented some disasters from happening (hindsight is a cruel mistress). I should have put my meringue in the fridge to keep it firm while I piped with different tips. My roses were last, and my meringue was not as cold, so these completely lost their shape in the oven and turned into blobs resembling dog poo. I also did not need to cook these anywhere nearly as long as I had found in my meringue studies. My oven cooks very, very hot, so I should have pulled the plug around 40 minutes; I was terrified to open the oven door and check on them though, and the oven light didn't show signs of burning, but by the time I hit 60 minutes and turned the oven off, my smaller pieces were tanner than I have ever been in my life. Thankfully, the bigger meringues were only slightly tanned, so they made the cut.

You really need a watchful eye with these because the second they all *look* done, turn your oven off, crack open the door, and let your meringues continue to fully cool in the oven and finish up. Next time, I know to pay closer attention to the timing. But burnt or not, the pieces I didn't use on my cake still tasted absolutely delicious. For science!
Thanks for saving the day, tiny Rumchata bottle.
 Thankfully, frosting this cake is an absolute breeze, even if it looks time consuming with the end result. Honestly, it took me 5-10 minutes from start to finish/assembly to fully frosted. The magic of piping bags, baby. For the frosting you need:
  • 4 ounces of 1/3 fat cream cheese at room temp
  • 1/2 cup of butter at room temp
  • 1 tsp clear vanilla extract
  • 1/4 tsp cinnamon
  • 3 TBS Rumchata
  • 2 cups powdered sugar
  • One 12oz bag of Swerve confectioners
Blend the butter and cream cheese for 2-3 minutes, until fluffy and fully mixed. Add in the vanilla, cinnamon, one TBS Rumchata, and the 2 cups of powdered sugar. Blend on medium-low until just mixed, then add in the Swerve and last two TBS of Rumchata. Blend fully until you have a nice consistency for piping. Divide your frosting into thirds. One third will stay white, one third will get a few (3-4) drops of blue gel dye, and the final third will get about 6 drops of blue gel dye.
You want a gradual color change, nothing too intense.
  Place each of these colors into their own piping bag fitted with a #12 round tip. Now, get your cakes out of the freezer and place one layer face down on a cake plate.
This is the opposite of the Target logo.
I wanted a neat surprise inside of the cake, but not one as time consuming and crazy as another damn vertical layer cake (I came, I saw, I conquered, I ate). So I took my white frosting, piped out a few circles on the outer edge of the cake, then took my lighter blue and piped a few circles on the middle of the cake, and then took my darkest blue and piped the middle. Then I took an angled spatula and smoothed out:
Like a delicious bullseye.
I took another layer of cake, placed evenly on top of this, and repeated my swirled filling. I took my final layer, placed it face down on top of this, and then got ready for an easy ombre frosting job.
I swear I was not drinking the Rumchata when I did this.
Basically, starting at the bottom of your cake and working your way up, pipe out several lines of dark blue on the bottom cake layer, several lines of light blue on the middle cake layer, and pipe white lines on the last layer and the top of the cake. This takes like 2 minutes. You don't have to be exact, it doesn't have to look good, you just need a nice thick layer around the cake.
The best baking tool you could ever buy is obviously the bench scraper, because it can take you from hot mess to totally flawless in one swipe. Like the cake equivalent of a beauty blender.
I placed a bench scraper parallel to the side of my cake, pressed it gently into the side, and turned my cake table slowly. After a full rotation around my cake, I cleaned off excess frosting from my scraper, and took another pass. I repeated this a third time and all my colors had been blended together nicely. I used an angled spatula to smooth the top of the cake and then, because I have a real problem with Florida's lack of seasonally-appropriate weather, added sanding sugar to the top to look like snow. It will be the only snow I see this month, guaranteed.
The weather outside is frightful(ly hot), but Rumchata cake is so delightful...
I then grabbed some snowflakes, stars, and a few meringues and gently pressed them into my cake to achieve my desired look, or as I'm calling it, "What I wish it looked like when I stare out my window."
Instead, I shall settle for "What it looks like on my plate."
I love the cute little pop of color the frosting layers on the inside of the cake have. I am definitely going to use this technique again on the future to add some flare to the inside of a cake the easy way.
Looking at this cake makes me feel so cold inside. I love it.
It may not ever dip below freezing here in Florida, but thanks to baking, I can fake it until I make it to Tahoe in January. I'm prepared to freeze my entire butt off, and I could not be more excited about the prospect. I just want to be an environment that makes my cold little heart feel right at home, what can I say. Aside from my near meringue meltdown, I had a ton of fun getting in to the season baking and decorating this cake. But anything filled with tons of booze generally helps liven up the holiday spirit anyway. Peppermint is great, but Rumchata is next level holiday goodness. It's simple to make, and the flavor is anything but. It's buttery and smooth, sweet but not too sweet (yes, this is a thing), and the Rumchata lingers on your tongue like Rumchata was made to do. It's definitely a cake that will give you a holly jolly Christmas. 'Til next time, my fellow eaters!
I can almost remember what it feels like to not be a muggy hot mess when I look at this cake, and that's the greatest gift of all.