Monday, September 19, 2016

But Are They Really Brownies?

I, like many of you, used to laugh at everyone that tried to make incredibly good-tasting, bad-for-you foods healthier. Cakes should be dense; brownies should be frosted; ice cream should be topped. How in the world is replacing delicious ingredients with things like fat-free applesauce and bananas ever going to work? But then one day, I decided that perhaps the root cause of never being able to lose those final three pounds (yeah, you know the ones) may or may not have something to do with the fact that I shovel copious amounts of cake, cupcakes, ice cream, and pie into my, well, pie hole. Appropriate nickname for the mouth aside, this obvious correlation was still startling. As much as I hate the meal known as lunch, I figure nixing it in favor of half a pint of Blue Bell after dinner wasn't something that could ever fall into the "I really know how to adult" category. If you told me as a child that as an adult I could eat all the dessert I wanted to, when I wanted to, I probably would've stopped listening after that. Never mind the "obvious consequences" speech. So here we are, years and many pant sizes and Jillian Michaels workouts later, trying to shed the final pounds standing between me and a year-round bikini body. I've gone to extreme lengths. Like buying froyo instead of Blue Bell, using calorie-counting apps, and replacing bad-for-you ingredients with healthy ones. That being said, you'd never know by looking at these chocolate peanut butter brownies that there's anything remotely healthy about them.
But they're made of stupid healthy ingredients.

And only three of them, to boot! That's right. I don't even really need to give you an actual ingredient list, although I will because clearly that's why we're all here. Or maybe you're just checking in to make sure I haven't lost my dessert-loving mind. Maybe I have, but those last three pounds went along with it, so I still consider it a win. Now, do these actually taste like brownies? This is a yes and no answer. They are dense, they are moist, they are sweet, they are chocolately, but they are also peanut buttery, so that makes a bit of difference in flavoring between plain chocolate brownie and chocolate peanut butter brownie, hence the name; if you hate peanut butter and chocolate, I have a substitution for you that will make these taste like plain chocolate brownies. See below. But even WITH the light cream cheese frosting, one brownie tops out at only 200 calories! And that's for 9 servings in a 9x9 pan. You could totally divvy these up into 12 servings and they'd only be 150 calories! Insanity!
No, this can't be everything? Oh, but it is.
Ha, three whole ingredients. It's so simple that it's actually borderline ridiculous. This is hands down the easiest dessert I have ever made, and you all know how much I love a good shortcut. All you need are 3 ripe to overripe bananas, 1/2 a cup of JIF creamy peanut butter (or Skippy if you hate your family), and 1/4 cup of dark cocoa powder.

Now, I'm quite new to the chocolate/peanut butter combo. I hated it throughout my entire youth, and then my taste palette grew into it as an adult. I know, I probably got the ordering there completely wrong, but what are you gonna do. If you have taste buds that die a little at the thought of this flavor combo, replace the peanut butter with almond butter. This will yield a classic brownie taste. I also have to avoid almonds because ingesting them gives me terrible eczema. Isn't the human body wonderful? I think some itchy elbows might be worth it in this case though. This is definitely a keeper of a recipe, so I'll load up on lotions and try it this way next time.

Back to the recipe and far, far away from discussing eczema while trying to sell you on food. Coat a 9x9 or 8x8 pan with cooking spray and preheat your oven to 350. In a large bowl or stand mixer, mash up the three bananas until completely smooth. Add in the cocoa powder and blend. In a small bowl, nuke your peanut butter for 30-45 seconds until melted. Add this to the cocoa powder and banana and mix for 1-2 minutes until completely smooth. Pour into your pan.
And forget to rotate photo.
Bake time is a little harder to gauge here. Since there is no flour or sugar in these brownies, they're not going to yield to a toothpick test. I baked for 25 minutes, until the top looked firm and set. You know, like my abs thanks to all this healthy eating we've been doing. I kid. Once set, I cooled for 10 minutes on a rack before moving to the freezer to finish because I'm impatient.
Hello, you firm devil.
While the brownies are setting in the freezer, it's frosting time. Now again, you can make some adaptations to cut even more calories out of this frosting. But even with a full-fledged, fatty fat fat cake, frosting is the most important thing in the world to me, so I refuse to go fat free. For my frosting I used one 8. oz. block of REDUCED fat cream cheese at room temp, 2 tablespoons of regular cocoa powder (not dark), 2 tablespoons of sugar, and 2 tablespoons of skim milk. I simply blended them all together.
Thick n' creamy. As it should be for frosting, but not your thighs.
Once the brownies are totally cool (in temp, not in an 80s reference), get a spatula and go to town. The frosting is thick, so if you need to heat up a metal spatula with hot water to get things smoothed out, go for it. Or, be an adult about it and just use sprinkles to cover up the unevenness.
Like so.
Let's have a talk. I am 29 years old and still not entirely sure what gluten is. I realize a lot of people in this world think they're allergic to it, so I have good news for you if you're one of these people. Upon my review, there is literally not a gluten to be found. I almost hate saying this, but if you're a vegan, you could find fat free/no animal byproduct cream cheese and almond milk for the frosting, and even you could eat these. I will draw the line there and not ask any questions about what it must be like to eat granola for every meal of the day. Just know, here's an alternative.
Seriously. Don't actually tell me what a gluten is. Even if I'm allergic to it, I refuse to make anymore changes. Banana-based brownies are all I can handle right now.
I love these brownies. But literally, the only thing that makes the dense, peanut butter and chocolate swirl of flavor taste even better? One scoop of salted caramel froyo. Yeah, I didn't realize froyo could be obtained by the carton. As a lifelong Blue Bell-er, I had never really given it thought. I've also recently gotten into smoothies because of this little factoid...take my Blue Bell away, Albuquerque, and you've forced me to look into alternatives. Healthy ones. I refuse to give up flavor, though. But now I just find a way to refine it into lower calorie desserts. Because one scoop of froyo a top a chocolate peanut butter brownie is still under 350 calories. I think the simple act of looking at a bakery brownie or glancing a carton of regular ice cream adds up to at least 500 calories, and that's not even ingesting any of it. So go crazy and try replacing the flours, sugars, and eggs with banana and nut butter of your liking. I promise you won't regret it. If these brownies aren't thick enough for you like a fatty brownie, just bake in a smaller pan or stack one on top of another, maybe with a little froyo filling. That's the great thing about being a health nut. You'll find the most creative ways to consume fewer calories! 'Til next time, my fellow eaters!
I shall henceforth just refer to these as 'weird brownies.' ...not to be confused with weed brownies, of course. They're really brownies and really special (again, not that kind of special), but I'm still not sure how its possible.

Sunday, September 11, 2016

It's Still Not Technically Fall, so Here's a Final Summery Dessert

Ahhh inaugural Football Sunday. The air is crisper, the temps..cool..ish (c'mon, I live in the desert), and the mornings smell distinctly like fall. But sadly, it is still not really time for autumn for another couple of weeks. I promised my husband I would wait to go crazy with the pumpkin desserts until fall equinox. But after spending the day clutching my chest, shouting like crazy, and feeling cautiously hopeful (as a Vikings fan, this is just typical Sunday behavior), I really wanted to bake dessert. We're on the precipice of my favorite season, and dammit, the house should smell like the inside of a Yankee candle store. I'm still trying to perfect a wide variety of healthier desserts because I want to have my cake and eat it, too, without also permanently becoming a stretchy pants person. I feel like pregnant women, competitive eaters, and most dads on Thanksgiving should be the only people allowed to wear such articles of clothing. I also still firmly believe leggings are not pants, but this is a rant for a whole other day. I digress. I've still been drooling over last week's low cal chocolate chip cheesecake, so I'm continuing in the savory direction. I wanted cake-like consistency with a fruity taste and sweet finish that lingers on the tongue. I've also decided that my use of adjectives when describing desserts should place me as a front runner should cake sommeliers ever become an actual job. I needed to make a dessert that would give summer one literal bittersweet, final goodbye...so say adieu to a treat that will have you blissfully happy to bear farewell to flipflop season. 
Footwear choices aside, I'll eat any dessert in bar form.

These lemon cake bars pack a punch. They're tart and mouthwatering, but they leave your sweet tooth satisfied thanks to the lemony glaze on top. Sliced up into 12 bars, they're only 175 calories a piece. Tell me what pumpkin-filled fall dessert can say the same?! No, literally, tell me because I'll want to make it in a few weeks. I may be basking in the glow of a Vikings win, but even if we had lost, these bars would've had me feeling better in no time. So uh, I guess if you're a Titans fan, sorry eh, but you could make these to soothe your soul. I promise you making these will be 1,000 times easier than watching your team fall to the Kings in the North. Skol.
At least the ingredients list isn't as confusing as our starting roster.
I had everything I needed already on hand to make these lemon cake bars, so I consider that another victory. Add one more to the win column today, and I may just go buy a lottery ticket. Chances are you'll be able to whip these up in under an hour from start to finish as well, so grab:
  • 1 stick of butter at room temp
  • 3/4 cup of sugar
  • 2 eggs at room temp
  • 2 tbs lemon juice
  • 1 tbs dried lemon jest
  • (not pictured) 1/2 teaspoon lemon extract (or you can just double the amount of zest but things may get crumby in texture)
  • 1/2 teaspoon vanilla extract
  • For healthier bars: 1/2 cup All Purpose flour and 1/4 cup whole wheat flour. Otherwise, use entirely All Purpose but add on a bunch of extra calories (boo)
  • 1/4 teaspoon salt
  • 1/4 teaspoon baking soda
  • 1/4 teaspoon baking powder
  • Optional: 4-5 drops of yellow food coloring because things should be pretty, dammit.
Preheat your oven to 350 and coat a 9x9, 8x8, or in my case because our "furnished" condo is lame, an 8x11 pan with cooking spray. In a large bowl or your stand mixer bowl, dump the sugar and butter together and cream until fluffy. Then add in the egg, lemon juice, zest, lemon extract, vanilla extract, and yellow dye. Blend for a minute until fully incorporated. While this is mixing, in a medium bowl combine the flours, salt, baking soda, and baking powder. Dump the dry ingredients in with the wet ones and mix for two minutes. Pour into your prepared baking pan and smooth out with a spatula since the consistency is thick. Bake for 20-25 minutes or until a toothpick comes out with some wet crumbs.
 This could definitely be eaten with breakfast, lunch, or dinner. Thanks, healthy food!


Let your bars cool on a rack until they're at room temp. Or you can speed things up by putting them in the freezer for a half an hour. I had time to walk the dogs and enjoy a thunderstorm while these cooled, like Mother Nature was reminding me the season of pumpkin is nigh.
Of course I'm adding sprinkles. I need sprinkle rehab.
The glaze is so easy, even a Raiders fan could put it together! I'm kidding. A little. What good is football season without some lighthearted ribbing, or if you're an Eagles fan, full-on verbal assault? Simply mix together half a cup of powdered sugar and two tablespoons of lemon juice until no chunks of powdered sugar remain.
Oh yeah, hit me with the good stuff.
Drizzle the glaze on your cooled bars and spread out with a spoon. Top with sanding sugar for extra pizzazz. I like a little sparkle with my desserts, what can I say. You can stick these in the freezer for a half hour so the glaze will set and they'll be ready for crisp, even slicing and consumption! Or you can leave them out if you're into teasing yourself that you can handle the pressure until you go crazy. I expect Cowboys fans to take this route.
At least you have Jason Witten? And dessert.
When you're ready to eat, pop these into the microwave to warm them up for a bit. If you're really feeling indulgent, top them with some sherbet. I imagine this would be insanely decadent and summery. Like a final reminder that sometimes it really does need to be so swelteringly awful outside that the only thing in the world that could satisfy your desert-induced thirst is a huge glass of lemonade. Or in this case, lemon cake bar. I promise you won't be disappointed when that first tingle of lemon hits your tongue and that glaze reminds you why sweet and sour is a winning combo. I believe some of the best things in life a multifaceted: sweet and sour, chocolatey and salty, winning and rubbing it in the losing team's face...you get the idea. But now we get to add one more thing to that list: low-cal and delicious. It's hard to come by (much like winning your division at the end of the season. Deal with it, Green Bay), but when it happens, it's pure magic. 'Til next time, my fellow eaters!
Sundays were made for treating yourself.

Wednesday, September 7, 2016

A Cheesecake by Any Other Name...

I have a problem. Well, many problems, but for the sake of this blog, let's just focus on the one. There are millions of delicious desserts out there in this world. So many that I have not one but two dessert boards on my Pinterest account dedicated to them. Where's the issue, you ask? They're all absolutely terrible for you. Anything dipped in double layers of caramel and deep fried just can't be good for the arteries. I've been trying my best to come up with desserts that don't rack up over 500 calories and still look like something you'd actually want to eat and not something you'd find on the bottom of your shoe after leaving a farmer's market. I had massive success with the strawberry bars from a couple weeks ago, but since I can't just reblog the same recipe week after week, it was time for experimentation. I decided to take on the cheesecake. Even the name itself sounds completely unhealthy, but there's nothing I love more than cheese or cake, so it was worth a shot.
And I'm really glad I did.
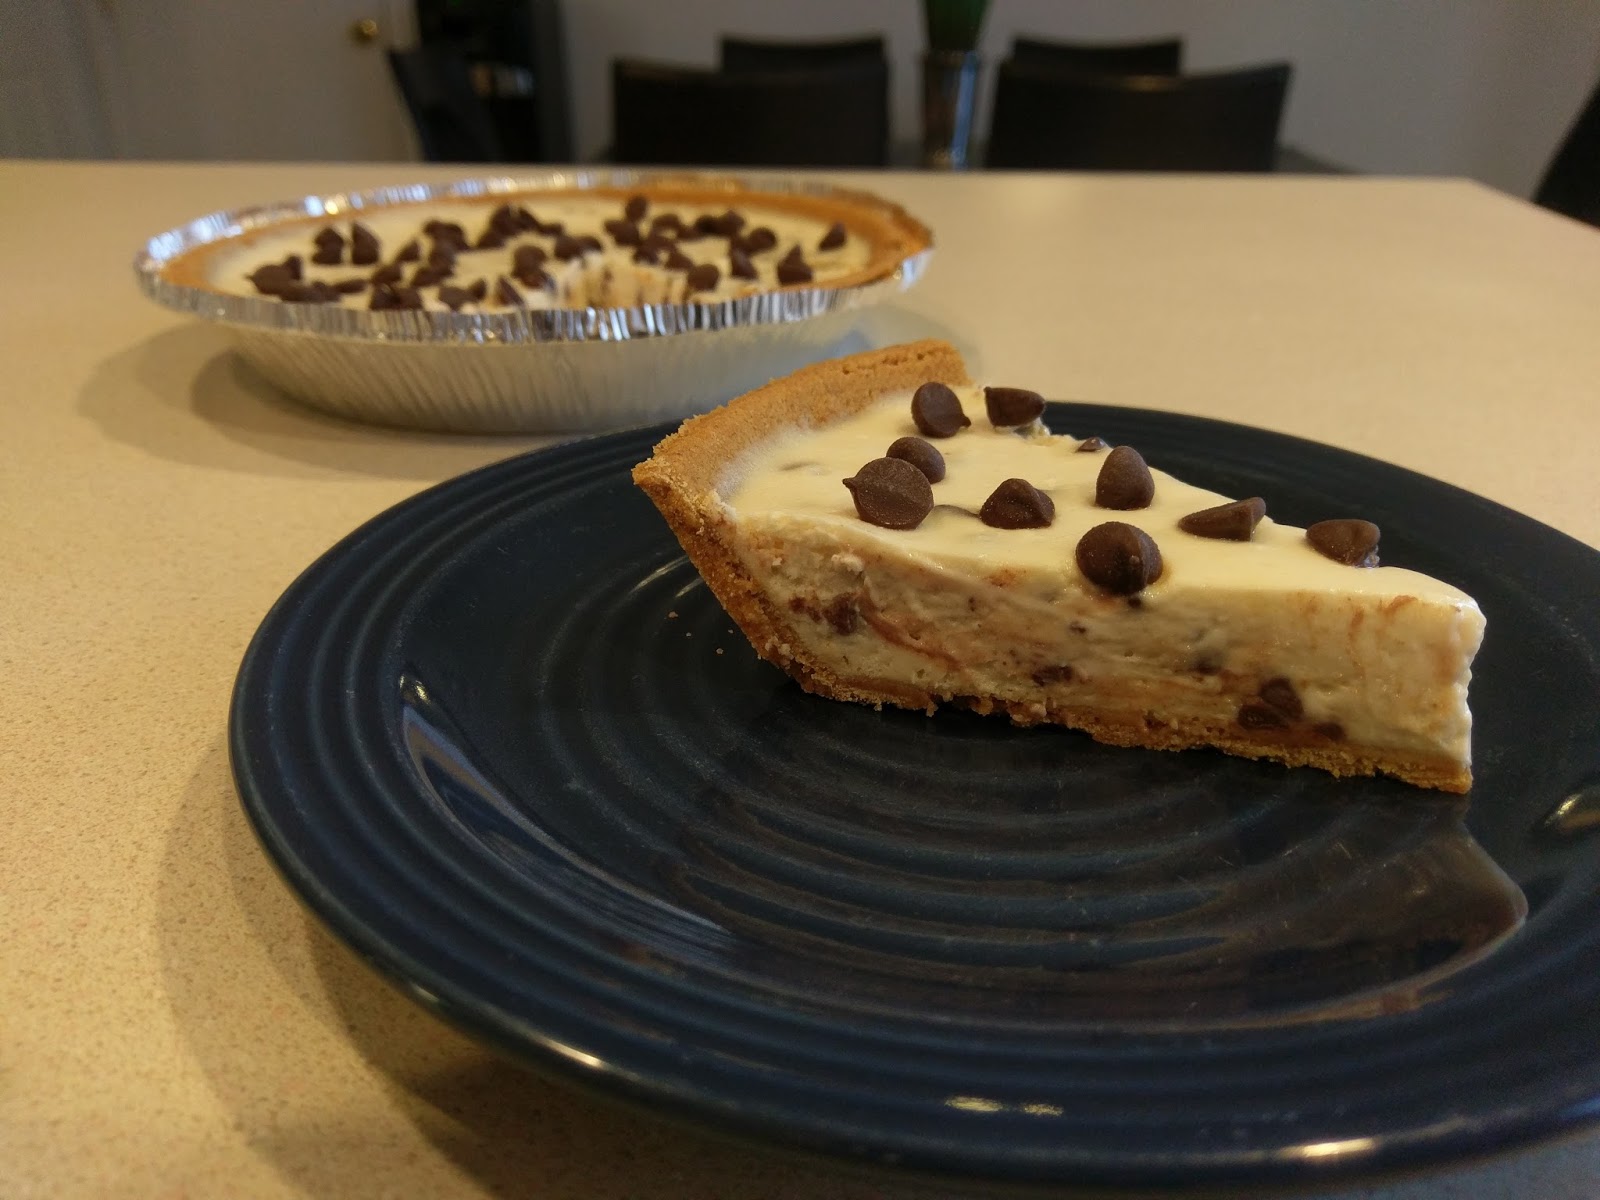
I know what you're thinking...'It looks like a cheesecake. So it either can't possibly taste like one or she's tricking us.' While I have been known to ramble off a lie so convincing a polygraph wouldn't know the difference (I'm still aspiring to become either Lucille Bluth or Mallory Archer, so this is a life goal), I promise you that no wool is being pulled over your eyes. Each slice of this decadent chocolate chip cheesecake is only 260 calories. That's right, it's pretty much the equivalent of eating a bowl of cereal for breakfast every morning but way tastier, so back away from the Raisin-bran. I have yet to try breakfast cheesecake, but since I've found a way to make low cal and delicious cheesecake, anything's possible. Did I tell you it's also insanely easy and quick to make? Because it is. There's even batter licking involved if you're not afraid of salmonella. It's good to boost the ole' immune system now and then.
Still not too good to be true!
Anything with premade pie crust cuts out half the battle. To knock off an extra 10 calories per slice, you can use a reduced fat pie crust. Even though I've moved to a land with a huge commissary, somehow they did not have reduced fat pie crust but Cannon AFB commissary always did. That's essentially my life in a nutshell. To make the cheesecake you'll need:
  • 1 premade pie crust of your choice (graham cracker, shortbread, low fat, etc.)
  • 1 8-ounce brick of reduced fat cream cheese at room temp
  • 2 egg whites
  • 1 small container of Yoplait light vanilla yogurt (if you want a different flavored cheesecake like strawberry or key lime, you can always try a container of another flavor)
  • 1/4 cup of sugar
  • 2 tablespoons of flour
  • 1 tablespoon of lemon juice
  • 1 tablespoon vanilla extract
  • 1/2 cup chocolate chips, mini sized 
  • Optional: additional regular chocolate chips for topping, chocolate syrup for drizzle
Preheat your oven to 350 and find a tray big enough to hold the pie crust. Dump the cream cheese into a large mixing bowl or your stand mixer (I envy you) and blend until fluffy. Then add in the egg whites, yogurt, sugar, flour, lemon juice, and vanilla. Blend for several minutes until everything is completely smooth. Fold in the mini chocolate chips and pour into the pie crust (smooth out with a spatula as needed):
It is now safe(ish) to lick the beater of your mixer. Just, you know, don't forget to unplug it first. But for scientific tasting reasons, forge on.
Bake your cheesecake for fifteen minutes and then cover it with foil to keep it from browning. Continue baking another ten minutes until the cheesecake is mostly set, like so:
There will still be a little jiggle. But if you've got Jello level jiggle, bake a few extra minutes.
Take the cheesecake off of the pan and let it rest on a cooling rack for 10-15 minutes before topping with additional chocolate chips for garnish.
It really does look prettier this way, and plus, more chocolate. Woo!
Once you've added the additional chips on top, ignore every fiber of your being and place the cheesecake into the fridge for five hours to set. You could cut the time in half by placing it in the freezer though if your willpower is pretty much nonexistent. Not saying I've done this before (but I totally have).
But totally worth it because then you get to take really pretty pictures of a nicely set cheesecake for all your social media needs. You're welcome.
Okay, full confession time. No, it's not as dense as a full fatty, fat, fat cheesecake. But you won't care because it is still just as delicious without all the guilt and hemming and hawing that comes with trying to logically reason with your waistline as to why cheesecake is a necessary food item. It's incredibly decadent, and adding a drizzle of chocolate sauce on top simply throws this recipe into my list of top five cheesecakes Kate's ever baked. I literally have no regrets with this one. It's simple to make, and  I've crafted a cheesecake that per slice has fewer calories than a PB&J. Plus it won't make you feel like a child while you're eating it, so unlike the PB&J, the chocolate chip cheesecake is a dessert for adults that suffer from an extreme need to eat dessert but still want to fit into their summer clothes. Vanity, thy name is cheesecake. 'Til next time, my fellow eaters!

Wednesday, August 24, 2016

Strawberry Bars Forever

I often get asked how my husband and I stay in such great shape what with all the baking I regularly do. My secret is that much like a shark, I never stop moving. "But Kate, you're sitting down to blog right now," you say? I'm tapping my foot at about a 50 mile an hour rate. Like a bumblebee on crack, I fidget. I assume fidgeting, along with intense workouts and dogs that will riot if not walked, helps me stay in shape. I enjoy really rich desserts, but every once in a while, I just want something light and low-cal. But usually when I hear the words "healthy dessert," I either assume it's actually cardboard or that whoever is trying to pitch it lives in a magical fairy-tale land full of whimsy and is completely insane. But as it turns out, that magical fairy-tale land happened to look quite a bit like my own kitchen this week. And while I may be heavy on the crazy, I've been told I'm not certifiably insane, so just go with me on this. What if I told you that you could eat a warm, sweet, glazed dessert for under 250 calories, AND I promise it isn't cardboard? No gimmicks! I'm starting to feel a lot like a used car salesman though, so let me wrap up the pitch and show you the damn dessert already. The low-cal dessert of your sweet-tooth-loving dreams has arrived:
I'll take five.
Dripping, yes, dripping with vanilla glaze, these strawberry oat bars are next-level goodness. Very rarely does a person get to eat a delicious dessert and not hate themselves immediately following (this can't just be me, but I am crazy, so who knows). Upon consumption, you have to remind yourself that feeling like a worthless sack of empty calories with lost Olympiad dreams simply isn't necessary! What I also love in a dessert is when it can double as breakfast (I am but a simple human). I've shared the merits of breakfast pie and breakfast cake before, but this is actually an acceptable breakfast because it has oatmeal in it. Although I will always argue the line between pie and turnover is thin and should be crossed, oatmeal is pretty damn normal where breakfast is concerned. Think of this as fully-constructed overnight oats. Baked for your taste buds' pleasure.
I have so much leftover oatmeal. I guess I could eat it for breakfast...but bacon exists, so yeah...
If you're not totally sold on the idea of a healthy dessert that's actually delicious, one, you're really hard to please and I feel sorry for the people that love you, and two, what if I told you that you already have everything you need to make these in your kitchen? Because I did. And I go through strawberries like, well, someone who really likes strawberries. A lot. So give your pantry a peruse and gather up:
  • 1 cup Quaker Old Fashioned Oats (not the mushy quick-cook kind)
  • 3/4 cup All Purpose flour
  • 1/3 cup dark brown sugar
  • 1/4 tsp salt
  • 1/4 tsp ground ginger
  • 6-7 tablespoons melted butter
  • 1 teaspoon cornstarch
  • 1 tablespoon lemon juice
  • 1 tablespoon sugar
  • 16 strawberries, diced into quarters
Start by preheating the oven to 375 and line an 8x8 round or square pan with Parchment paper and spray with cooking spray. In a large bowl, mix the oats, flour, brown sugar, salt, and ginger together. Once combined, add in the melted butter and mix until all ingredients are damp. In a small, separate bowl, mix together the cornstarch, lemon juice, and sugar and set aside.
Press half of the crumb mixture into your prepared pan.
Top with the chopped strawberries. Then take the bowl of lemony sugar and pour over all the berries.

And finish off by sprinkling the rest of the crumb mix on top.
Bake for 40 minutes, until the top layer is golden brown and your house smells like brown sugar heaven. I was nearly drooling by the time these were done...Pavlov would've had a field day with me. Let cool on a rack for 10-20 minutes before placing (while still in the pan) into the fridge or freezer to fully cool and set. I placed into the freezer for a half an hour.
Which was really hard because, loooook at how yummy and golden.
I mean really, now you're just showing off, oat bars. You're not allowed to look as delicious and drool worthy as a cake.
Carefully, very, very carefully, remove your fully cooled strawberry oat bars from the pan (if you care about presentation). Clearly, I do because ugly photos means no likes on Facebook, and that makes me a sad panda. I found it best to take a sharp knife around the edge of the pan to separate any sticky areas, and then used the knife to lift out one corner so I could grab on to the Parchment paper and just slide it out on to a plate. It sounds complicated because it is. There was a lot of  low, hushed cursing at this point and prayers to several deities, but the dessert made it in one piece since it was a little frozen. Had I not needed presentation photos for some greedy jerks that read my blog...have I told you thanks for reading lately? My heart, much like my strawberry bars, is slightly frozen, so I'm not great with the gratitude.
Because without glaze, this is just breakfast food.
Glaze. There are few things in life that glaze can't make better. Bad day? Put some glaze on your pie. Put some glaze on your carrots. Put some glaze on your rolls. I'd put glaze on top of frosting if I wasn't positive it would give me diabetes. Simply gather up a small bowl, half a cup of powdered sugar, one teaspoon of vanilla extract, and one tablespoon of milk. Mix your ingredients together and get ready to drizzle, baby.
Pretty sure this is the definition of food porn.
At this point, you're ready to eat. Sliced into 8 larger bars, that's only 230 calories per bar. I know. Seems too good to be true. Certainly you're about to eat some cardboard with glaze on top of it. But on a scale of one to Ryan Lochte, I'm not even lying a little, not even lying a Lochte. Heat up your bar in the microwave so things are ooey gooey warm, and you will not be disappointed. The strawberry is a very versatile fruit. So versatile, in fact, you forget you're basically eating oatmeal for dessert because paired with the berries, glaze, and wonderful brown sugar, you've got guilt-free sweets for days! Or for a few days if you have to share...which is unfortunate. Because I promise you once you get a bite of these bars with their tart crunch and silky vanilla glaze, you're gonna want to keep these gems hidden. But I find if you tell people it's a low-cal, healthy dessert, they really do look at you like you're crazy and reach for the ice cream over your magical fantasy treat that only exists in fairy-tale land. They don't have to know it's real, but I can guarantee you one look at these bars and the only thing they won't believe is that they actually have redeeming nutritional value. But I'm okay with people thinking I'm insane if it means I get more dessert to myself. 'Til next time, my fellow eaters!
It's...berry...delicious. Second blog in a row ended on a terrible pun. How oat-terly terrible.

Tuesday, August 16, 2016

Orange You Glad I Bake?

When I was a wee child, I played soccer. I didn't so much play as I did sign up to get free orange slices at halftime. I mean, clearly I didn't join because I have a natural inclination for the sport. I have the coordination of a baby giraffe and a drunk toddler all wrapped up in one wobbly package. But damn if I didn't love those orange slices. I've always been a fan of fruit, seeing as it is the natural dessert of the food world. Bless the person who came up with fruit and dessert fondue. I remember in my youth my mom used to melt chocolate Symphony bars and dip strawberries in them to get us to eat anything other than McDonald's apple pies for dessert. Although, looking back, she probably also made this dessert because children drive you crazy, and every once in awhile you need to indulge in some really good chocolate to cope. She has also always been a fan of chocolate and orange combined together. I was introduced to the orange Milano cookie by my mother. I don't care who you are, when you bite into an orange Milano you get the distinct impression of what it must have felt like to be Italian nobility: "Servant--tell chef I require a dessert that has both chocolate and cream, but I must be able to eat it with my fingers without making any mess at all."  Talk about the good life. I'm still a huge fan of any flavor Milano cookie, but the orange will always reign supreme. I decided I needed to take this love to the next level, so naturally that means baking it into cake form. Say ciao! to the orange chocolate Milano cake, named as such for its shockingly identical taste...
Brown and orange, not just for the five remaining Cleveland Browns fans.
Like most of you, I've spent the last week and half living and breathing all things Olympics. I wonder how long synchronized swimming routines take to master and what it must feel like to be able to get your entire body perfectly inline with someone else's. I've yet to even master synchronized walking with my own two legs, so things like diving, swimming, and gymnastics leave me feeling relatively underwhelmed by my existence and generally concerned I may well step off a curb wrong and simply fall over dead one day. I was not blessed with a streamlined physique and proclivity for athletics. I was blessed with the ability to bake my ass off though, and I feel like this is worthy of a medal of some sort. Or at least a hearty thumbs up. And I can guarantee you that if you make this orange chocolate Milano cake, people will want to laud you with medals, well wishes, and for two seconds forget people with superhuman abilities exist (looking at you, Ledecky. There's only room for one Katy in this blog).
This is what a medal podium looks like in the baking world.
I searched high and low for the perfect orange chocolate cake recipe, and I was relatively shocked that Pinterest offered me nary a recipe up to my standards. It's like one of those moments when you Google something relatively simple and yield no results. I managed to quell the confusion and decided to go full Martha on this cake and just do it my damned self. Insider trading aside, she's a pretty big baking inspiration. To make my orange chocolate Milano cake, you'll need:
  • 1 cup sugar
  • 3/4 cup flour, plus 2 TBS
  • 4 TBS Hershey's unsweetened cocoa powder
  • 2 TBS Hershey's unsweetened dark cocoa powder
  • 3/4 tsp baking soda
  • 3/4 tsp baking powder
  • 1/2 tsp salt
  • 1 large egg at room temp
  • 1/2 cup of milk at room temp
  • 1/4 cup veggie or canola oil
  • 1 tsp vanilla extract
  • 1 TBS pure orange extract
  • 1/2 cup nearly boiling water
While it's a lot of ingredients, everything falls together with nice ease. You can use a 9x9 or 8x8 circular or square pan for this recipe. Just be sure to grease the hell out of the pan. I even put down Parchment paper first and greased that since this is a very dense cake.

Preheat the oven to 350. I only have one giant mixing bowl in our what I call "somewhat" furnished condo (seriously, what furnished kitchen doesn't come with a pasta strainer), so make do with what ya got. Dump all the dry ingredients together and whisk until well incorporated. Then add in the egg, milk, veggie oil, and extracts and blend well. Finish off by adding in the hot water (carefully) and mixing.
So smooth. So dreamy. Like the Ryan Lochte of cakes.
Pour into your prepared baking pan. This cake will rise a bit, but it will not spill out of an 8x8 pan, I promise. It took my cake 30 minutes to finish baking throughout, but if you use a 9x9 pan, it will probably take less, so start checking for doneness (spell check doesn't believe this is a word) around 25-28 minutes. Let cool in the pan for 10 minutes before using an angled spatula to ensure your edges are not sticking to the pan before removing to a cooling rack to finish cooling.
I am also sans cooling rack, so this went on my cake round and directly into the freezer for 45 minutes. I do recommend freezing before crumb coating.
When we finally get to Florida and I can unpack my entire kitchen, you'll hear my sobs of happiness from a ten mile radius...especially when I'm reunited with my stand mixer. I apologize profusely to any of you who have tried to make my buttercream frosting with a bowl and hand mixer; it is not for the faint of heart.
But you're gonna have to do it again..
This makes a large enough amount of frosting that you could get fancy and torte your cake and fill the layers with frosting. I thought about it, but since I'm trying to have some semblance of healthy desserts in my life, I opted to skip the inch-thick additional layer of frosting in the middle of the cake. Trust me, it is still delicious enough without it. So to make enough frosting for the cake and for you to shamelessly shovel several spoonfuls into your mouth for taste testing purposes, you need:
  • 1/2 cup of softened butter (1 stick)
  • 1/4 cup of Hershey's Cocoa Powder
  • 1/4 cup of Hershey's Special Dark Cocoa Powder (if you want an even lighter chocolate flavor, omit this and use 1/2 cup of the regular powder instead, but trust me when I say you want the dark cocoa powder)
  • 1 tsp vanilla extract 
  • 1 tsp pure orange extract
  • 4 cups of powdered sugar
  • 5 tablespoons of milk 
Cream the butter until fluffy, then add in the cocoa powders, extracts, two cups of powdered sugar, and two tablespoons of milk. Blend well, make a huge mess with your hand mixer, curse the life you took for granted that had a stand mixer in it, scrape the bowl, add in the remaining two cups of sugar and three tablespoons of milk, and realize cake baking can get pretty emotionally draining outside your normal kitchen.

Also realize you've been tricked into a crappy photo montage.
Crumb coat your cake once it is fully cooled; once again, I do recommend freezing this cake because it is extremely moist, so even frosting a crumb coat might be tricky. Slather a nice layer of crumb coat on your cake, throw back into the freezer for thirty minutes, and longingly gaze upon the bowl of frosting.
Or you could be more productive, gathering an orange, zester, knife, and fitting a piping bag with a 1M tip. Zest a bit of the orange before cutting it for garnish. Let the zest sit out to air dry for easier handling later.
Messy, rustic, chic, all the same.
You can smooth this frosting using the Viva paper towel trick, but I wanted to make it swirly since it was so nice and creamy. I applied my second layer of frosting over the entire cake with a small angled spatula and then came back over every inch of cake with it while swirling the spatula in wavy S patterns. I then took my remaining frosting and loaded it into the piping bag. I simply topped the cake with large, mounded stars, but you could do large shells or rosettes as well. Any of them would be pretty!

But much like me in high heels, these large, mounded stars make this single-layer cake look even taller.
I finished up my decorating by dusting the top of the cake with orange zest and a couple small slices of oranges. You could get really fancy and candy orange slices to top the cake with, but that takes two hours, and I was busy wondering what the actual rules for Olympic men's field hockey were and why everyone that plays this sport is ridiculously attractive, so I already had a full day.
This. cake. Orange my God (surprisingly kept the orange puns to a minimum in this blog. What a navel  novel idea). It is rich. It is moist. It tastes exactly like an orange Milano cookie. So to answer the question, yes, it is possible to make an orange Milano even better because you can turn it into cake. You could even garnish this cake with orange Milanos to have some sort of cake-cookie inception situation happening. This yields 10 slices of cake with each slice ringing in at just under 450 calories. I know, not light or healthy by any means, but I really did feel like an Italian noble while I ate it, so my waistline is just going to have to deal with it. After feeling so inferior while watching the Olympics, I deserved five minutes of feeling better than everyone who doesn't eat cake. I may not know the sweet taste of athletic victory, but I do know exactly how good it feels to devour chocolate orange Milano cake, so in your face, coordinated people of the world. If competitive cake eating ever becomes a thing, I'm bringing home the gold. 'Til next time, my fellow eaters!
Not trying this cake would be a pith-y. Get it? What an a-peeling pun. Okay, I'm done, I swear.

Friday, August 5, 2016

Dessert and Brunch Are Essentially the Same Thing Anyway.

So it's been awhile. Ever since Bakefest 2016 at the beginning of July, we had to play the "we're moving, so everything in the pantry must GO" game and I had nothing to bake. I've literally never had so much ramen in so many different ways before in my life. I cringe every time I hear a crinkle wrapper opening. Too soon. But now that we've settled into our long-term temporary abode (this is not an oxymoron if you're in the military) in the actual Land of Enchantment portion of New Mexico, I finally had the chance to go grocery shopping and NOT at a Walmart. You know you've been outside of civilization for too long when entering a real grocery store makes you so happy you almost cry. I've gone from no Targets to THREE. I've gone from no Chickfila to one that is two minutes away. I've gone from cow poo smell and desolate wasteland (think Mad Max) to mid afternoon rain and mountains. I'm, dare I say, happy. Aside from the soul-crushing fact that Blue Bell ice cream is absent from Albuquerque. Call me Icarus, thinking I could fly that close to the sun and have it all. Well, I may not be able to have Blue Bell until November, but dammit, I can still bake.
Where there's an oven, there's a Kate.
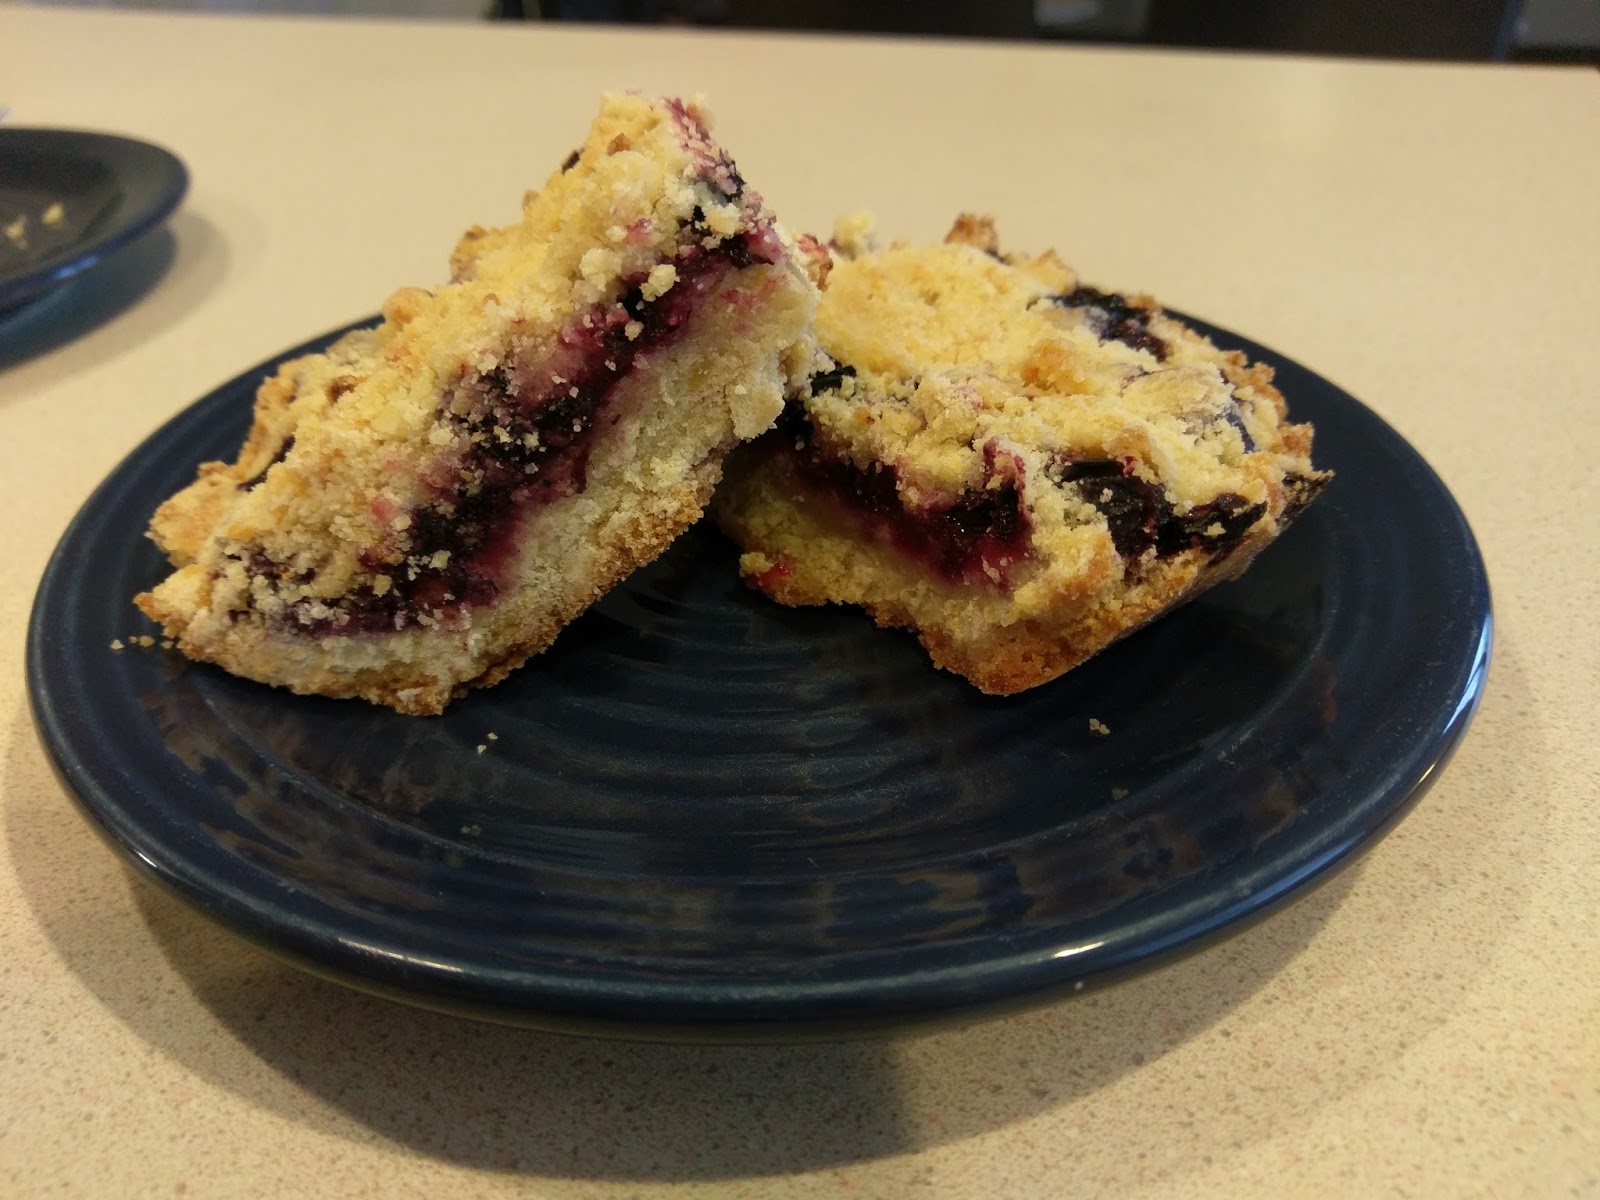
These little beauties are blueberry crumble bars. Not to be confused with blueberry cobbler because blueberry crumble bars are a handheld item. This is really one of the only differences, I suppose. But I've always wondered if there was any way to have cobbler like everywhere and anywhere I go, so I've solved a longstanding personal problem with this recipe. These can work excellently for brunch or as a dessert. You can top them with ice cream to make them absolutely divine, but people might judge you if you starting eating ice cream at 10:30 a.m. ...and yet they're perfectly okay with you getting loaded on champagne. It's a fickle world we live in, people.
New kitchen, same crappy photos!
It takes longer for these bars to bake than it does to pretty much quite literally throw them together. I actually had to go out and buy most of my ingredients since we showed up to our townhouse with a box full of cereal and pretty much nothing else in the way of food, but you've probably got most of what you need. Gather up:
  • 3 cups of flour
  • 1 1/2 cups of sugar, divided
  • 1 tsp of baking powder
  • 1/2 tsp of salt
  • 1 cup of butter (COLD)
  • 1 egg
  • Fresh blueberries (I used 1 lb, feel free to use 2 for extra goodness)
  • 1 heaping tablespoon of cornstarch
  • 3 tablespoons of lemon juice
Start by greasing an 8x11 or 9x13 pan and preheating the oven to 375. Fun fact! Our new place has a gas oven/stove, and I forgot that it always smells like the house might explode when you cook with them. Good times.
It kind of looks like cornbread at this point.

 In one bowl, mix the flour, 1 cup of sugar, baking powder, and salt together. Cut the butter into small pieces and then use two forks to incorporate the butter. This is a really obnoxious process, but our furnished place didn't come with a pastry cutter (I know, right? Don't they know who I am?). Add in the egg and blend...things will be very thick and kinda crumbly...hence the name "crumble" bar. 
You missed my smartassery.
Press half the batter into the bottom of your greased dish. I used an 8x11 dish (because it was all our house came with. Recurring themes...). But this yields really thick bars, and I like more dessert for the punch. If you use a 9x13 pan, you'll probably need to use 3/4 of the batter but the bars will be thinner.
If you eat enough blueberries, will your skin turn blue? These are my deep thoughts.
Take your remaining half a cup of sugar, the cornstarch, and the lemon juice and whip into a thick paste. Fold in the blueberries and really make sure they all get coated.
But like, how many blueberries would it actually take to turn your skin blue?
Dump your blueberry mix on top of the batter mix. Use a spoon to even out the blueberries. You're gonna want an even distribution of crust to berry. Trust me. I'm a professional. Or something.
Can you get blueberry poisoning? Because that would probably happen before your skin turned blue.
Take the remaining batter mix and press it on top of the blueberry layer. I honestly had a handful or two leftover. You want enough to cover the berries but not so thick a layer that it won't brown up on top without burning the bottom crust layer.
Because daaaamn it looks good all nice and browned.
Baking time will vary depending on the size of the pan you use. With the 8x11, I baked for 45 minutes and broiled for 5 to brown the top crust. You'd probably need to reduce baking time 5-10 minutes in a 9x13, but still broil to get the crust golden. Now, the hard part: put in the fridge for several hours to cool. I wanted dessert and fast after going for so long without baked goods, so this went into the freezer for two hours to set.
Totally worth it.
Now, here's the shocking part: one of these little bars will ring in at only 300 calories. Not terrible in the realm of dessert, especially since I know ways of making one slice of cake run you nearly 900. Gluttony, thy name is Kate. But with Florida really looming on our horizon now, I must unfortunately actually reel in the old sweet tooth. The great thing about these bars is that they are nice and sweet while not breaking the old calorie bank. Until you "Kate them up" and add ice cream, anyway. The first night we had these, we decided that for future consumption to warm them up in the microwave for 30 seconds to make them ooey gooey in the middle, which was a total win. But then we also decided a scoop of homemade vanilla from Blue Bell would make these taste absolutely heavenly. Subsequently, I spent the following day running around every store I could think of frantically searching for Blue Bell. I got really twitchy. And then really sad when the cashier at the commissary told me Blue Bell isn't sold out here anymore. I died a little when I placed a carton of Breyers in my cart. It made do, and I was reminded with each scrumptious bite that complaining about ice cream is a problem I'll gladly take after living for over five years in an area that sanctimoniously crushed souls and enjoyed it. Now excuse me while I go enjoy that mountain view some more while bopping up and down like an overeager toddler on sugar because I've earned it. 'Til next time my fellow eaters!
Ultimately, still delicious. But you better believe we're trying this recipe again when we return to the promised land with Blue Bell. Why yes, I am so Texan it hurts. How did you know?